Bindings in automations
Automations in Budibase deal a lot with data. Something Triggers the automation, and then actions can be performed based on that. But how do you deal with data inside automation?
This in-depth guide will explain the best way to deal with data in automations.
Trigger Data
Let's begin to look at the data coming in through a trigger. We're going to be looking at the Row Created action, but this same flow also works for all other actions.
Follow alongTo follow along with our example, load the csv-data from the Quickstart guide.
First, define a Row Created Trigger.
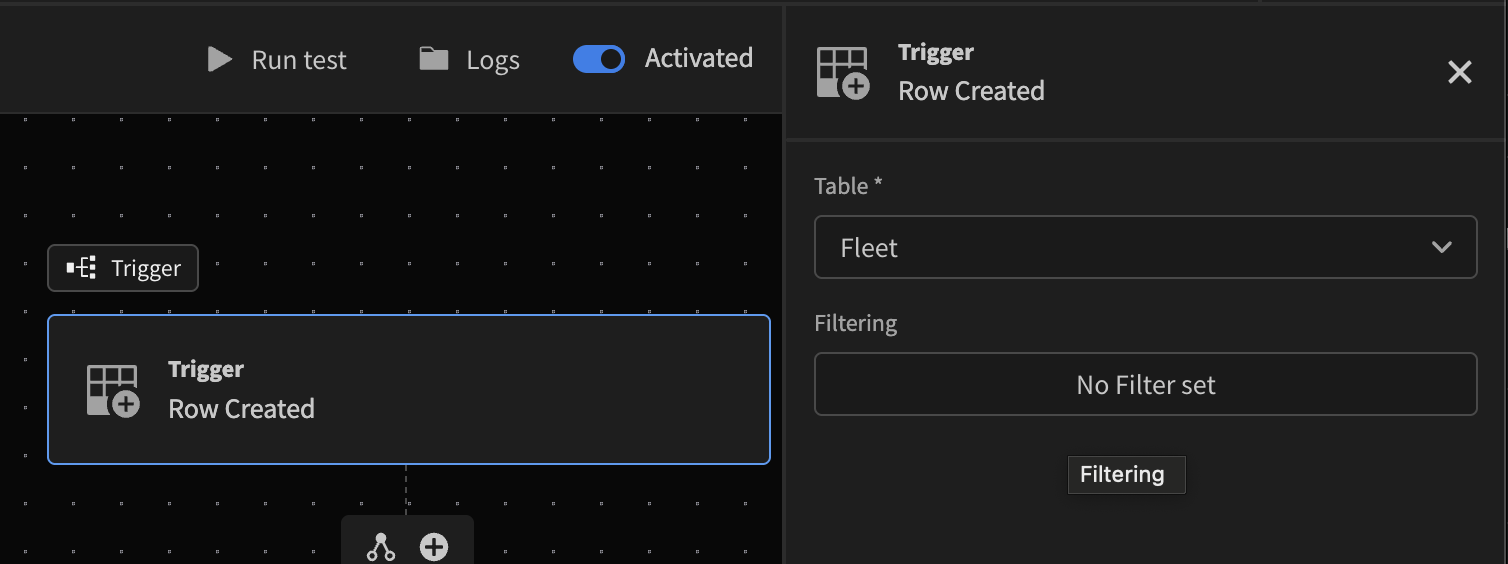
We've selected the table Fleet which we want to monitor, and then our Trigger is defined correctly.
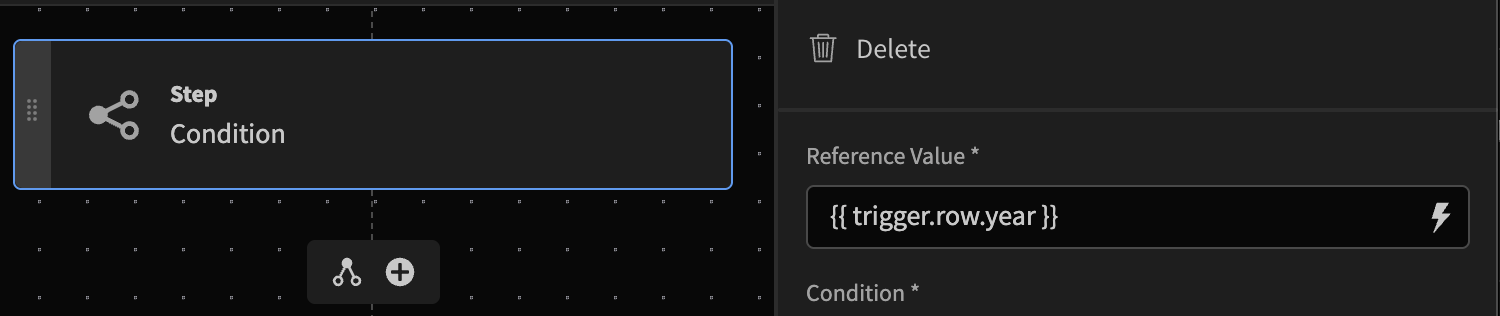
Next step, create an action. Choose any action you want, but in our example we're going to be adding a Condition action to make sure we're only running this action on cars that are newer than 2015. Alternatively, you can apply filters to the initial trigger. If whatever filter provided doesn't match the automation simply won't run.
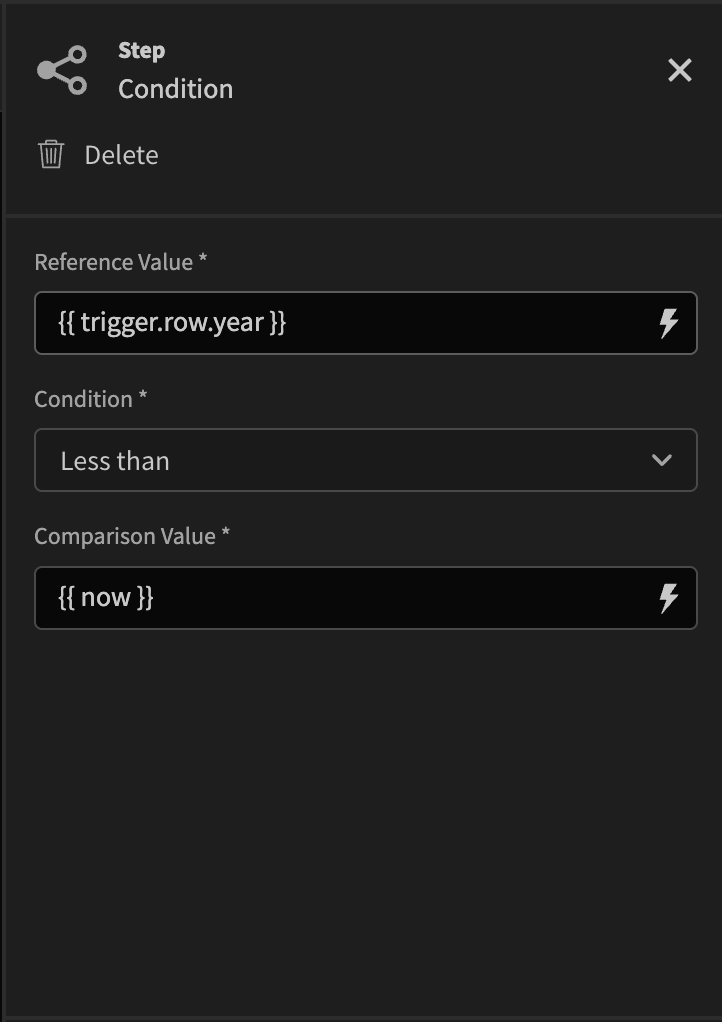
Inside the Condition action you can see the field Reference Value, this is where the Bindings come in. When clicking the lightning icon you can select from the predefined value of Trigger.row. This is what we want to use, as that is an object containing the data from the table.
Look at the table to see what the data-structure is and what the name of the column is, then add that to your binding.
Comparing it to the current year using the {{ now }} binding. This outputs a UTC timestamp value to compare against.

And then of course we're setting our value 2015 and the greater than condition accordingly.
Trigger.row
Trigger.rowwill always contain the row from the trigger, in an object format, when the action is row-related. No matter how many actions you've added in between, the data will be there to be used as an object.
Querying data with trigger data as filter
Next, now that we've set our arbitrary condition, we're going to do an arbitrary query on the Fleet table from the same year as the newly added car. For this, we'll need to use the Trigger row data to match this.
First, let's add the Query Rows action, and select the same table, Fleet as the source for querying. Then, we're going to define a filter.
Click the Define Filters button in the Query Rows action to get started

A modal will be presented, in which we're going to add a filter for Year. Use the binding property, and enter `{{ trigger.row.Year }}``, or click the lightning bolt to use the Bindings overlay.
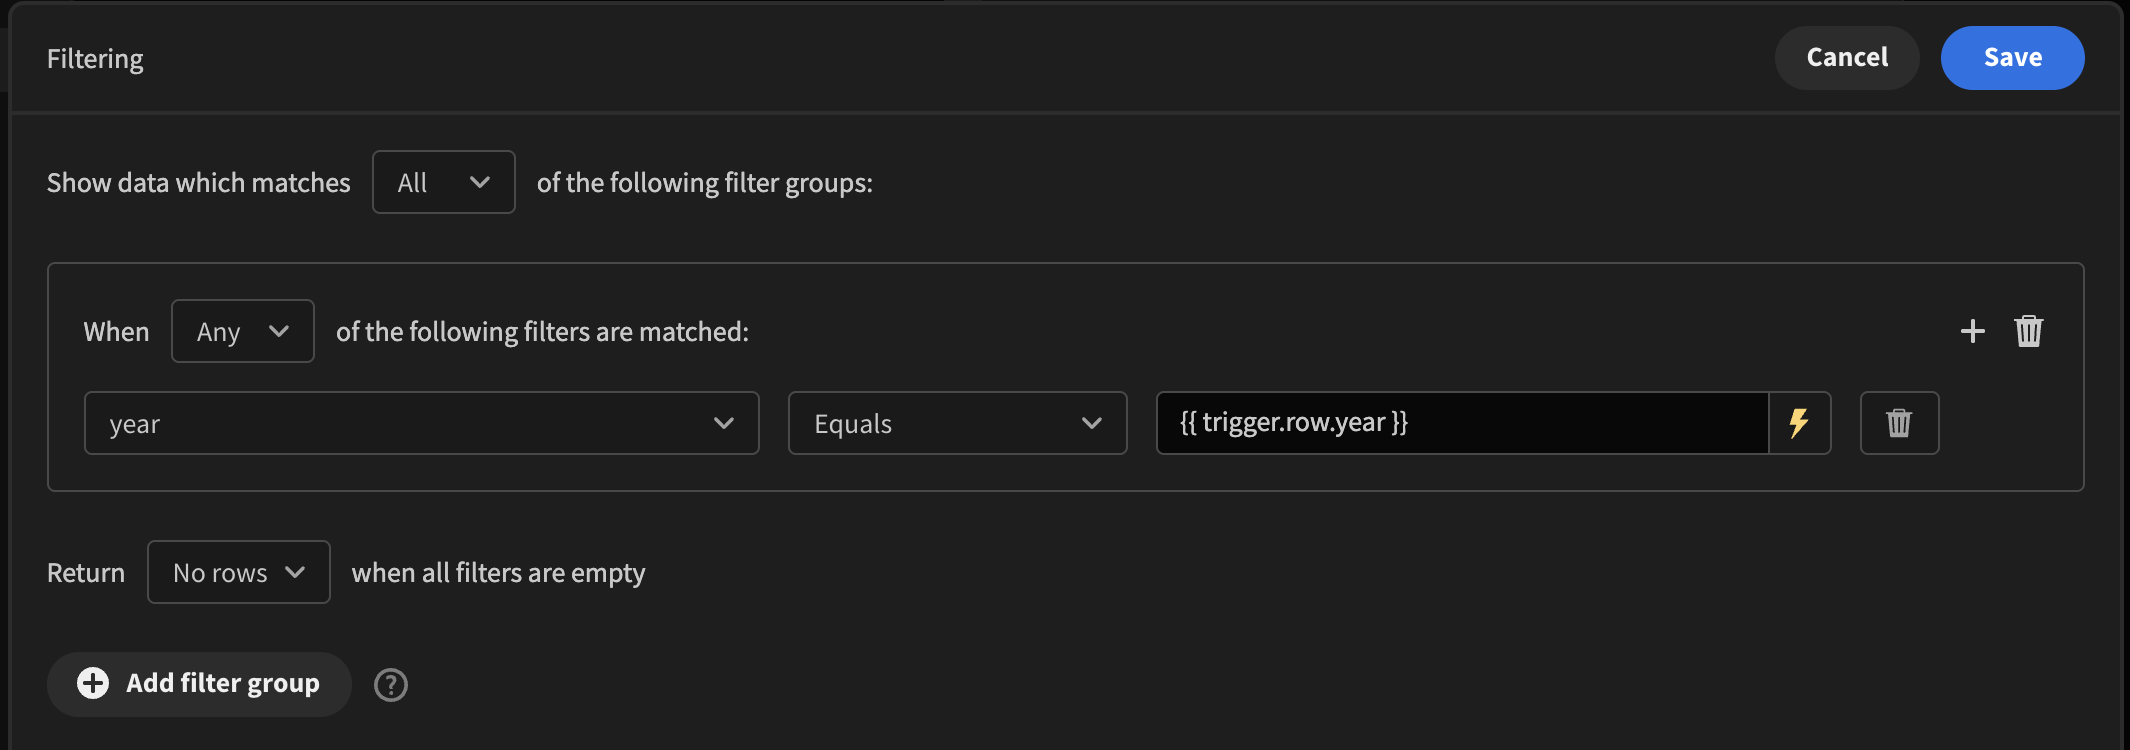
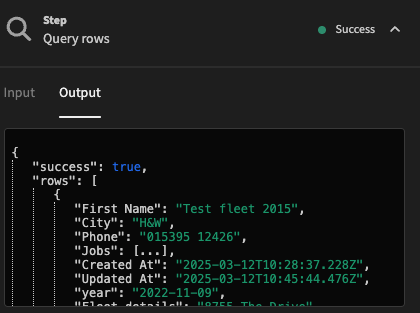
Click save, and your filter is now defined to take the newly created car as a source for querying. Complete the setup for Query Rows by setting the limit to 1, and then setting sorting to your own wishes.
Now you can test your automation to see what data is returned. In the output section you should see a JSON representation of returned data from the Fleet table.
Using Automation Step Data
Every automation step generates data you can use, from booleans if things went successful, to query data. Each step generates an item in the bindable Steps object available throughout the automation. Take the condition action we've defined in the Trigger Data step above. Considering the output is only a boolean, it will return a boolean. But as the condition halts automation execution, we only will ever see true returned, nonetheless, this boolean can be found under Steps.1.success.
Next of course is the more logical data to use, the car queried in step 2. For the purpose of demonstration, we're going to send a Discord Notification with the Make and Model of the car we just queried.
Enter the Discord Webhook URL and bot-name accordingly, and then we're going to the fun part. Binding data from the Query Rows in step 2.
Step 2, or steps.2 in Bindings, contains a rows array, giving you the results of the query. Considering we have limited the query to 1 item, we're going to have to use steps.2.rows.0 to reach the data.
Your {{ steps.2.rows.0.Make }} {{ steps.2.rows.0.Model }} {{steps.2.rows.0.[License Plate]}} was just automatically queriedAnd with that handlebars expression, I just received the following message in Discord:
Your Toyota FJ Cruiser CJE-7940 was just automatically queried
Using Query Result as a condition
Of course in the example above we've used the "Happy Path" as an example. We know we're going to get results with the query, but you might want to halt the automation if you get no results.
You can do this by adding a condition action in between the Discord Notification and the Query Rows action, and then bind the Success state of the Query Rows as a condition as shown below.
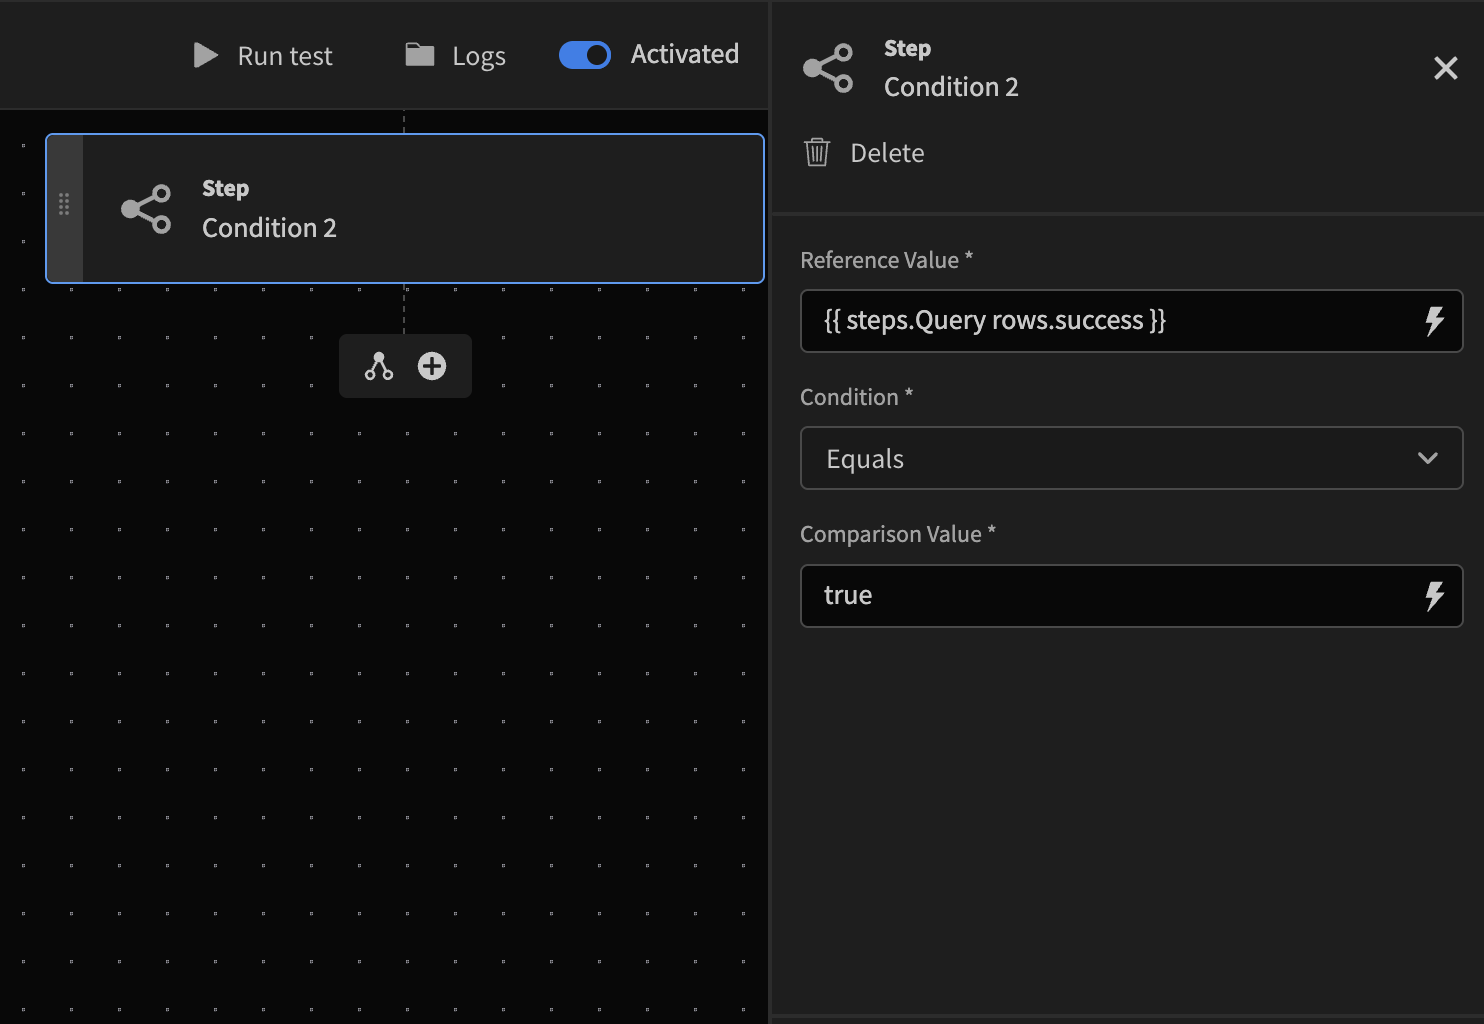
By comparing the success state of a query with true you can continue automation if you have a result, or abort the automation if you have not.