PostgreSQL
Using a Postgres Database Server as a datasource for Budibase
SQL DatabasesBudibase is designed to integrate with any core SQL database.
Read more about SQL Datasources.
Video tutorial
Tutorial: Inventory management
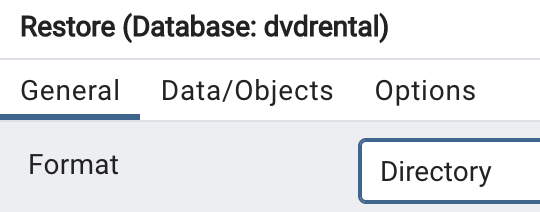
In this tutorial we will look at using the DVD Sample Database within Budibase. A link to pgadmin import instructions are included in that article, but it is worth noting that if you are not on Windows, you will want to extract the zip folder, and restore from Directory instead.
This sample database includes a complete system of film details through to payments and customer details. To keep the tutorial to a modest size, we shall focus on the film details and inventory management.
Datasource setup
Assuming you have setup the example database on a running Postgres instance, we can start pulling data into Budibase.
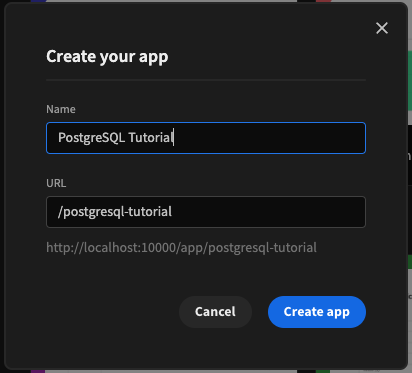
First create an app - no sample data needed.
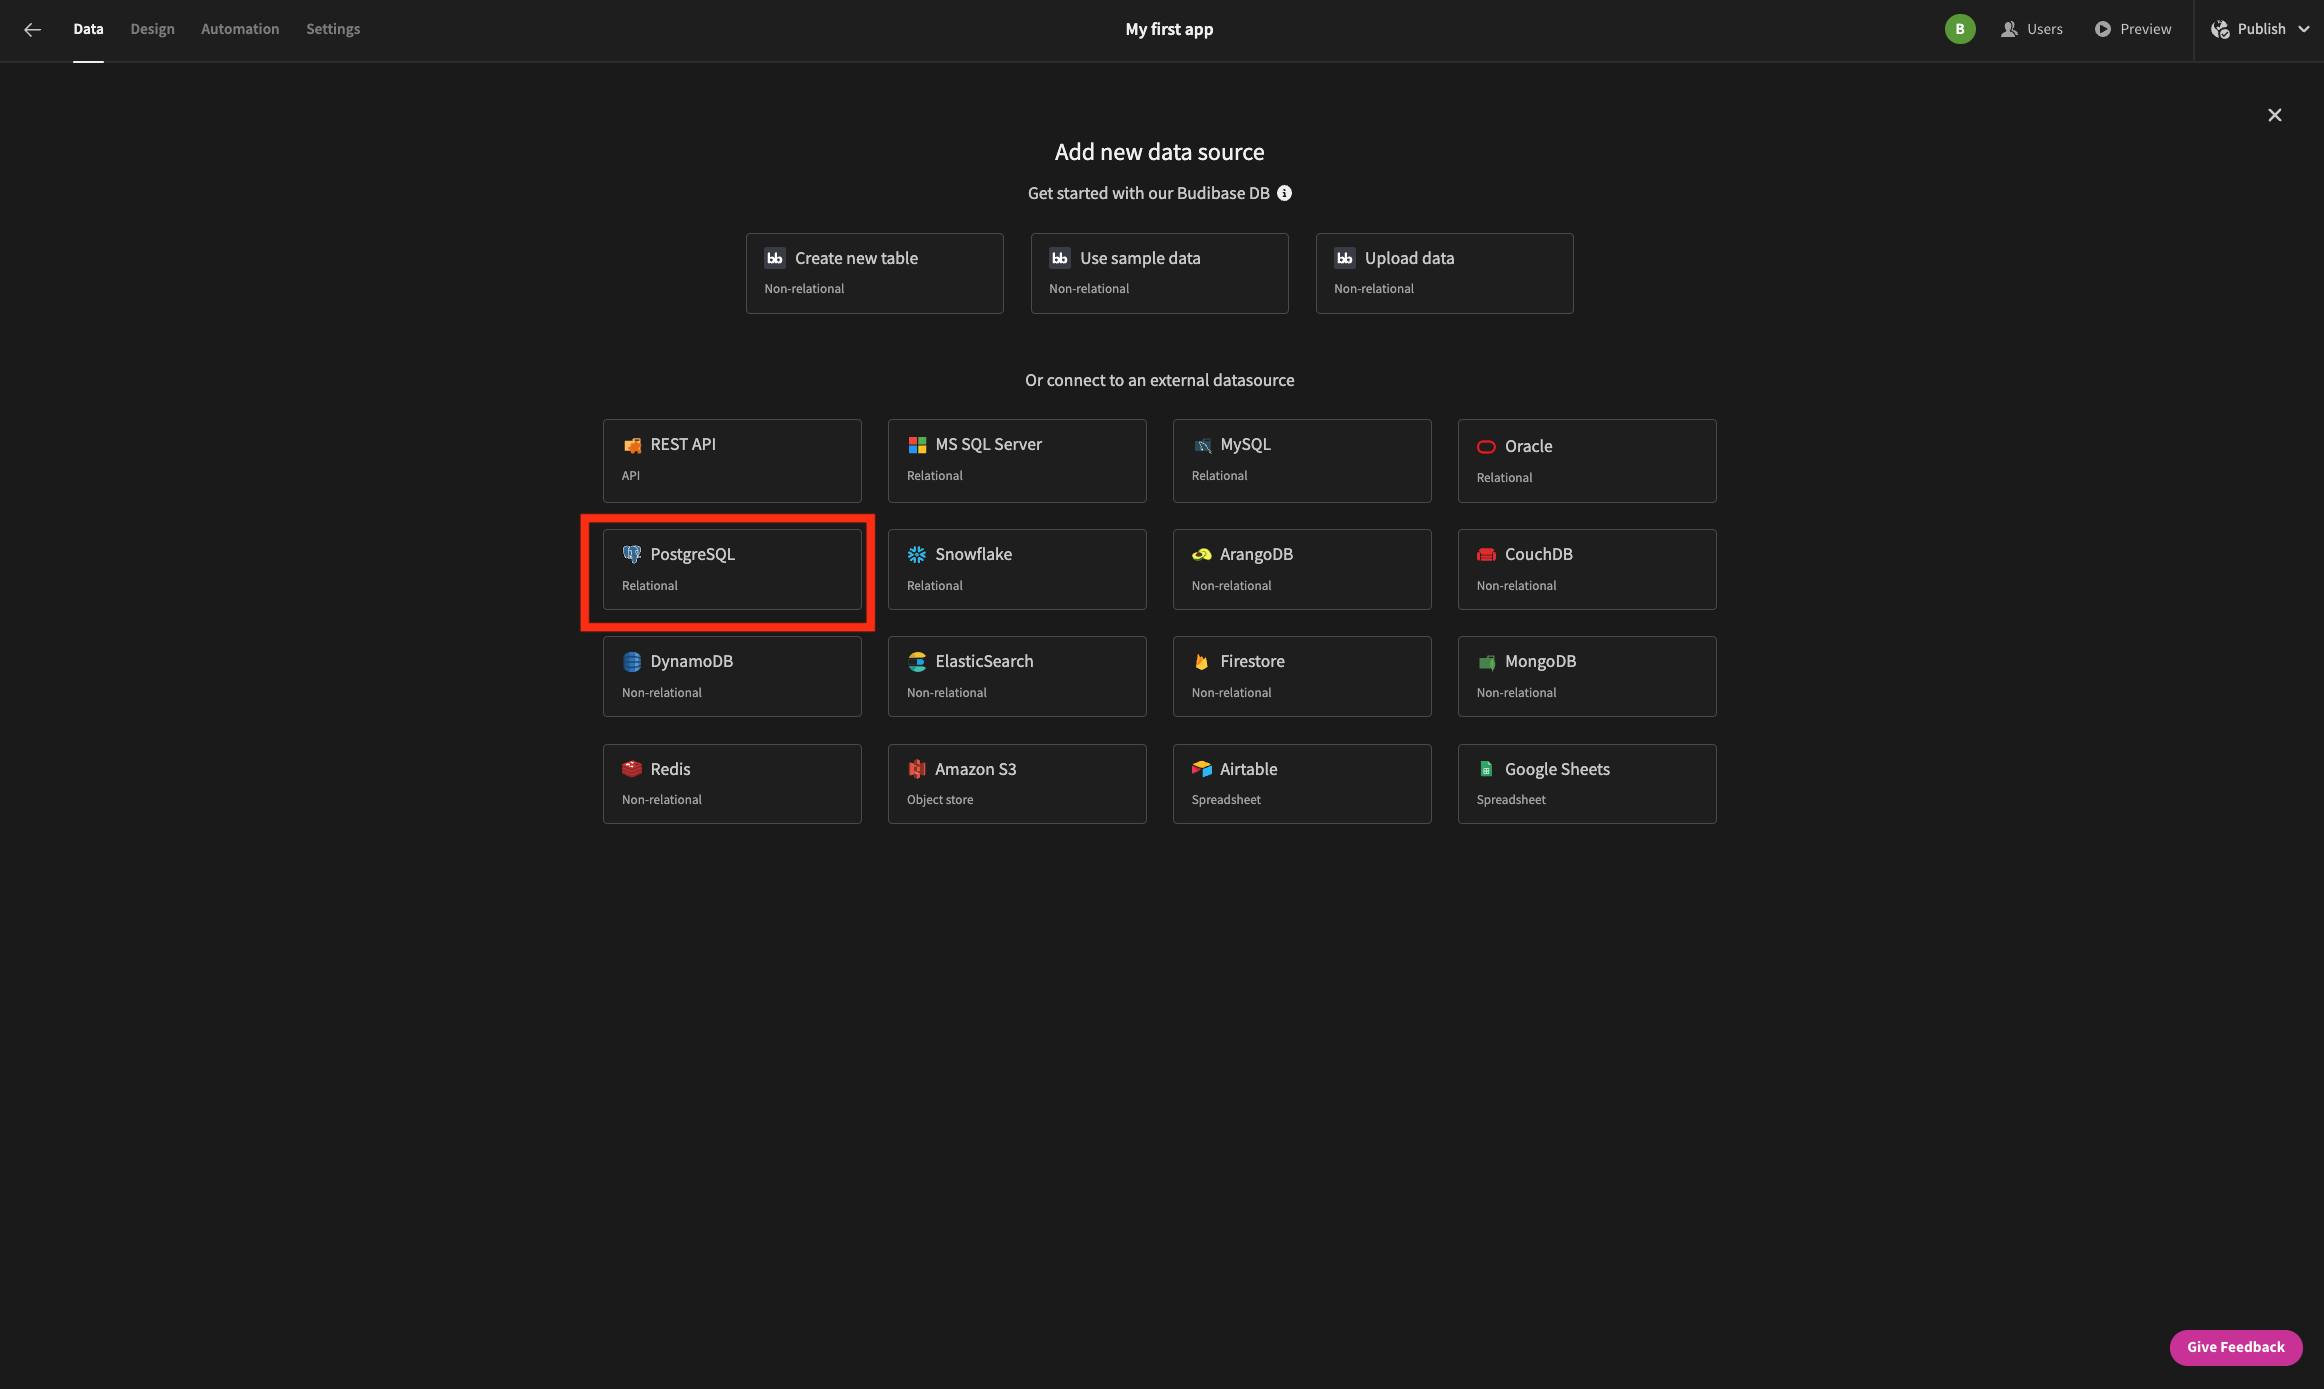
Click Add source, select PostgreSQL and press Continue.
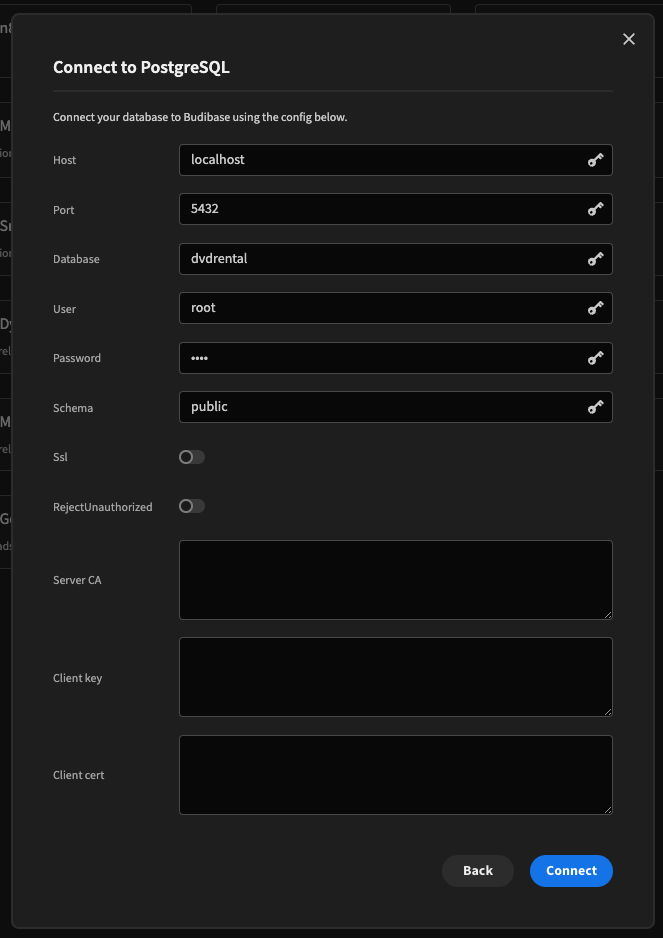
You will then be presented with a connection configuration modal. Fill in the correct connection details but press Skip table fetch. We want to manually fetch tables later so we can choose the tables we want to use in our Budibase app.
Note that if you are connecting to a database on
localhost, your host should be set tohost.docker.internal, or172.17.0.1if running on Linux.
Now we have the Postgres Datasource added, and the configuration page should be displayed.
Under the Tables section press Fetch tables. Tick Fetch listed tables only and provide the following table names:
category
film_category
film
language
film_actor
inventory
actor
store
address
city
country
Fetch the checked tables from the list
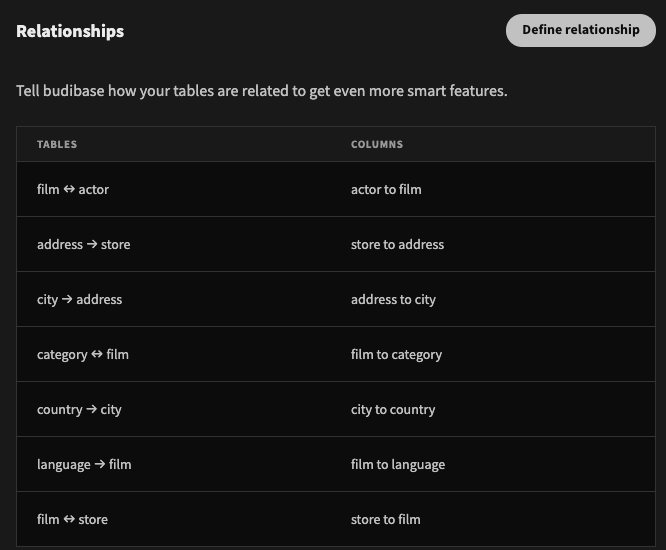
Defining relationships
With our tables fetched, we can now define relationships within Budibase.
We will need to setup the relationships as presented in the DVD Rental ER Model, excluding the tables we did not fetch.
Click the Define relationship button below the Table section.
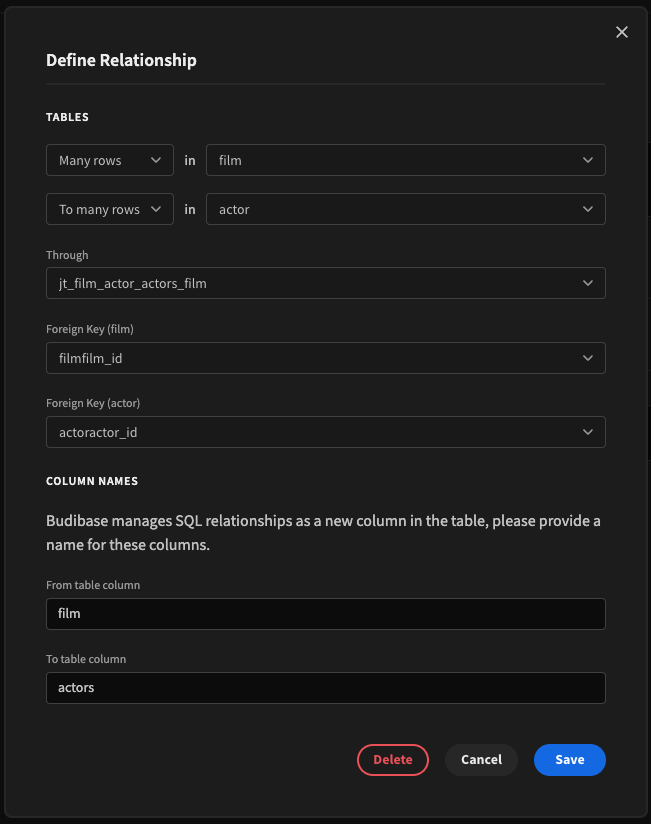
Setup a Many->Many relationship between the category and film tables. Notice the error received below:
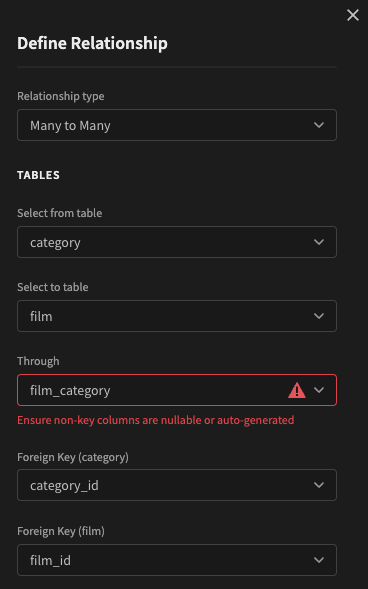
film_category is not a valid Budibase join table
This error is caused by the Not NULL constraint on the last_update column. This is easily resolved by setting this column to nullable in pgadmin.
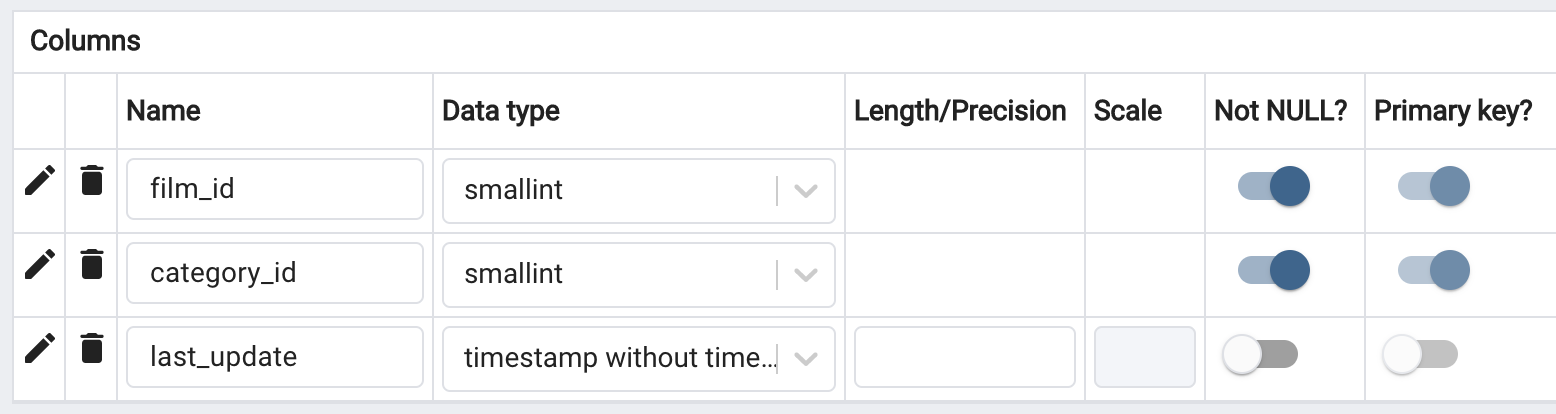
Setting last_update to nullable
Do the same for thelast_update column in the film_actor table.
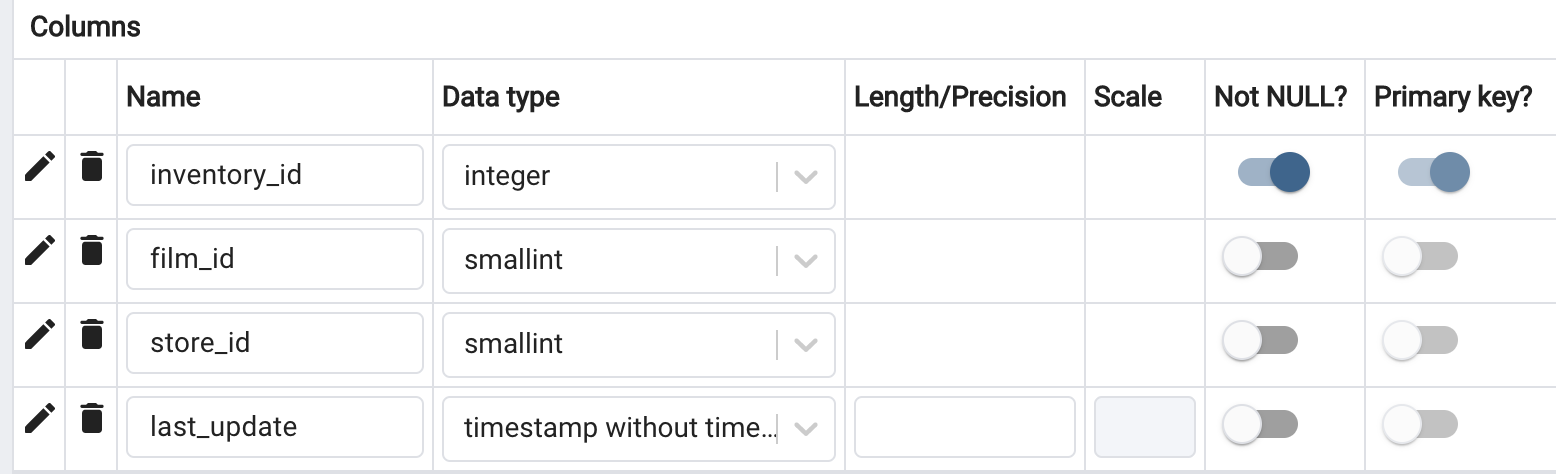
In addition, the inventory table is a through table that will need adjusted like so:
Make sure to re-fetch the tables to pull down the new schema information!
You should now be able to create this Many->Many relationship.

Many to Many relationship between category and film
When all relationships have been defined, you should see something like so:
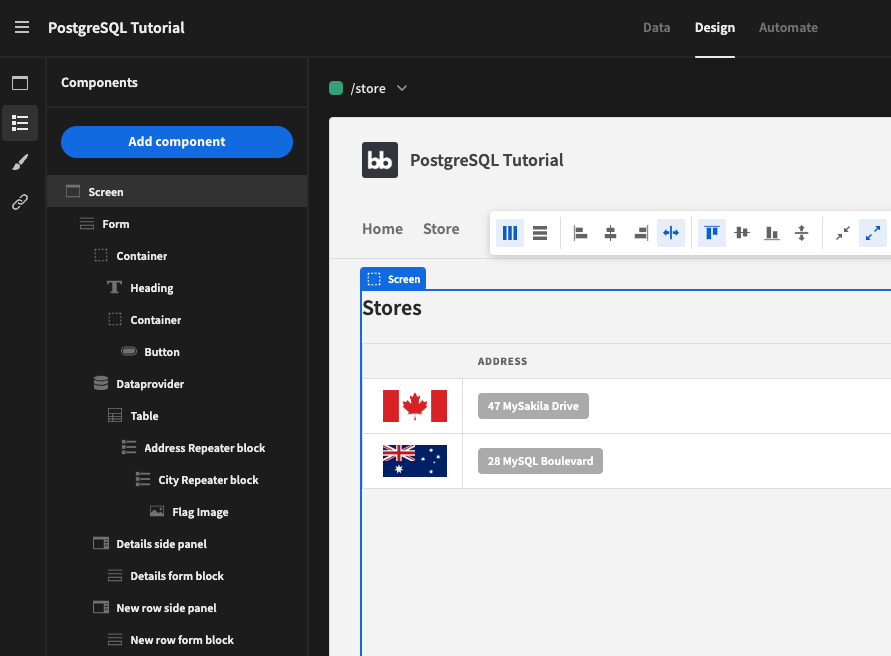
Stores screen
Add an autogenerated screen for the store table. Change the Title to 'Stores'.
Next Configure columns, click Add all columns, and then remove columns with the x so that only the address is displayed.
Adding a flag icon
We will also add a flag image within the table to indicate the country of the store. It would be possible to write insert statements to add image URLs for the two stores, but for the sake of demonstration we will use the country name from the store address relationship.
Eject the table block. As there are only two stores, uncheck the pagination of the Data provider.
Naive approach: using multiple repeaters
Select the Table and click Add component to nest a Repeater block. Select the address relationship as the datasource.
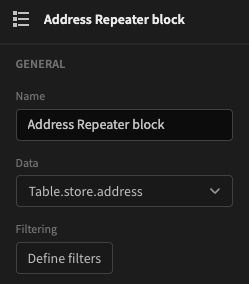
Using the address relationship as a datasource
We then have to nest another repeater block under the first one to hop from the city table to the country table!
Select the city relationship as the datasource.
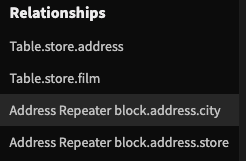
City relationship of the address table
Finally we can nest an Image component within the City repeater block. Provide the following JavaScript binding:
const countryName = $("City Repeater block.city.country")[0].primaryDisplay.toLowerCase();

return `https://images.mapsofworld.com/${countryName}/${countryName}-flag.gif`;
The primaryDisplay property works here because the country name is the table display column.
Better approach: using a custom query
Adding two nested repeater blocks is not ideal for performance, and is also not very maintainable. Considering that we are looking to get specific data from the relationships, using custom SQL queries is better for this scenario.
In the Data section add a query to your PostgreSQL datasource. Give it the name 'Get Country Names', give it a Binding or the address_id with the query:
SELECT LOWER(country) as country_name FROM address a
JOIN city on a.city_id = city.city_id
JOIN country c ON c.country_id = city.country_id
WHERE a.address_id = {{ address_id }}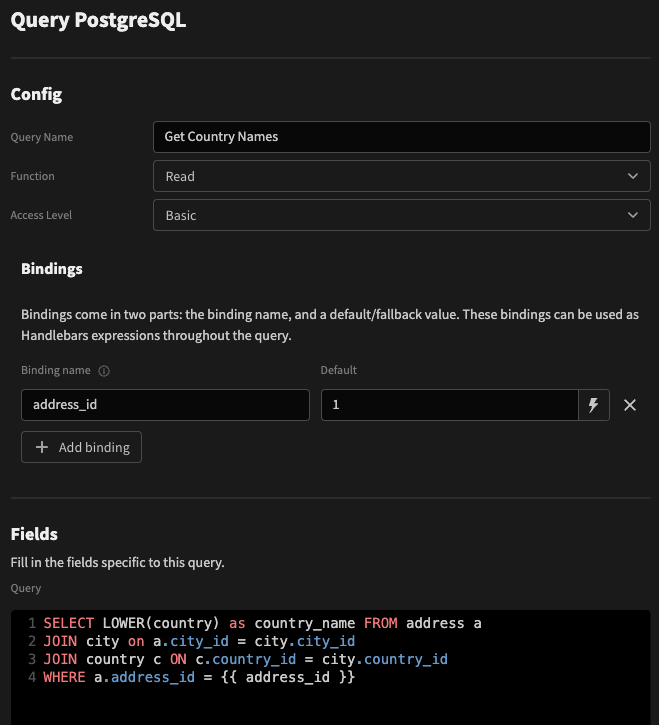
Make sure to click Run Query followed by Save Query!
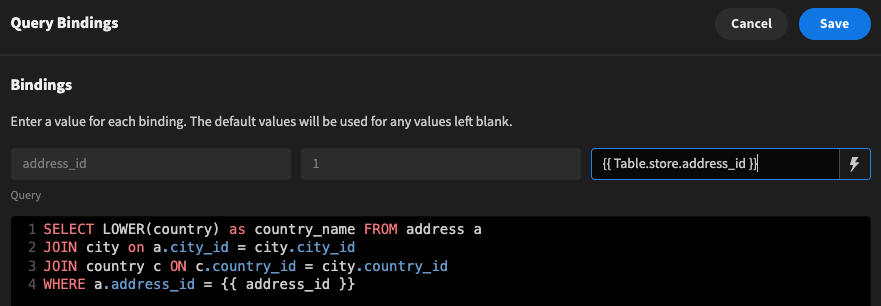
Now back to the Design section, the two existing repeater blocks can be replaced with a single new repeater block, using our new query as the datasource. Click the cog icon to open the binding drawer. Assign the address_id.
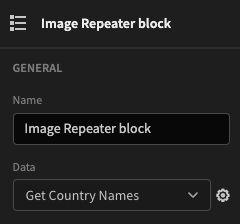
Image repeater block
Finally the image URL can be set to the following Handlebars expression:
https://images.mapsofworld.com/{{ Image Repeater block.Get Country Names.country_name }}/{{ Image Repeater block.Get Country Names.country_name }}-flag.gif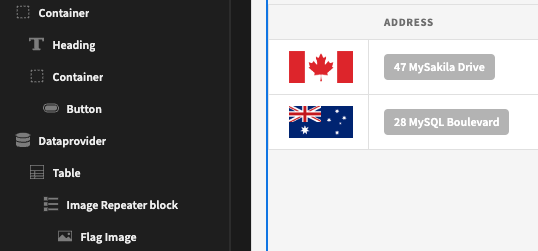
Custom query reduces the number of repeater blocks needed
Adding a store map location
First we need to make a REST API call to get the longitude/latitude from our address. Go to the Data section, and add a REST datasource.
I used the OpenCage API, which you can sign up to and receive an API key to use.
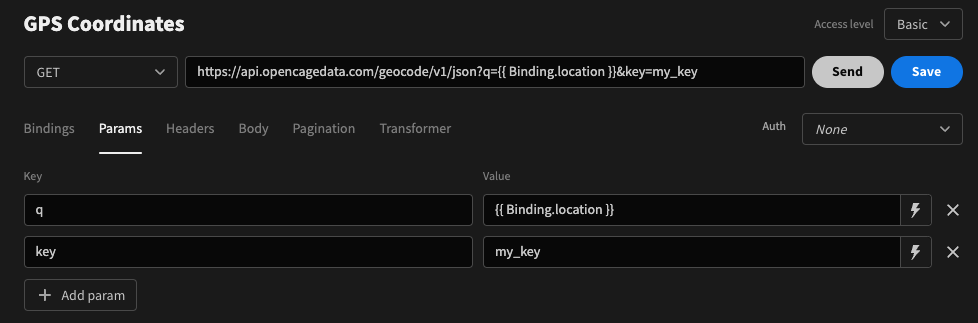
Select the GET method and paste in the URL:
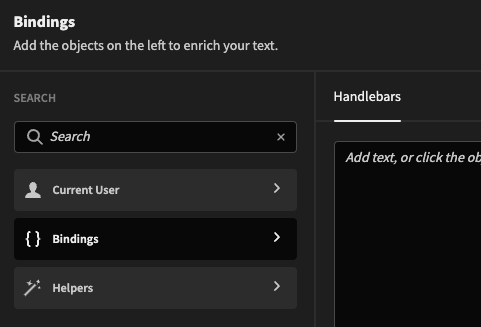
https://api.opencagedata.com/geocode/v1/jsonAdd a binding called 'location' and give it a default value. Next add two params. One for your API key, and another for the q (query string). Click the lightning bolt icon to select the location binding.

 |  |
|---|
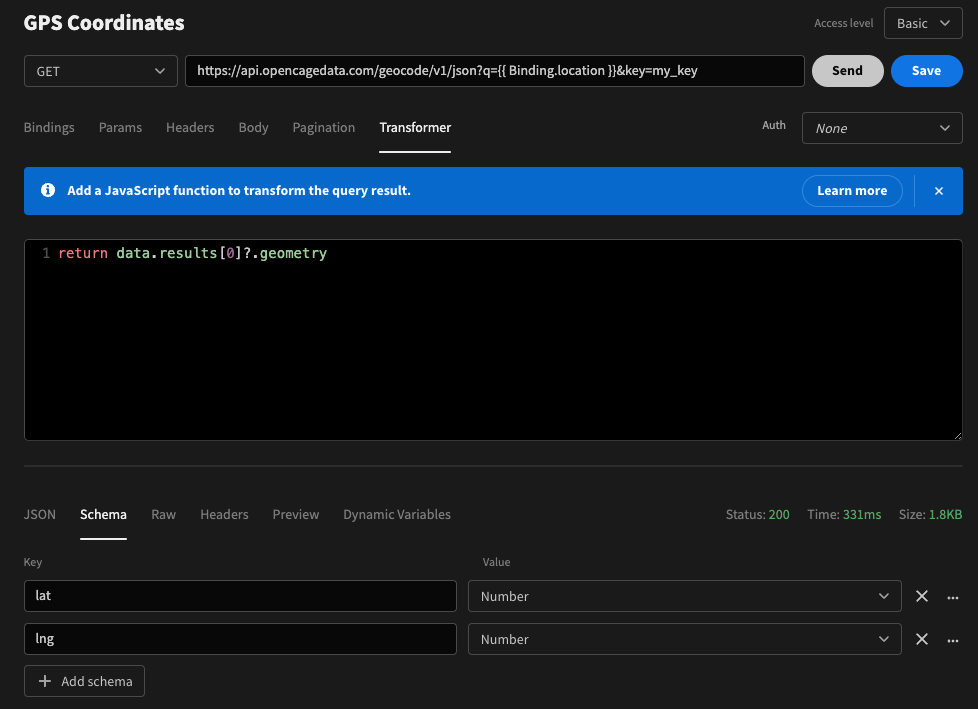
To make sure we're pulling the co-ordinates of the first result, add the following to your Transformer:
return data.results[0]?.geometryAfter clicking the Send button, your Schema should include the latitude and longitude. Make sure to also click the Save button!
We will need to pull the city name and country name for a given address_id in order to make use of this API. As before, a custom SQL query is the most efficient way to do this. In fact we can update our existing Get Country Name query without breaking the current usage for the flag image.
Click on the Get Country Names query under the PostgreSQL datasource. Update the query to pull back the city name as follows:
SELECT LOWER(country) as country_name, city FROM address a
JOIN city on a.city_id = city.city_id
JOIN country c ON c.country_id = city.country_id
WHERE a.address_id = {{ address_id }}
The schema should now have two fields: one for the country, and one for the city. Make sure to run and save the query.
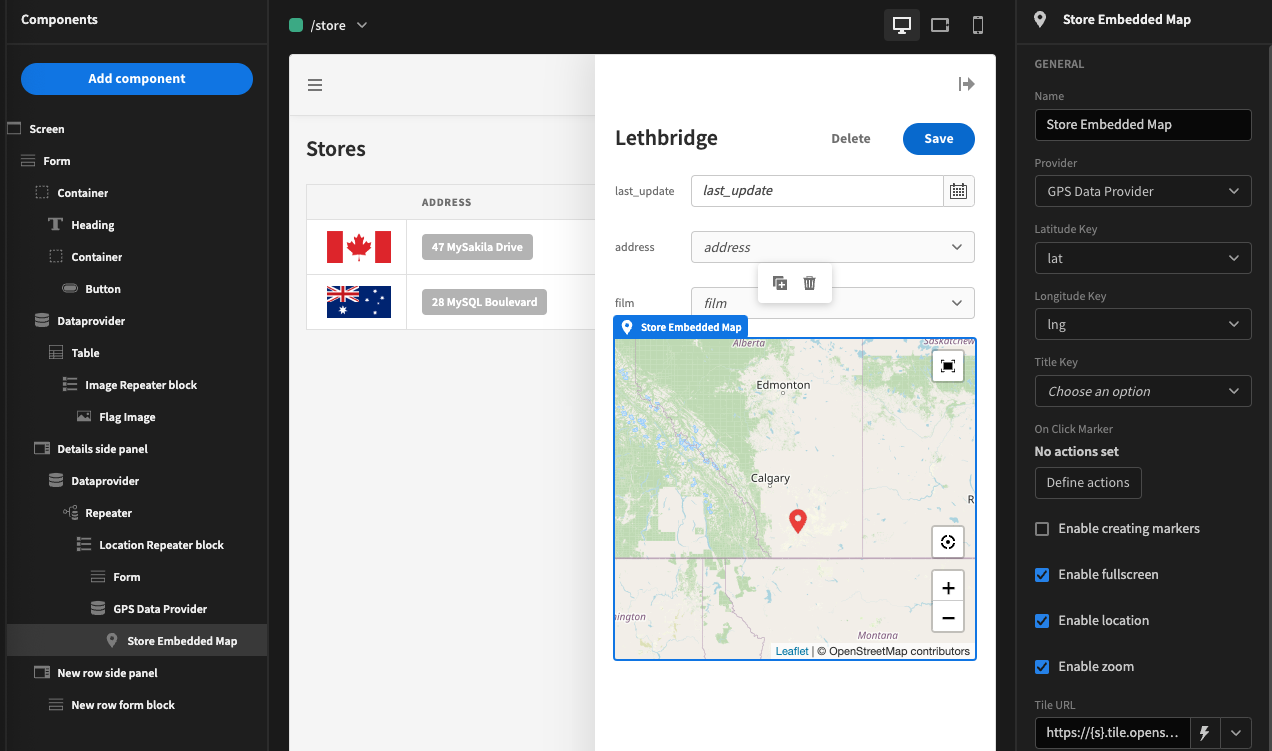
With the REST query set up, go back to the Design section. Within the Details side panel, eject the Details form block. This will give us access to the store entry data. Click on the Repeater and add a repeater block with the name 'Location Repeater Block', which will be nested below. Set the Get Country Names as the datasource, and click the cog icon to pass in the binding {{ Repeater.store.address_id }}. Drag the Form into the new Location Repeater Block.
Currently the heading is displaying the ID value of the store. This isn't very nice, so let's replace it with the store location. Replace the Heading Text handlebars with the following:
{{ Location Repeater block.Get Country Names.city }}You can use the bindings helper on the left hand panel to insert this value. It is also unlikely that you would want _id fields in the form, so go ahead and delete those.
Next nest a Data provider under the Location repeater block, below the form. Set the datasource to REST query we added earlier, and click the cog icon to pass in the following binding for the query string param:
{{ Location Repeater block.Get Country Names.city }}, {{ Location Repeater block.Get Country Names.country_name }}Finally nest an Embedded Map underneath the REST query data provider. Choose it as the Provider and select the lat and lng keys.
Viewing available films in store
Create a new screen with the route: /film/:storeid.
Add a Row Explorer block for the film table. Set the Height to 800px and set the Search Field to title. Assign the Title, Subtitle, and Description to some appropriate bindings, e.g.
{{ Film Explorer Block.film.title }}{{ Film Explorer Block.film.release_year }}{{ Film Explorer Block.film.description }}
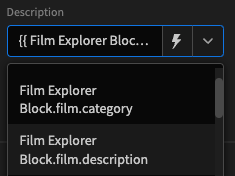
Selecting the film description from the binding dropdown
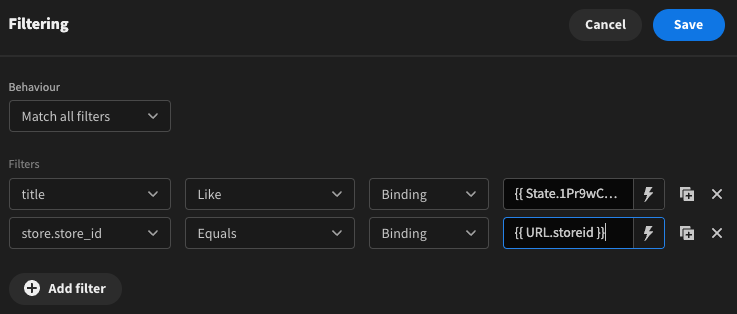
As we want to filter the list of films by the store_id that we pass via the URL go ahead and eject the Row Explorer block, and Define filters for the now exposed Data provider.
Click Add filter to add an additional filter for the store_id column.
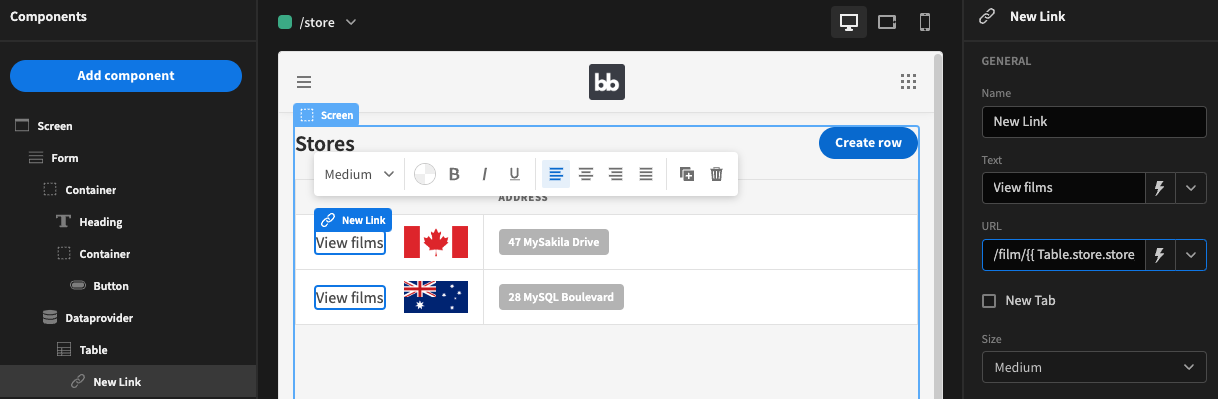
Back to the /store screen, click on the table and add a new Link component. Give it the name 'View films' and the URL binding: /film/{{ Table.store.store_id }}.
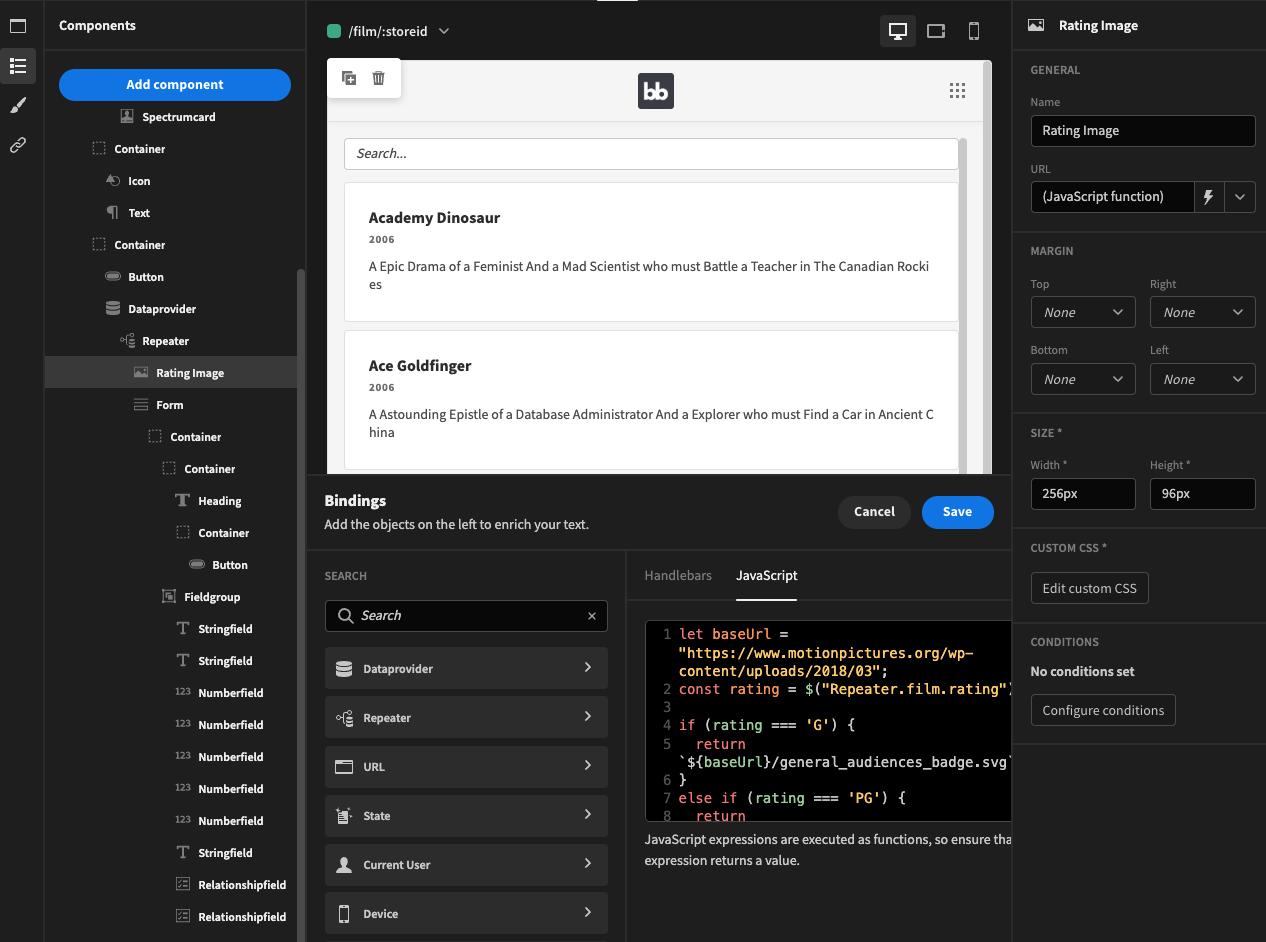
Adding the film rating image
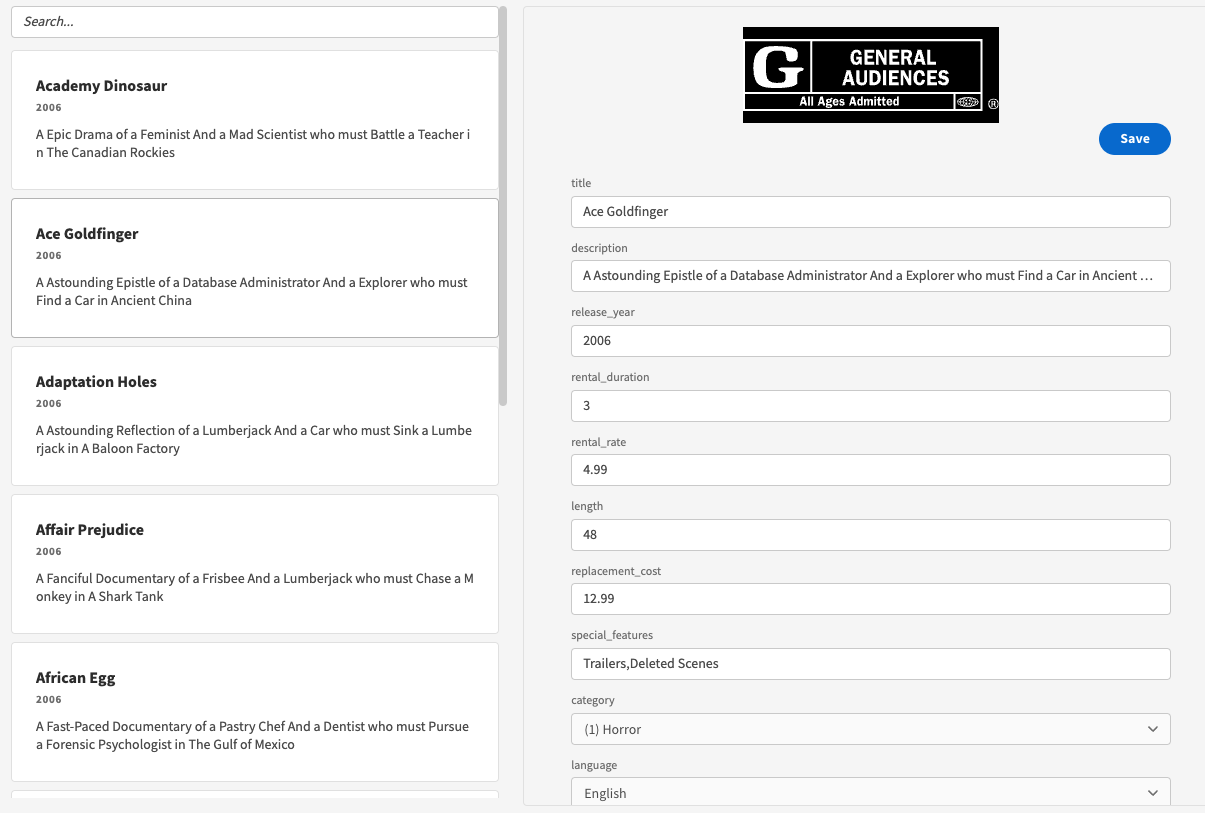
At the moment the row explorer presents the film information in a basic form. This is fine, but let's make it look a little nicer.
First remove the rating field, and any of the fields that you do not wish to be displayed or edited from the Form block. Next eject the form block so that the data provider can be used.
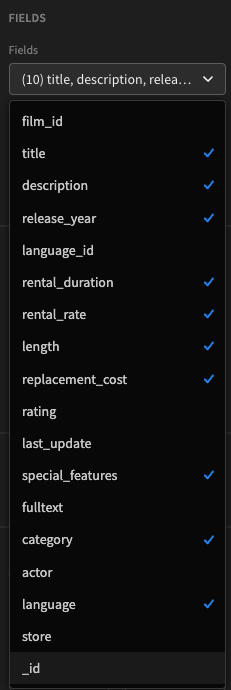
Selecting the form block fields
Above the recently exposed form, add an image component. Give it the following JavaScript URL binding:
let baseUrl = "https://www.motionpictures.org/wp-content/uploads/2018/03";
const rating = $("Repeater.film.rating");

if (rating === 'G') {
	return `${baseUrl}/general_audiences_badge.svg`;
}
else if (rating === 'PG') {
	return `${baseUrl}/parental_guidance_badge.svg`
}
else if (rating === 'PG-13') {
	return `${baseUrl}/parens_strongly_cautioned_badge.svg`

}
else if (rating === 'R') {
	return `${baseUrl}/restricted_badge.svg`
}

return `${baseUrl}/no_17_and_under_badge.svg`
As these images are white, you'll also want to edit the Custom CSS and give it a black background: background-color: black;. Also set a width and height, e.g. 256px * 96px.
Displaying inventory count
Within the film view, it would also be useful to show the user what the current stock is for the selected film.
In the Data section add another custom SQL query.
select COUNT(*) from inventory
WHERE film_id = {{ film_id }} and store_id = {{ store_id }}
GROUP BY film_id
As always, be sure to Run Query and Save Query.
Back in the Design section, add a new Repeater block above the row explorer detail heading. Select the inventory count query as the datasource. Click the cog icon to pass in the binding values:
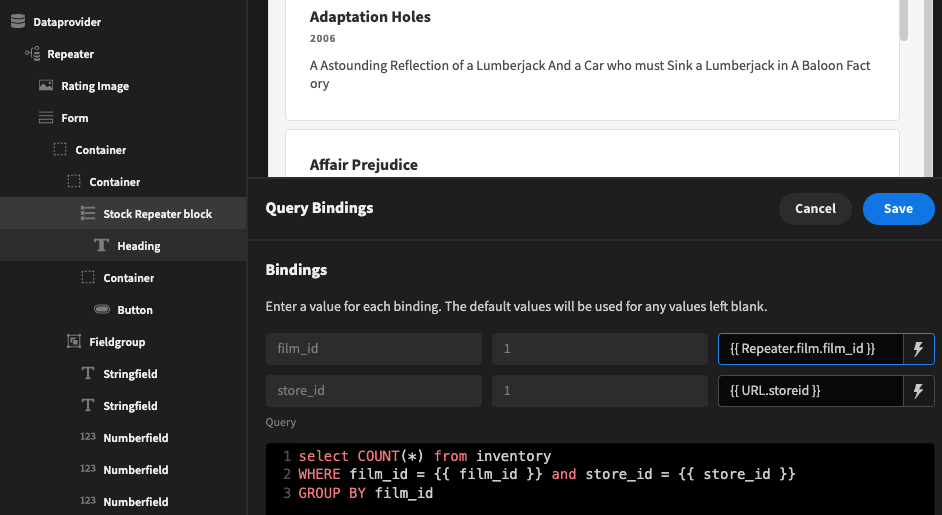
Nest the Heading component under the Stock Repeater block and give it the binding Text value: Stock: {{ Stock Repeater block.Get Inventory Count.count }}.

Using query bindings in more complex queries
For the most part Bindings in PostgreSQL queries will behave much in the same way as other Custom queries and as shown in the tutorial above.
It is worth understanding however, that SQL queries will be parameterized under the hood. This is mainly done to improve security and performance.
This enhanced security does have a small drawback in reducing the flexibility of your queries. For example, bindings cannot be used as a direct inline replacement of text in your queries, and therefore cannot be used to dynamically set table or column names, dynamically set operators, or inject SQL snippets. Ideally your Budibase bindings should be used in the same way that you might use $ parameters in your Postgres queries.
Example: Using a binding with INTERVAL
Let's say you have the following query:
select * from public."ServiceLog" where "ServiceDate" > NOW() - INTERVAL '2 years'And you want to add bindings to make the INTERVAL adjustable. This can be done like so:
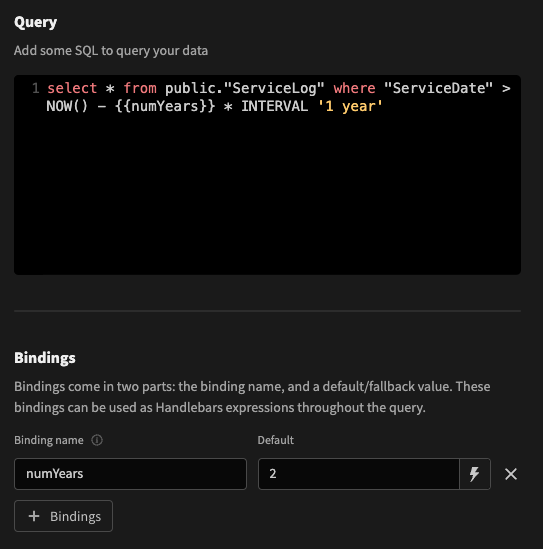
Query an interval of 'n' years
Alternatively, if we wanted to provide an INTERVAL string, then we need to use Postgres typecasting in our query like so:
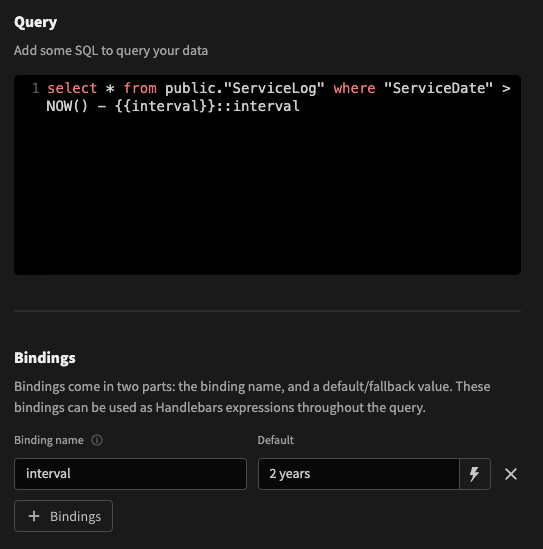
Text binding input must be cast to Postgres interval