Expense Approval
Our expense approval template offers a ready-to-use solution for enabling employees to submit claims for review and authorization. However, it’s also fully customizable, providing a basis for creating your own bespoke solution in Budibase.
In this guide, we’re outlining how our template works, how it’s built, and a few examples of changes you could make to reflect your own internal expense processes.
To use this template, click here.
Let’s jump in.
What does this template do?
Handling expenses is one of the most common administrative tasks across businesses in all industries. At the most basic level, this involves:
- Enabling employees to submit structured expense data.
- Routing submitted expenses to the appropriate authority for review.
- Applying defined business logic to approve or reject submissions.
- Recording outcomes and communicating them to stakeholders.
Our template is built around a simple approval workflow with two types of users.
Employees can submit itemized claims relating to specific company events.
Their Managers can then view, review, and approve these claims.
This is built on top of our internal database.
Let’s break down the core functionality.
CRUD Operations
The core of our app is allowing different types of users to carry out defined CRUD operations on our underlying data. This relies on providing users with differing permissions to access data or carry out actions subject to their roles.
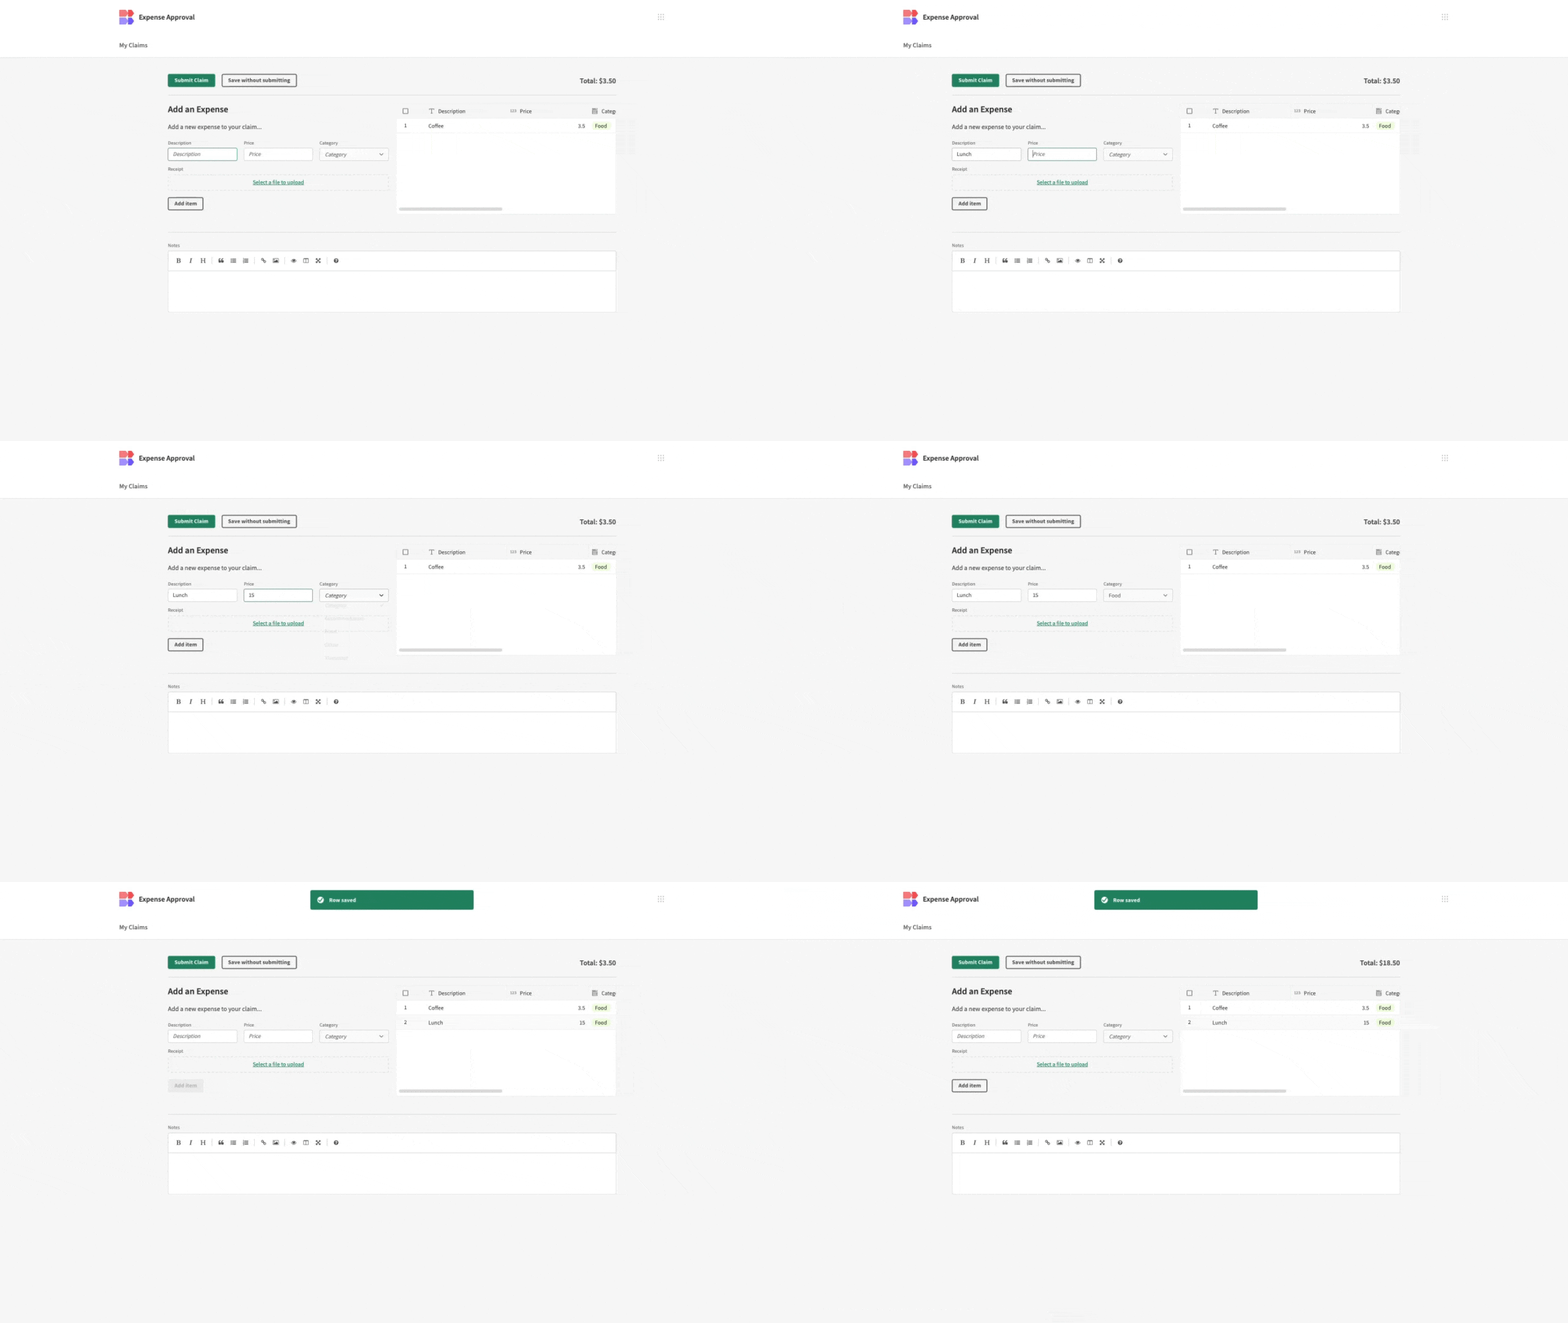
Firstly, Employees can view expenseable events and create new claims using a dedicated data collection form.
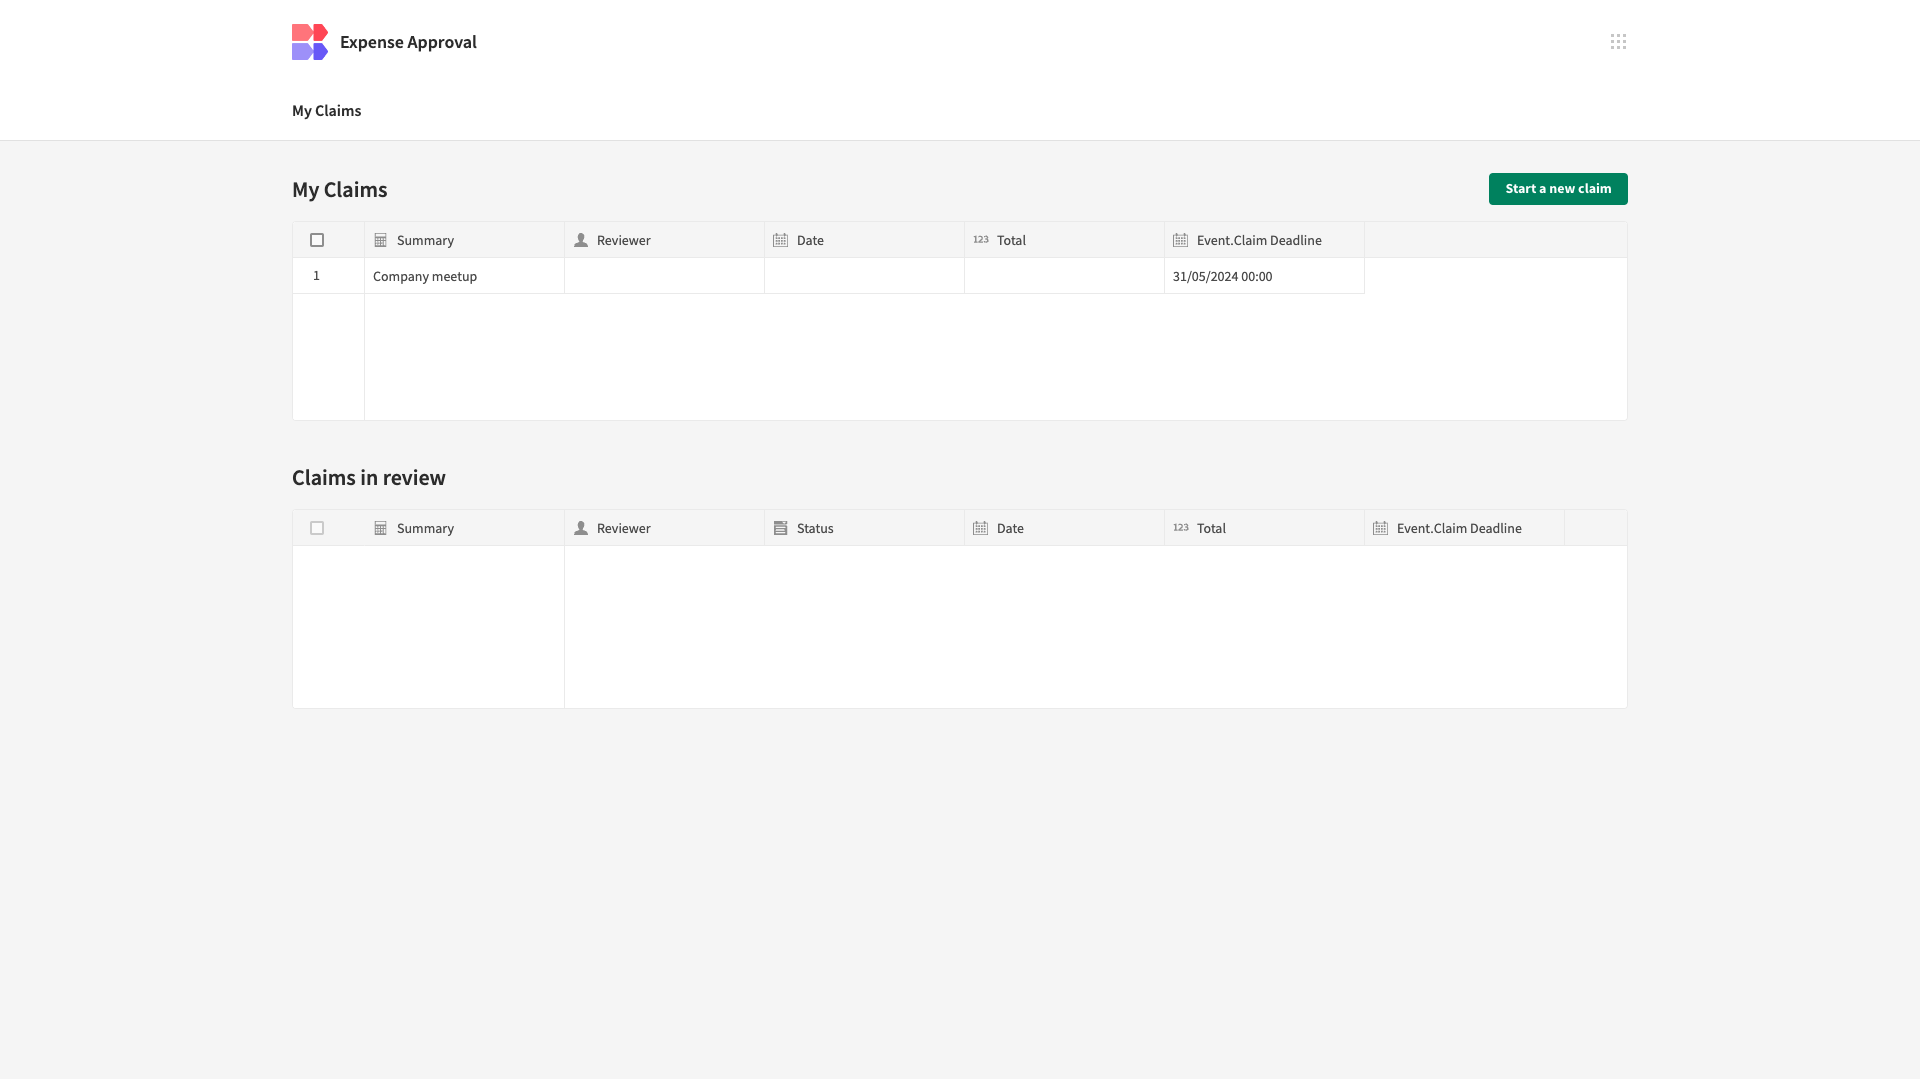
They can also view their own previous claims, including their current statuses, but not the claims of their colleagues.
Within existing claims, they can update the Status attribute to Cancelled.
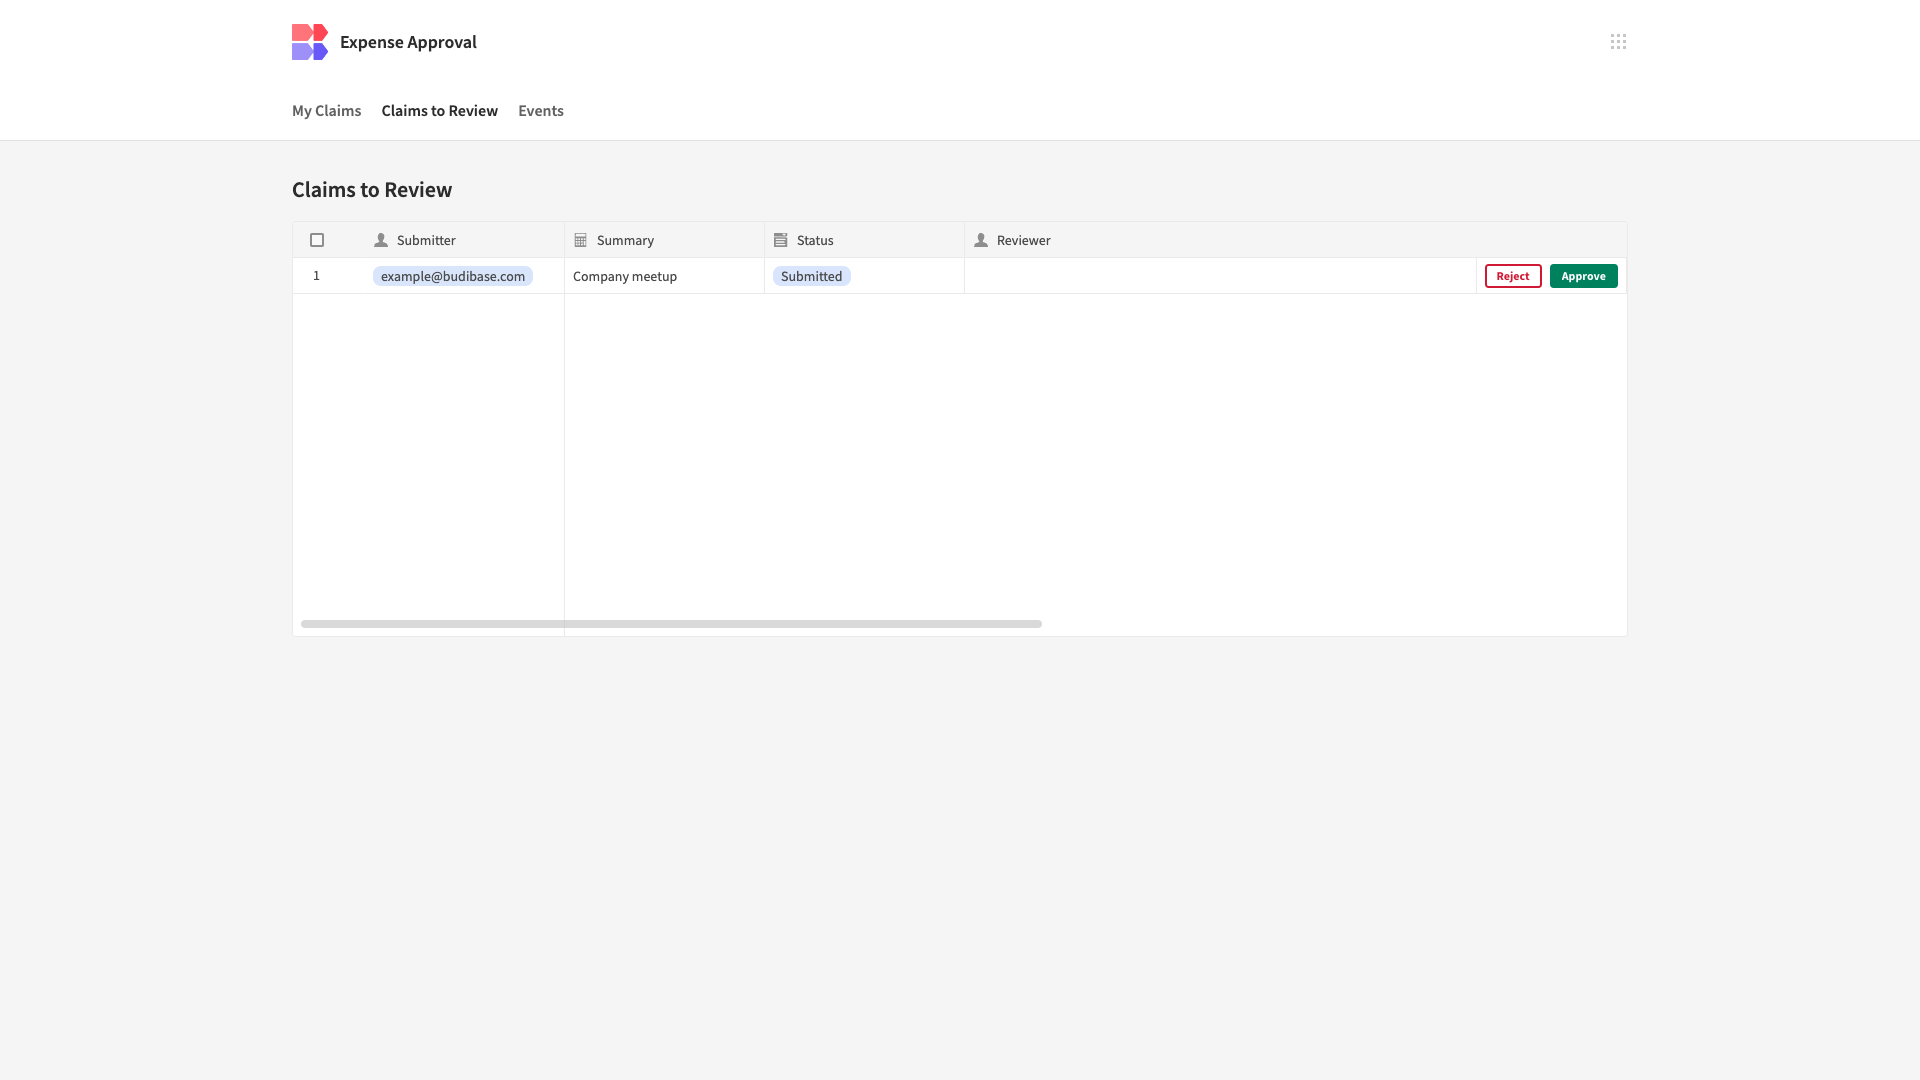
Users with the higher Manager role inherit all permissions from Employees. On top of this, they can view all claims, as well as carrying out update actions, enabling them to approve or reject submissions.
Receipt uploads
To help validate claims and maintain effective records, users can submit receipts with their expense submissions.
Our submission form features a File Upload component, which users can use to provide evidence supporting their claims.
This is stored in an Attachment column alongside each individual expense item.
Approval flows
Our template is based around a simple, single-step approval workflow, with one class of users responsible for authorizing all expenses. This works by updating the Status attribute of the original claim to either Approved or Rejected.
These are performed using Row Actions, enabling approvers to respond to expense claims at the press of a button, rather than manually updating the Status attribute.
Tracking change statuses
Within any approval workflow, tracking the status of submissions as they progress is critical.
Employees can view their previous expense claims to check if the status has updated when a reviewer responds. As we’ll see in the next section, they’ll also be notified when the status of their claim is updated.
Automated emails
A key time sink within approval processes is handling communications. Specifically, notifying users that something needs their attention. To solve this problem, our template utilizes email automations triggered by specific user actions.
In our workflow, this occurs at the point at which an expense claim receives a response.
When this happens, the user who initially submitted the request is emailed, informing them of the outcome.
This utilizes Email actions within the respective Reject and Approve Row Actions. We’ll examine how Row Actions work a little later.
Take a look at our documentation on working with email automations.
How does it work?
Now that we have an understanding of how our template functions from the perspective of end-users, we can move on to thinking about how it’s actually built.
Within Budibase, app-building is divided into separate concerns. Let’s check out how our template works across each section of the Budibase builder.
User roles
Budibase’s custom RBAC tools allow us to configure the exact data, screens, and actions that different users are able to access.
We can add or edit roles using our visual RBAC editor and grant them access to specific tables or Views within Budibase’s Data section.
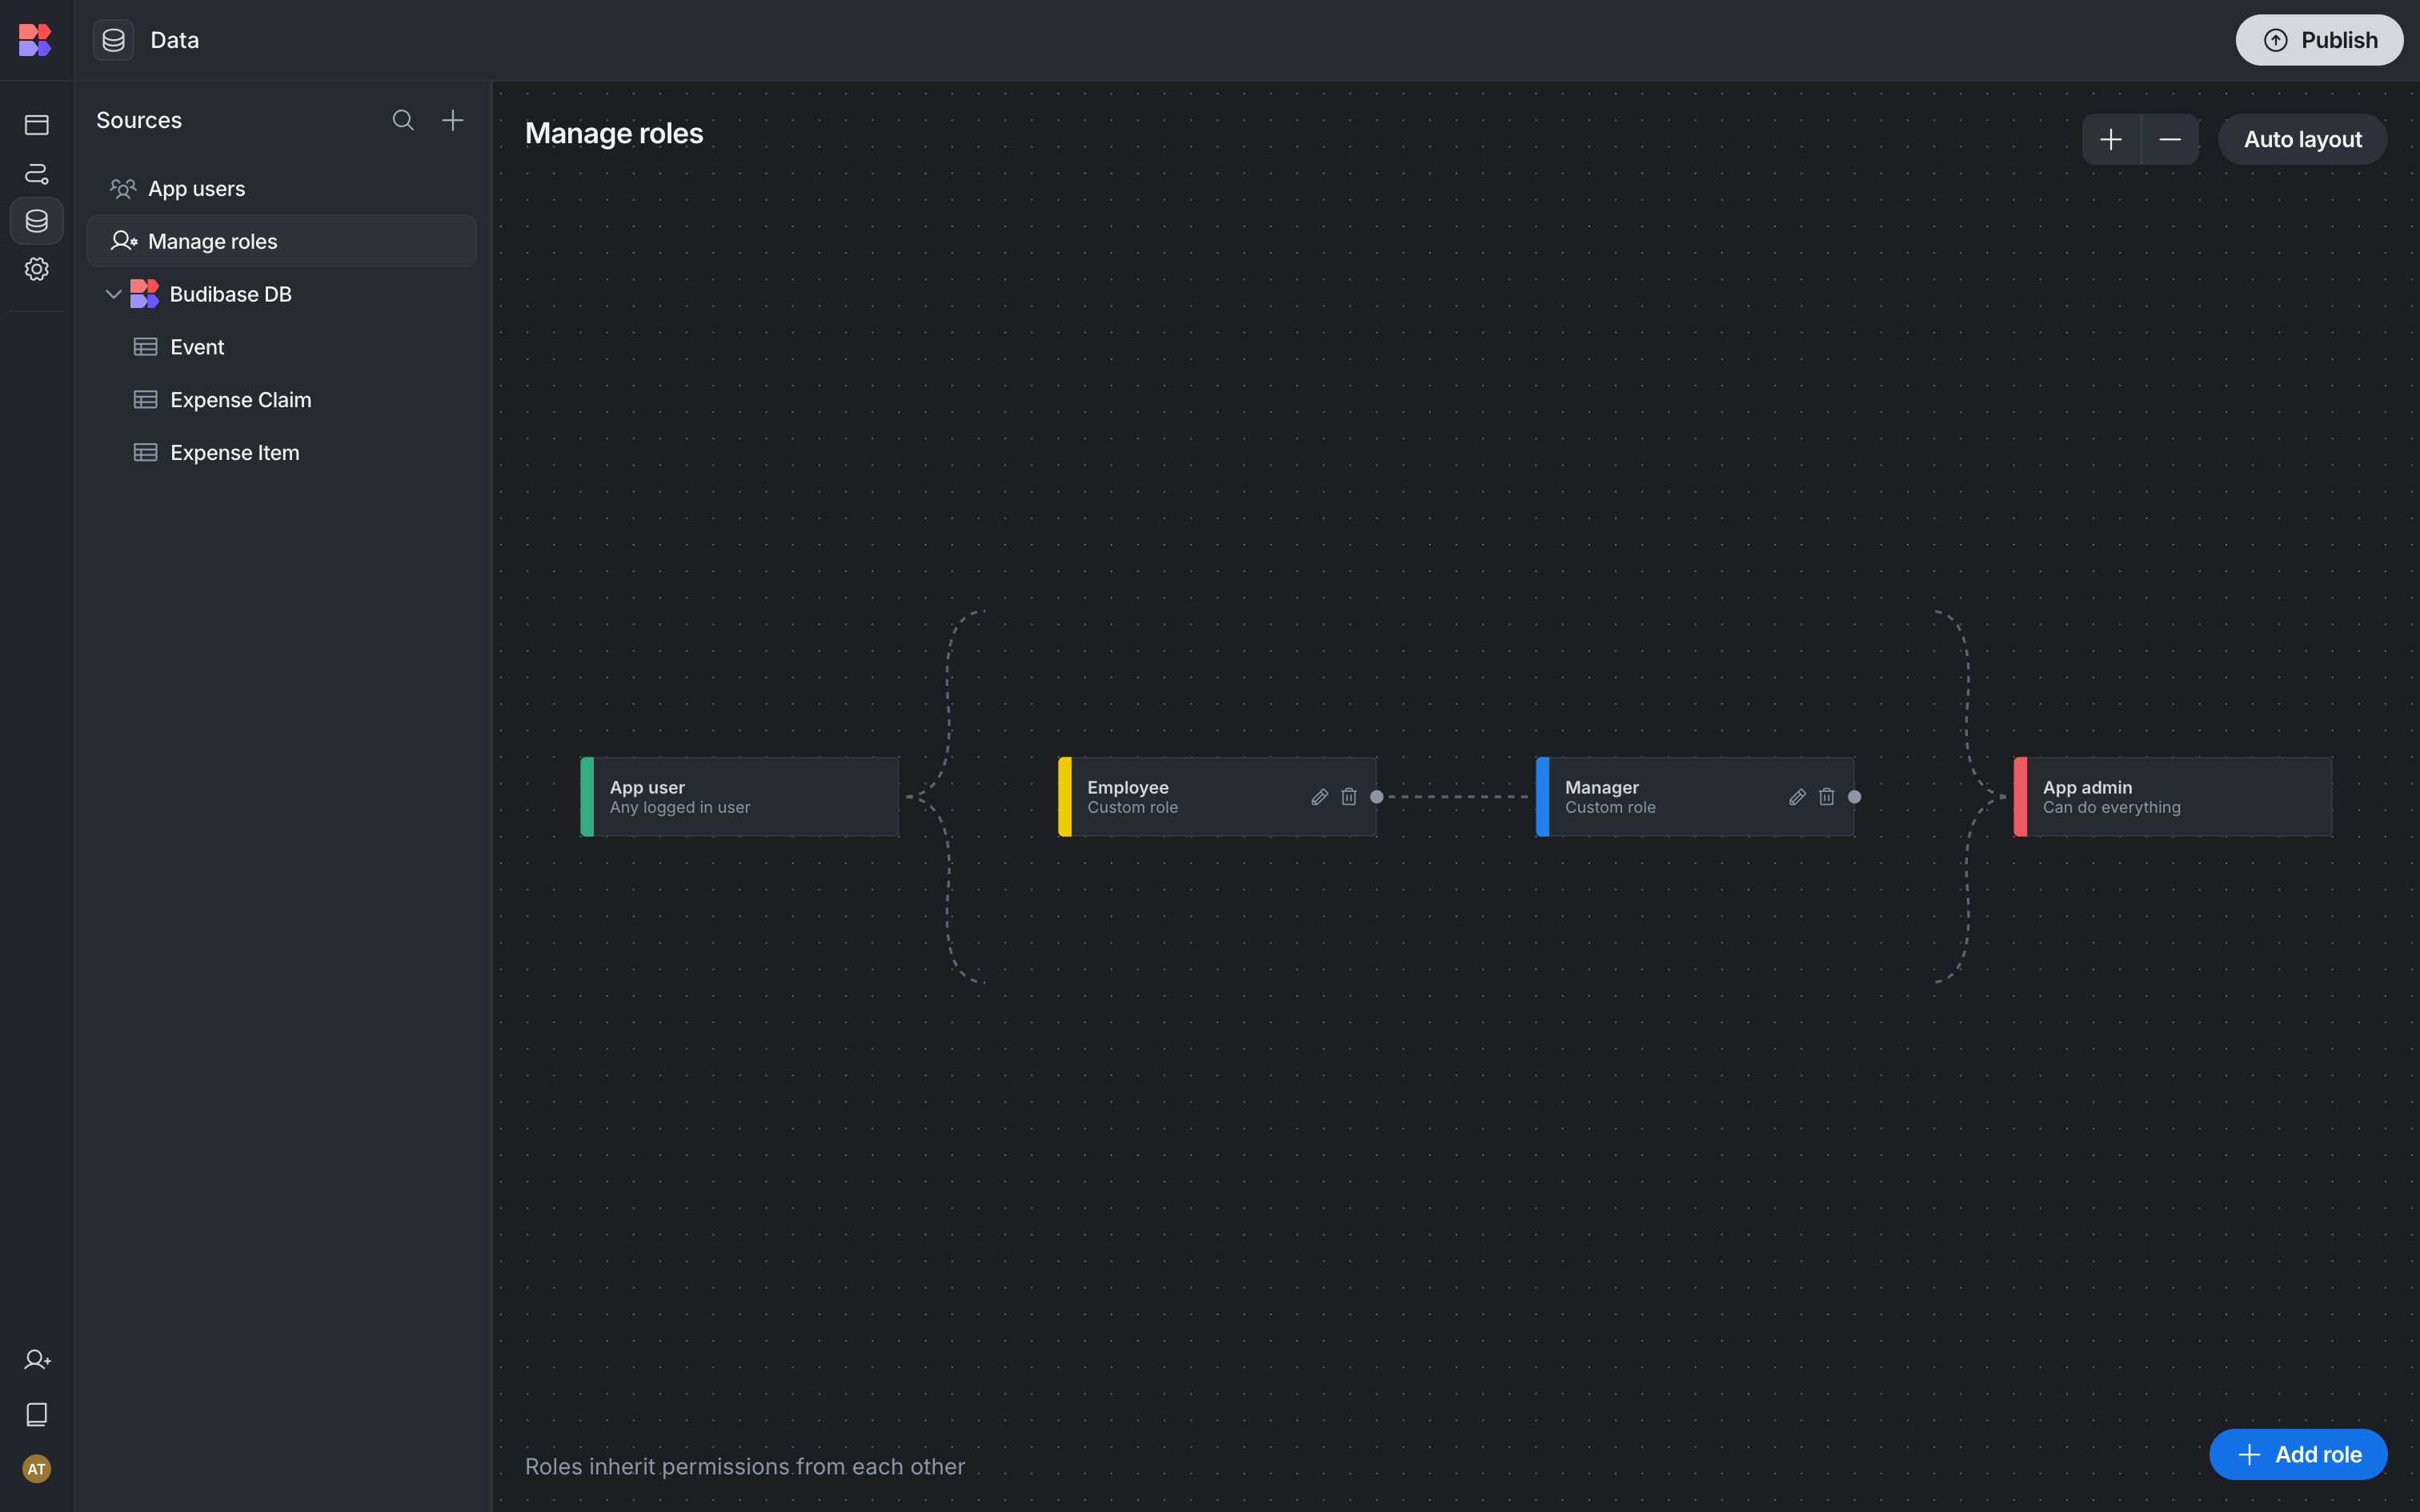
Our template utilises three distinct roles to control how user cohorts interact with data across our apps.
Employees are able to view expensible events, submit itemized expenses, and view the current state of their own previous submissions. They can also update or cancel claims that they have created but not submitted.
Managers can view, review, and respond to all Employees requests.
App Admins have full CRUD access across all data tables.
We’ll see the database Views we’ve created for each in the next section.
Data structure
As we said earlier, our application is built on top of Budibase’s internal database. Check out our documentation on Budibase DB to learn more.
Here’s how our data model works.
Tables
Our app utilizes three internal tables:
- Events - storing information relating to company events which expenses can be claimed against.
- Expense Claim - storing information about employees’ expense submissions.
- Expense Item - storing information about individual items within expense claims.
Additionally, our template’s data model uses the Single User data type to establish relationships between our data and Budibase’s internal Users table, enabling us to assign rows to specific end users.
The Events table stores columns with the following names and data types:
- Title - Text,
- Description - Long-Form Text,
- Location - Text,
- Start Date - Date,
- End Date - Date,
- Claim Deadline - Date,
- Max Claim - Number,
- Claims - Relationship,
- Image - Single Attachment.
The Expense Claim table stores:
- Summary - Formula,
- Submitter - Single User,
- Reviewer - Single User,
- Status - Single Select,
- Date - Date,
- Expense Items - Relationship,
- Event - Relationship,
- Total - Number,
- Submitter Notes - Long-Form Text,
- Reviewer Notes - Long-Form Text.
Lastly, our Expense Item table stores the following attributes:
- Description - Text,
- Price - Number,
- Category - Single-Select,
- Claim - Relationship,
- Receipt - Single Attachment.
We’ll check out some examples of how you might want to modify these later.
Relationships
Our three tables are linked using Budibase’s Relationship data type.
This allows us to define how individual entries across each of our tables relate to each other. We can then utilize attributes from directly related tables across View Joins within Budibase’s Data section or throughout our Designs and Automations.
Our app relies on two Relationships:
- A Many-To-One Relationship from the Expense Item table to the Expense Claim table.
- A Many-To-One Relationship from the Expsense Claim table to the Events table.
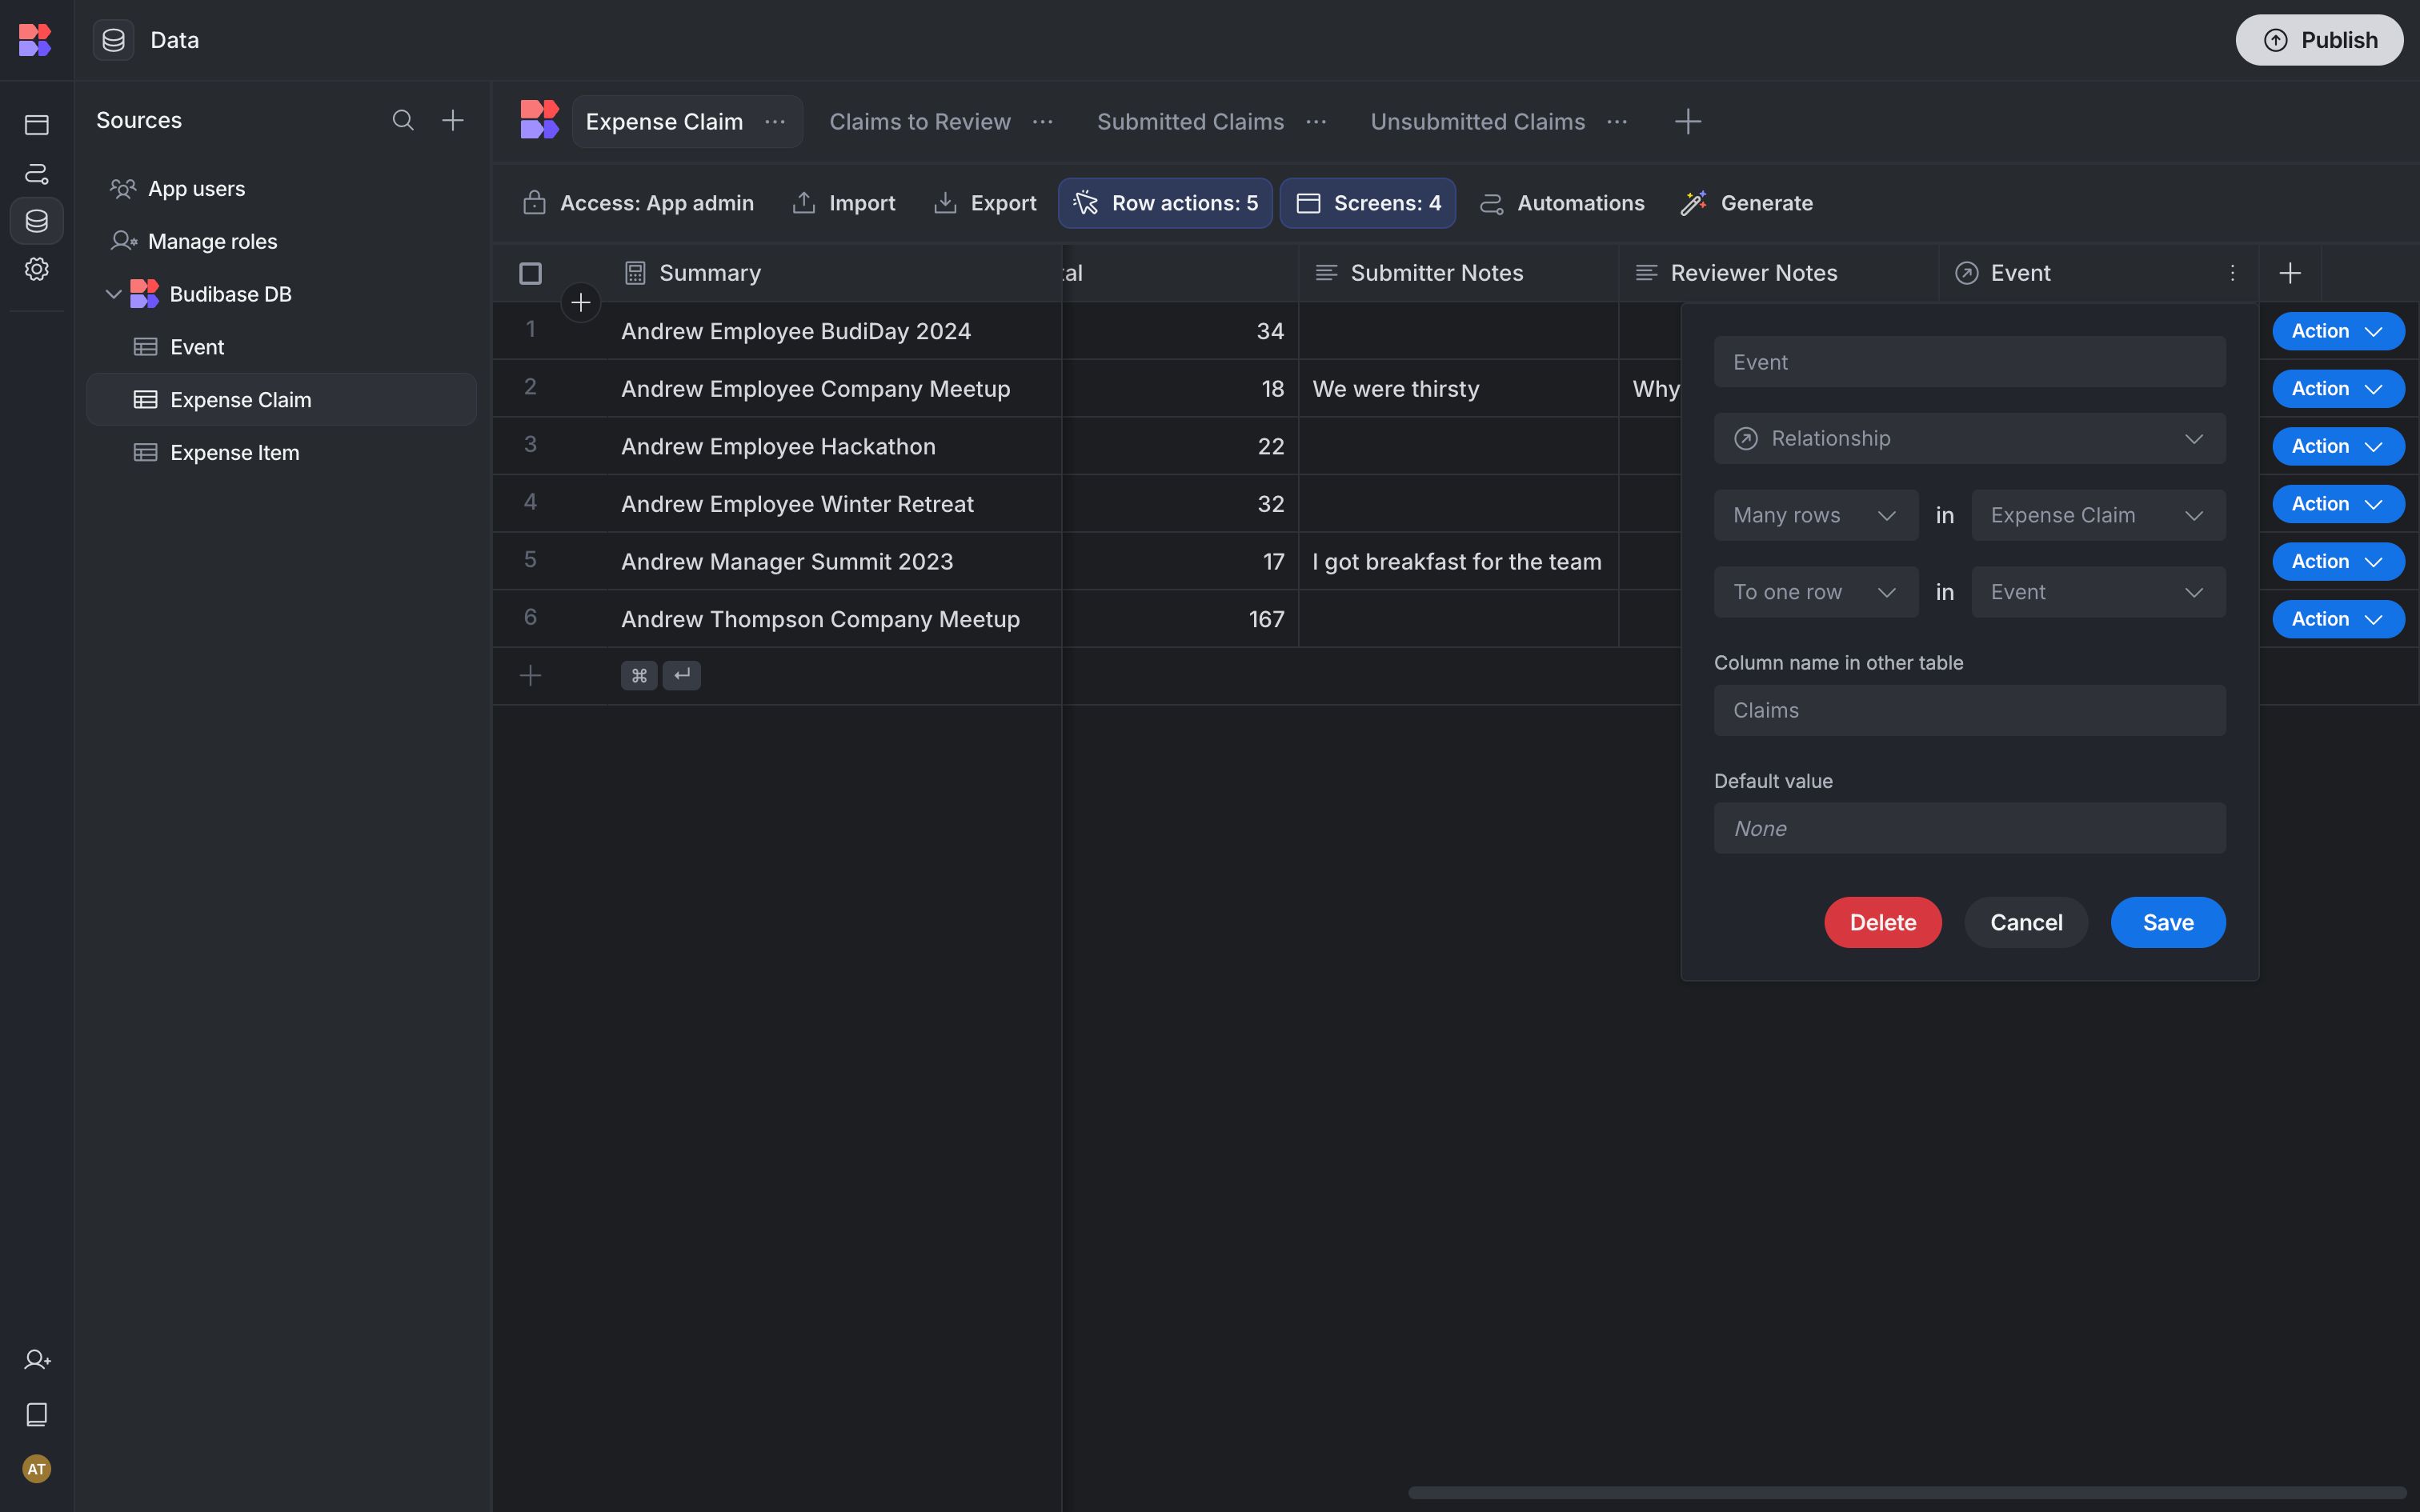
As we said a second ago, we also use Single User attributes to link specific pieces of data to users within Budibase’s internal Users table.
There are two instances of this in our app, both within the Expense Claim table:
- Submitter - An attribute that links each entry to the User that initially created the request. The value of this is set automatically, using the default to current user option.
- Reviewer - An attribute that assigns records the Reviewer of the expense request.
Views
A View is a subset of our data that’s used to define which rows, columns, actions, or aggregated data specific users can access across one or more tables.
In Budibase, these can be used to centrally configure all aspects of how our end-users interact with connected data within the Data section. Once we’ve created a view, we can use it to autogenerate role-specific screens and automations in just a few clicks.
Our expense approval app utilises several views. Here’s a summary of the views we’ve created across our three tables.
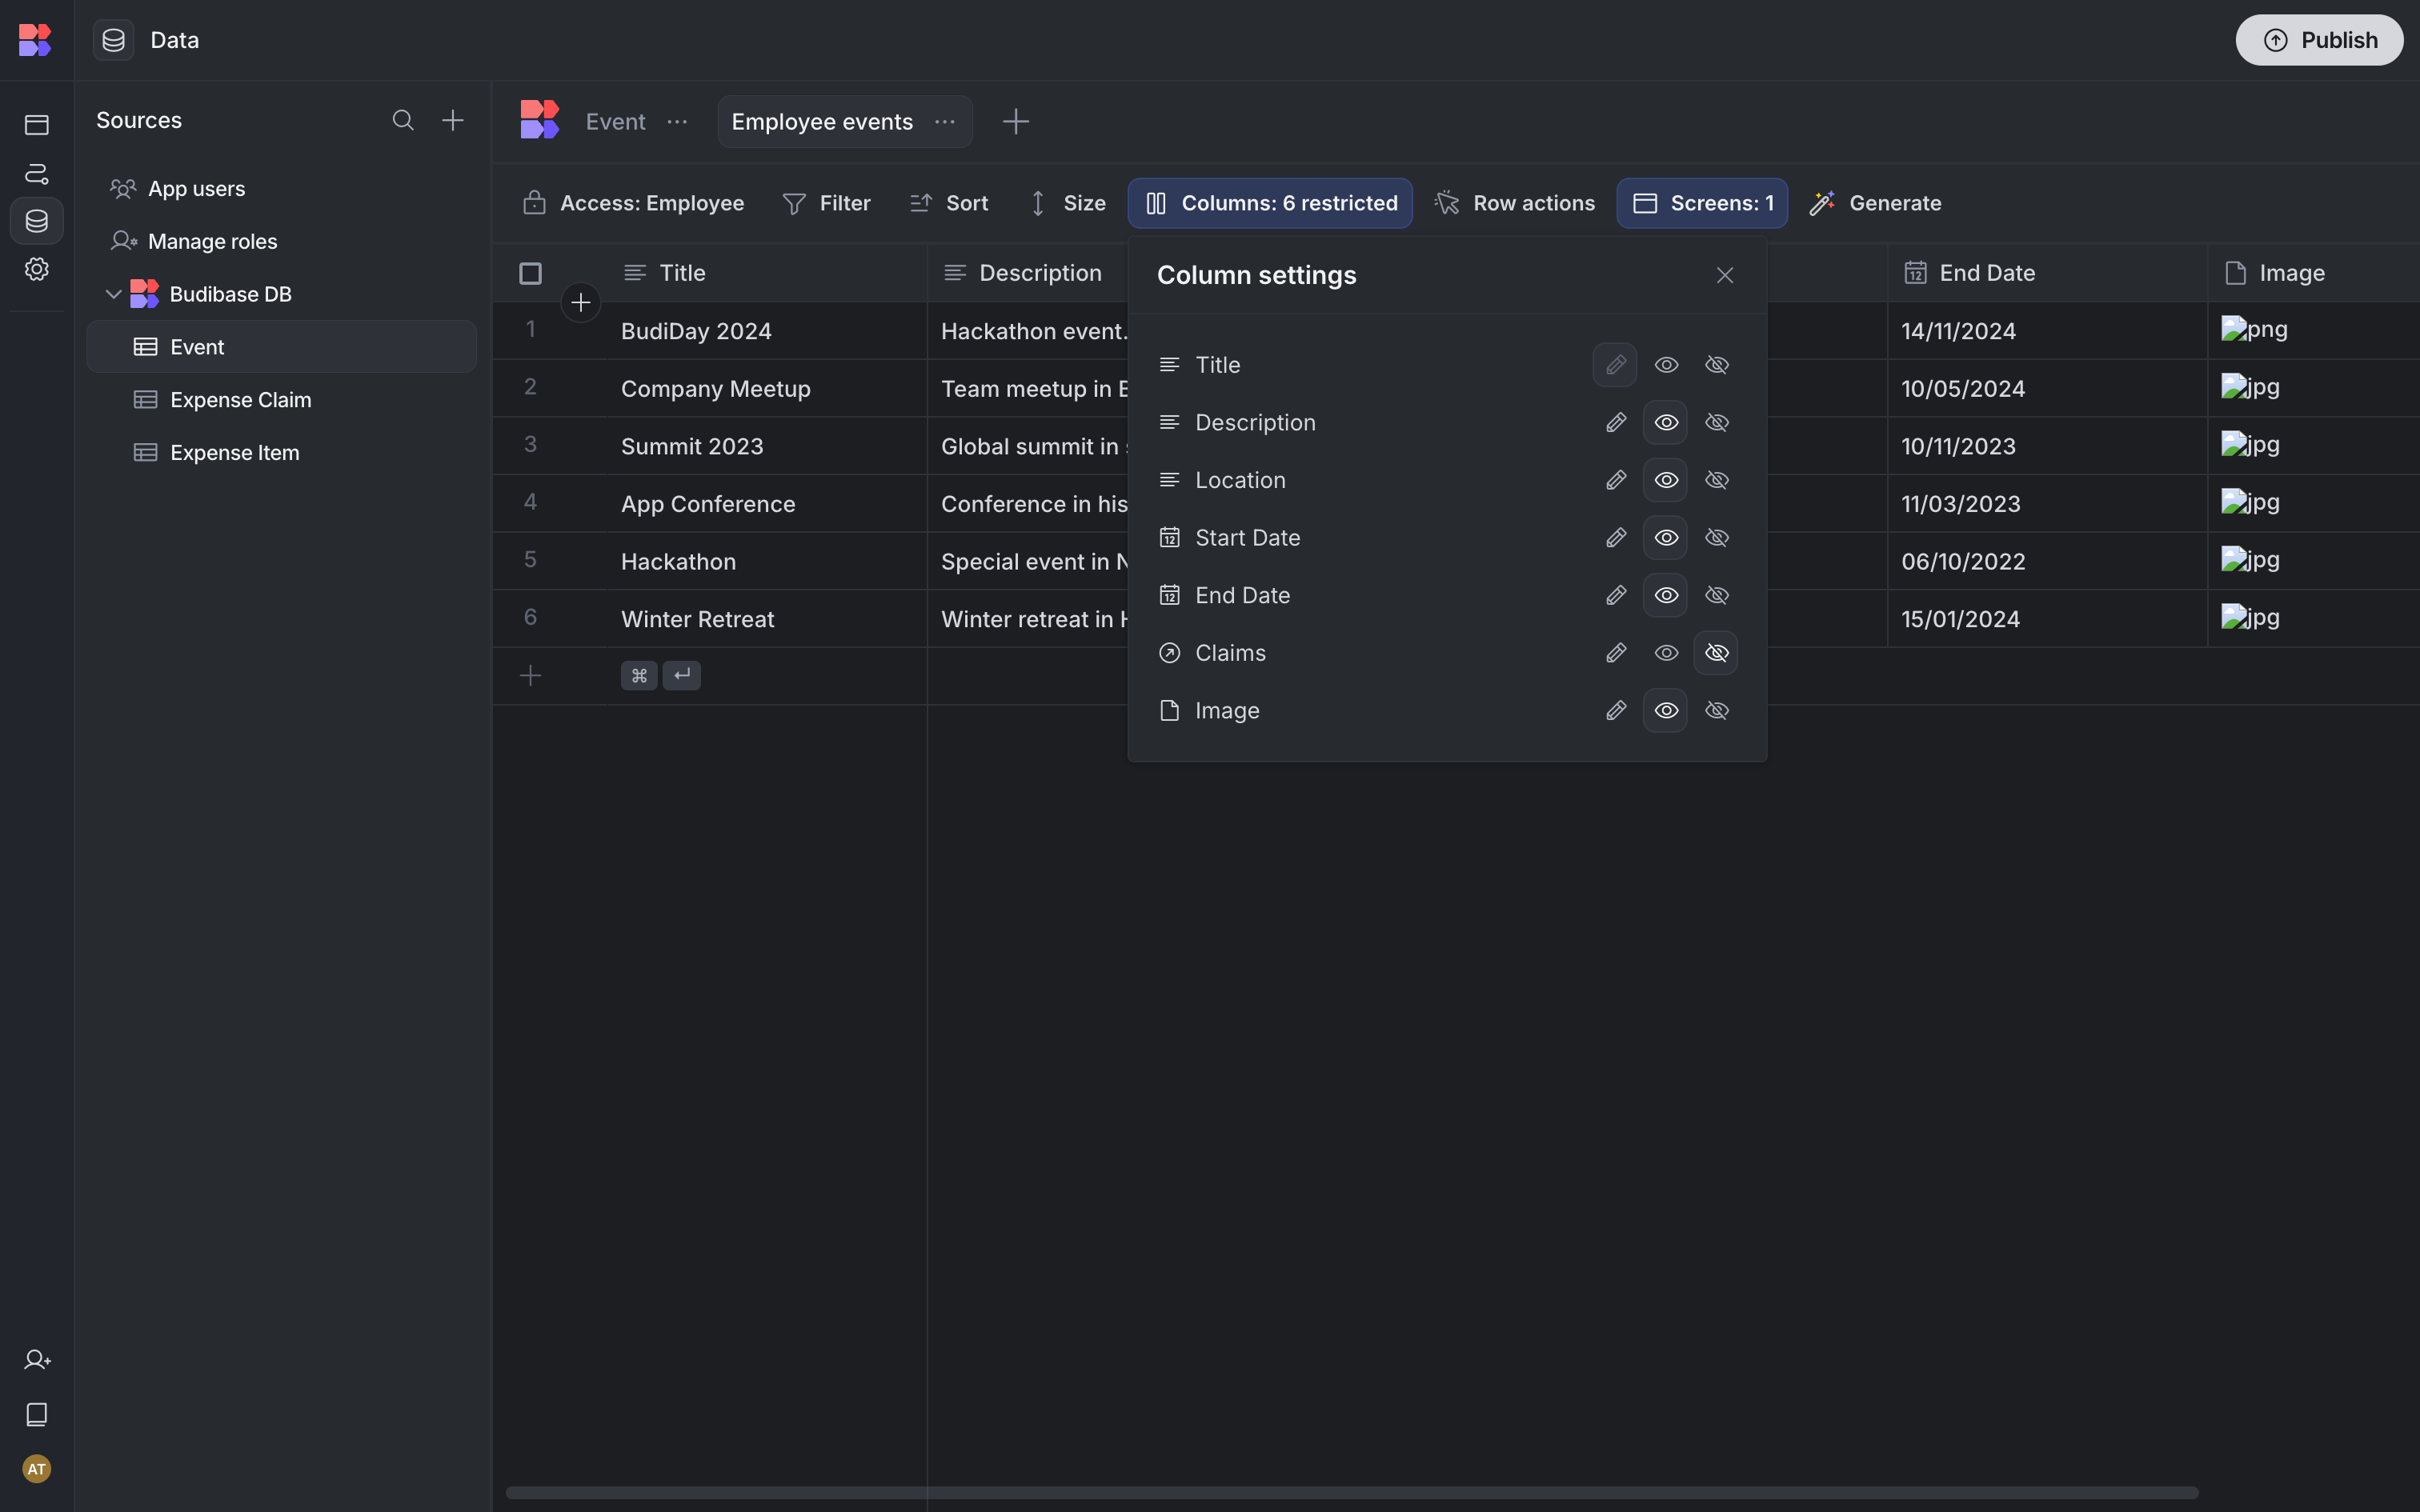
On top of the Events table, we’ve created one view called Employee Events. This provides a Read-Only version for the Events table for users with the Employee role, omitting the Expense Claims column.
Within the Expense Claims table, we’ve created three views, called Claims to Review, Submitted Claims, and Unsubmitted Claims.
The Claims to Review View is reserved for the Manager role for both Read and Write actions. It also uses a filtering expression to only include the rows where the Status attribute is equal to Submitted. All columns are writable except Submitter Notes, which is read-only.
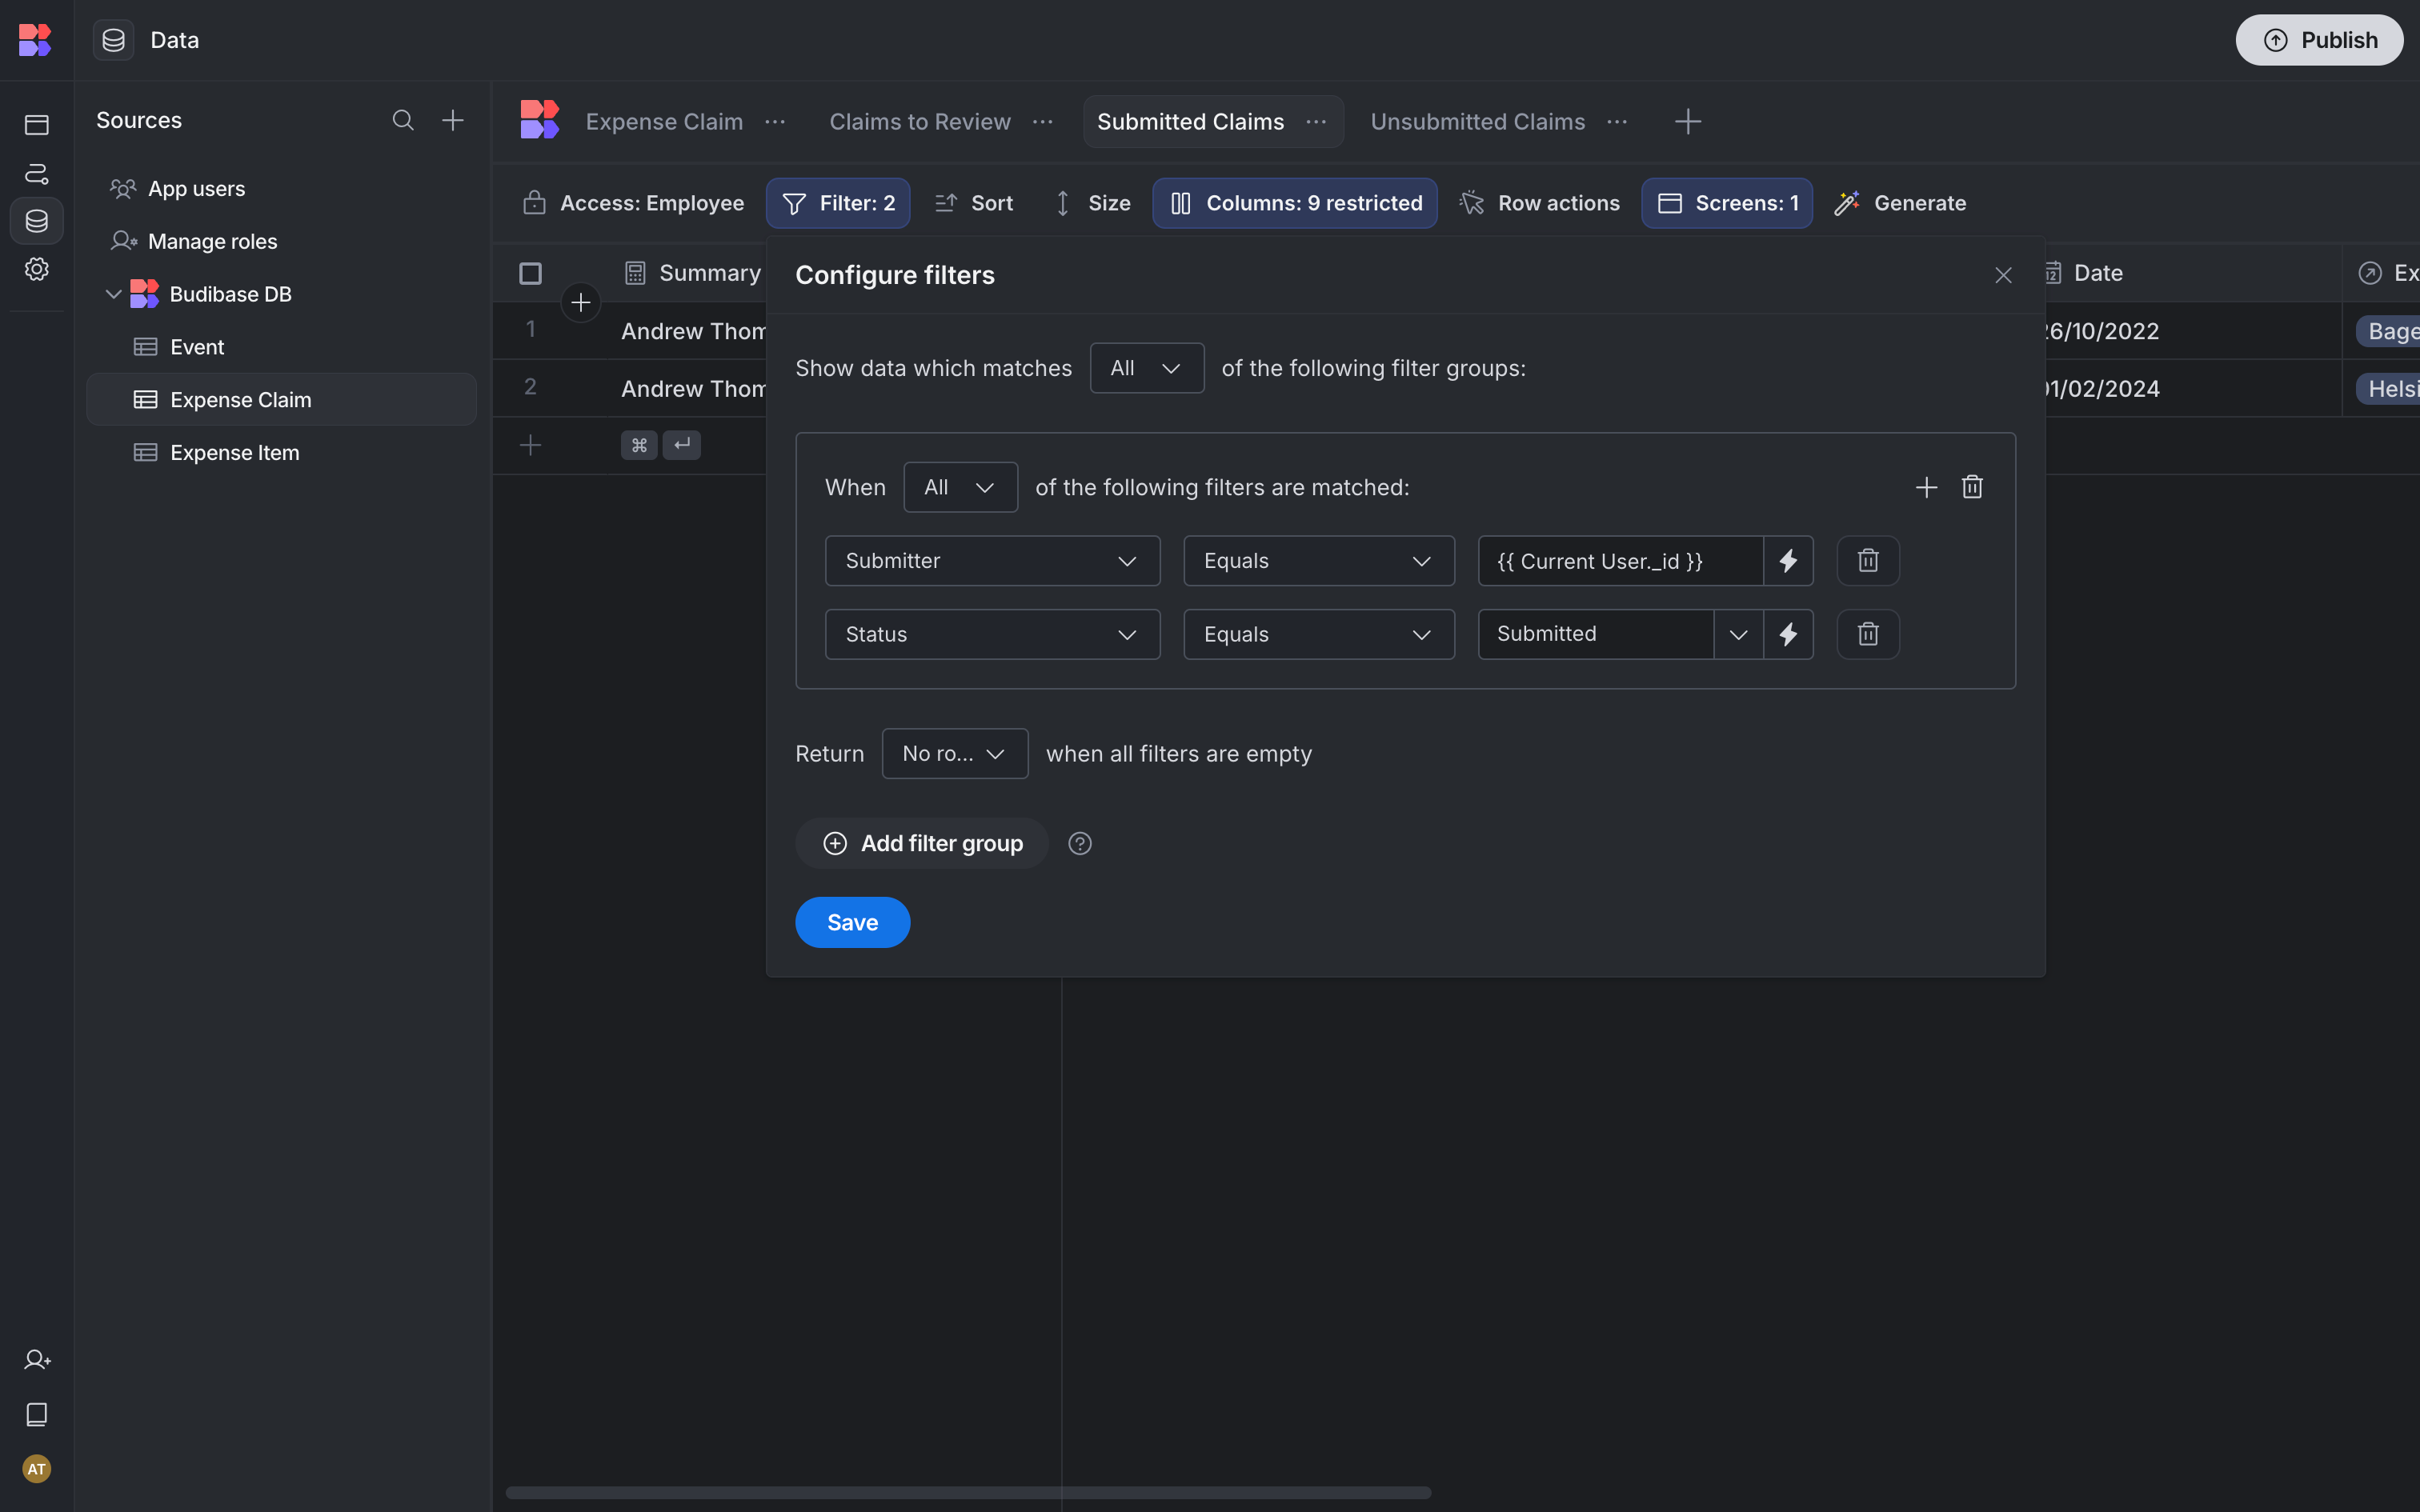
The Submitted Claims View provides Read-Only access to Employees, using a filtering expression to only include rows where the Status is Submitted and the Submitter is equal to the Current User.
The Unsubmitted Claims View provides the same access for Employees, except the Status filter is set to Not Submitted.
Our Expense Items table has a single View, giving Employees access only to the rows where the Submitter attribute in the related Expense Claims table is equal to the Current User.
User interfaces
Our app features several distinct screens for each role. Check out our docs page on working with screens within Budibase.
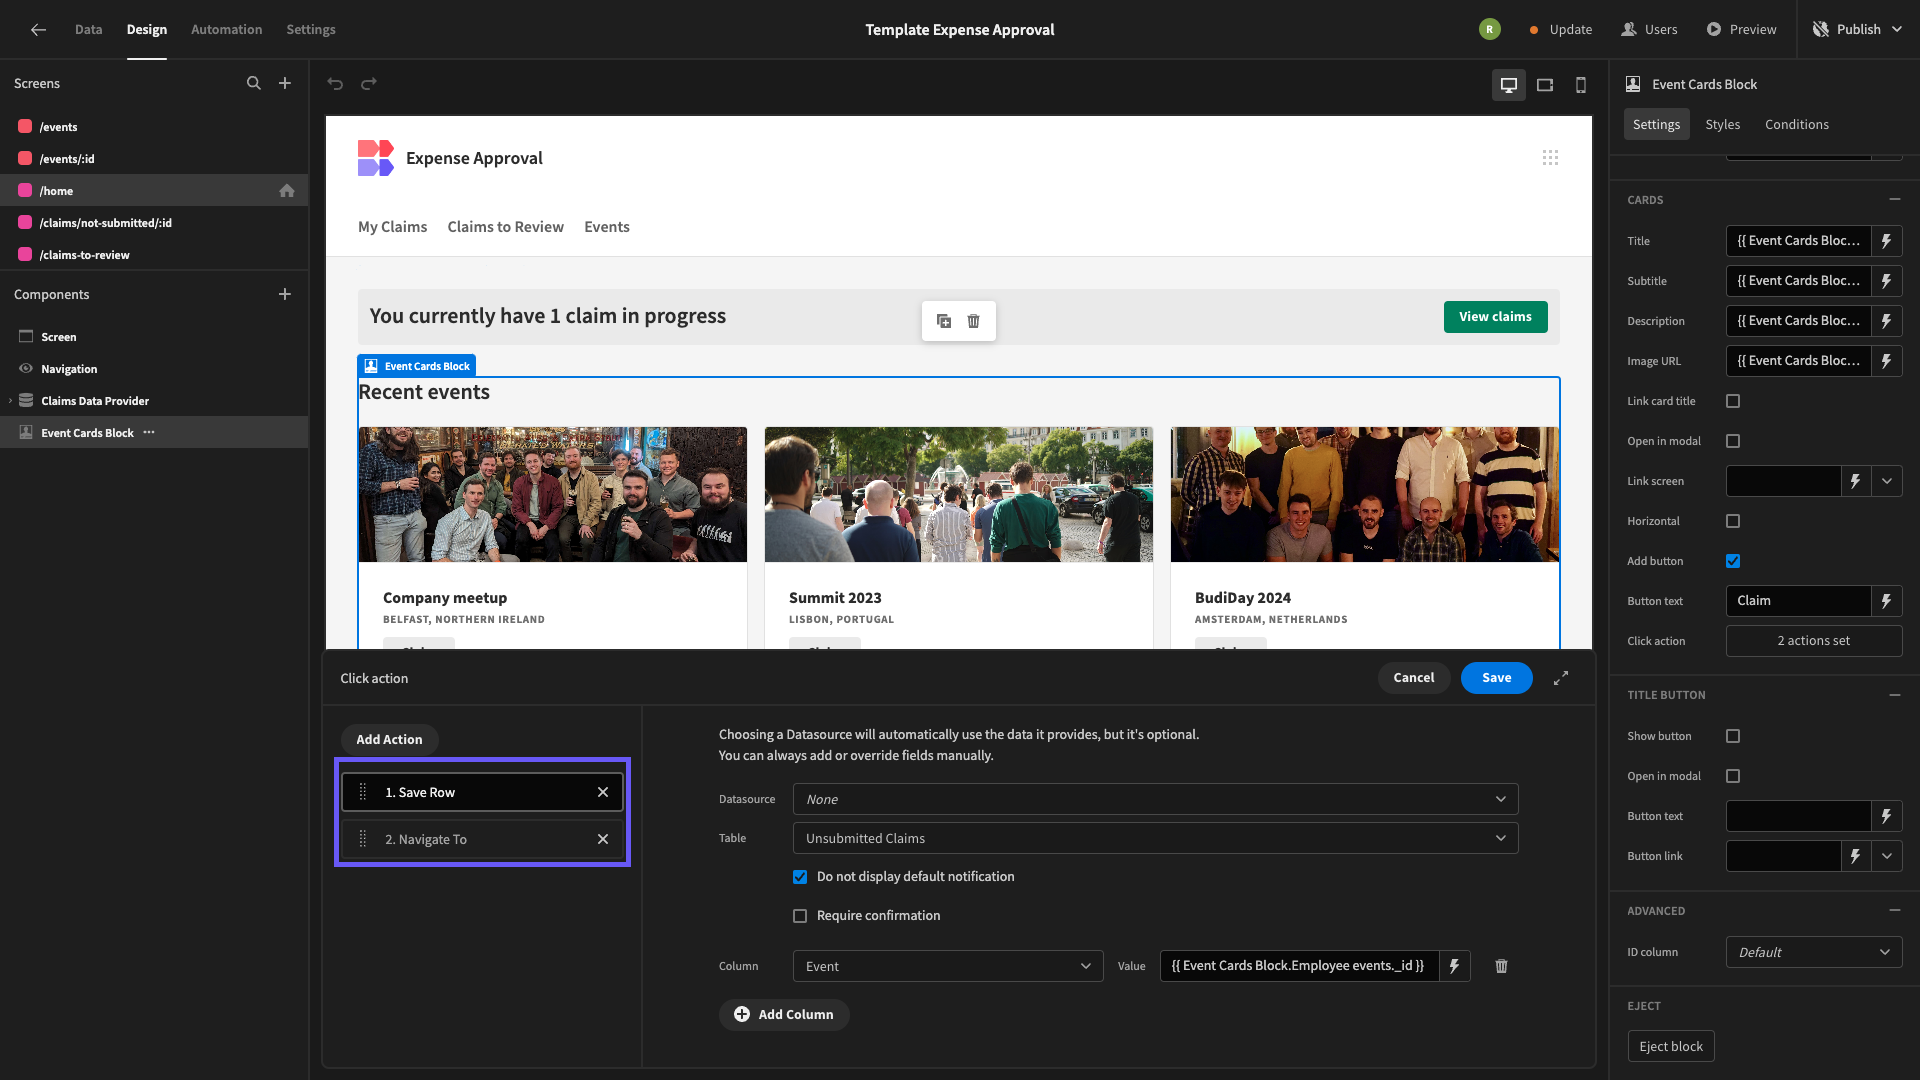
We’ve created a home page as an initial screen for all Employee users. This allows them to navigate to expensible events. From here, they can navigate to a form where they can start logging itemised expenses.
When they click this, a new Expense row is created for the Employee to start populating with related Items.
Employees can also access a a screen for viewing their previous submissions. This features two tables - one displaying all of their submitted claims and the other for claims that are currently in review.
Take a look at our documentation on working with data in design to learn more about how this works.
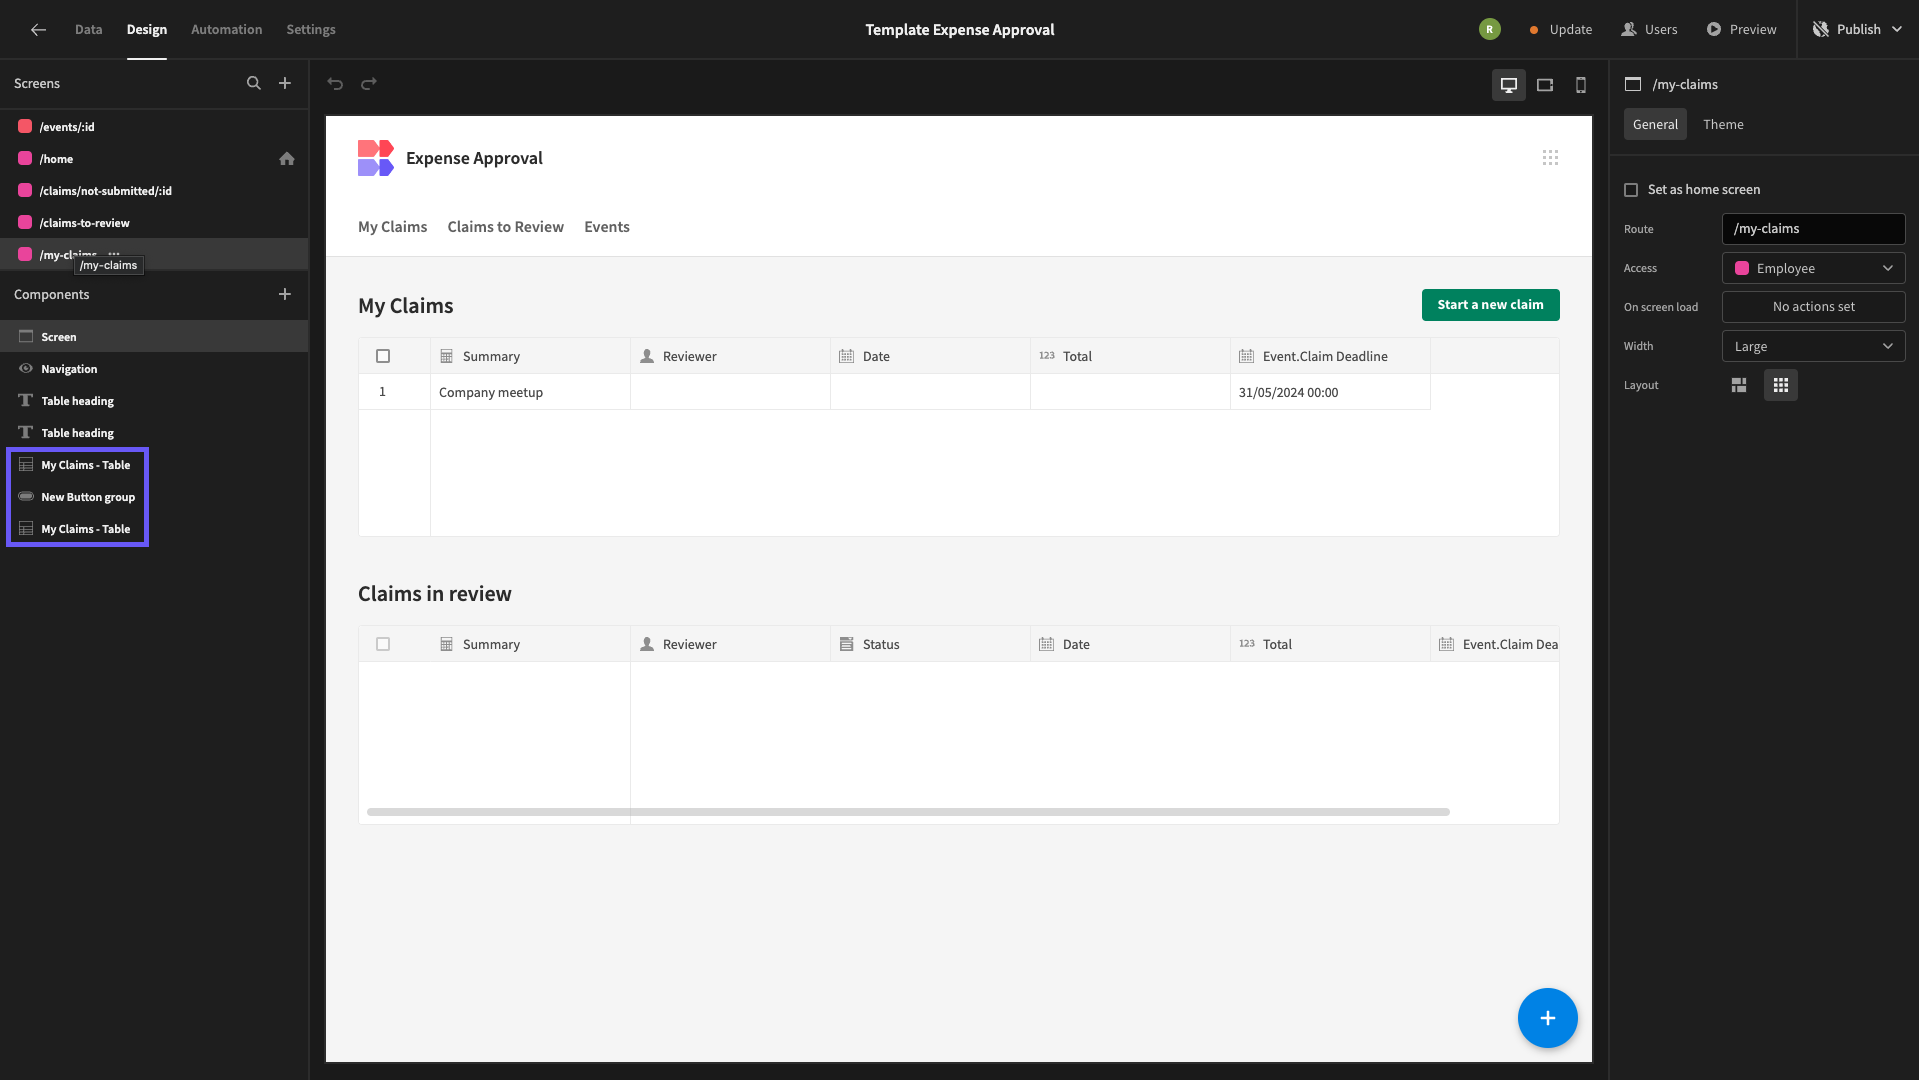
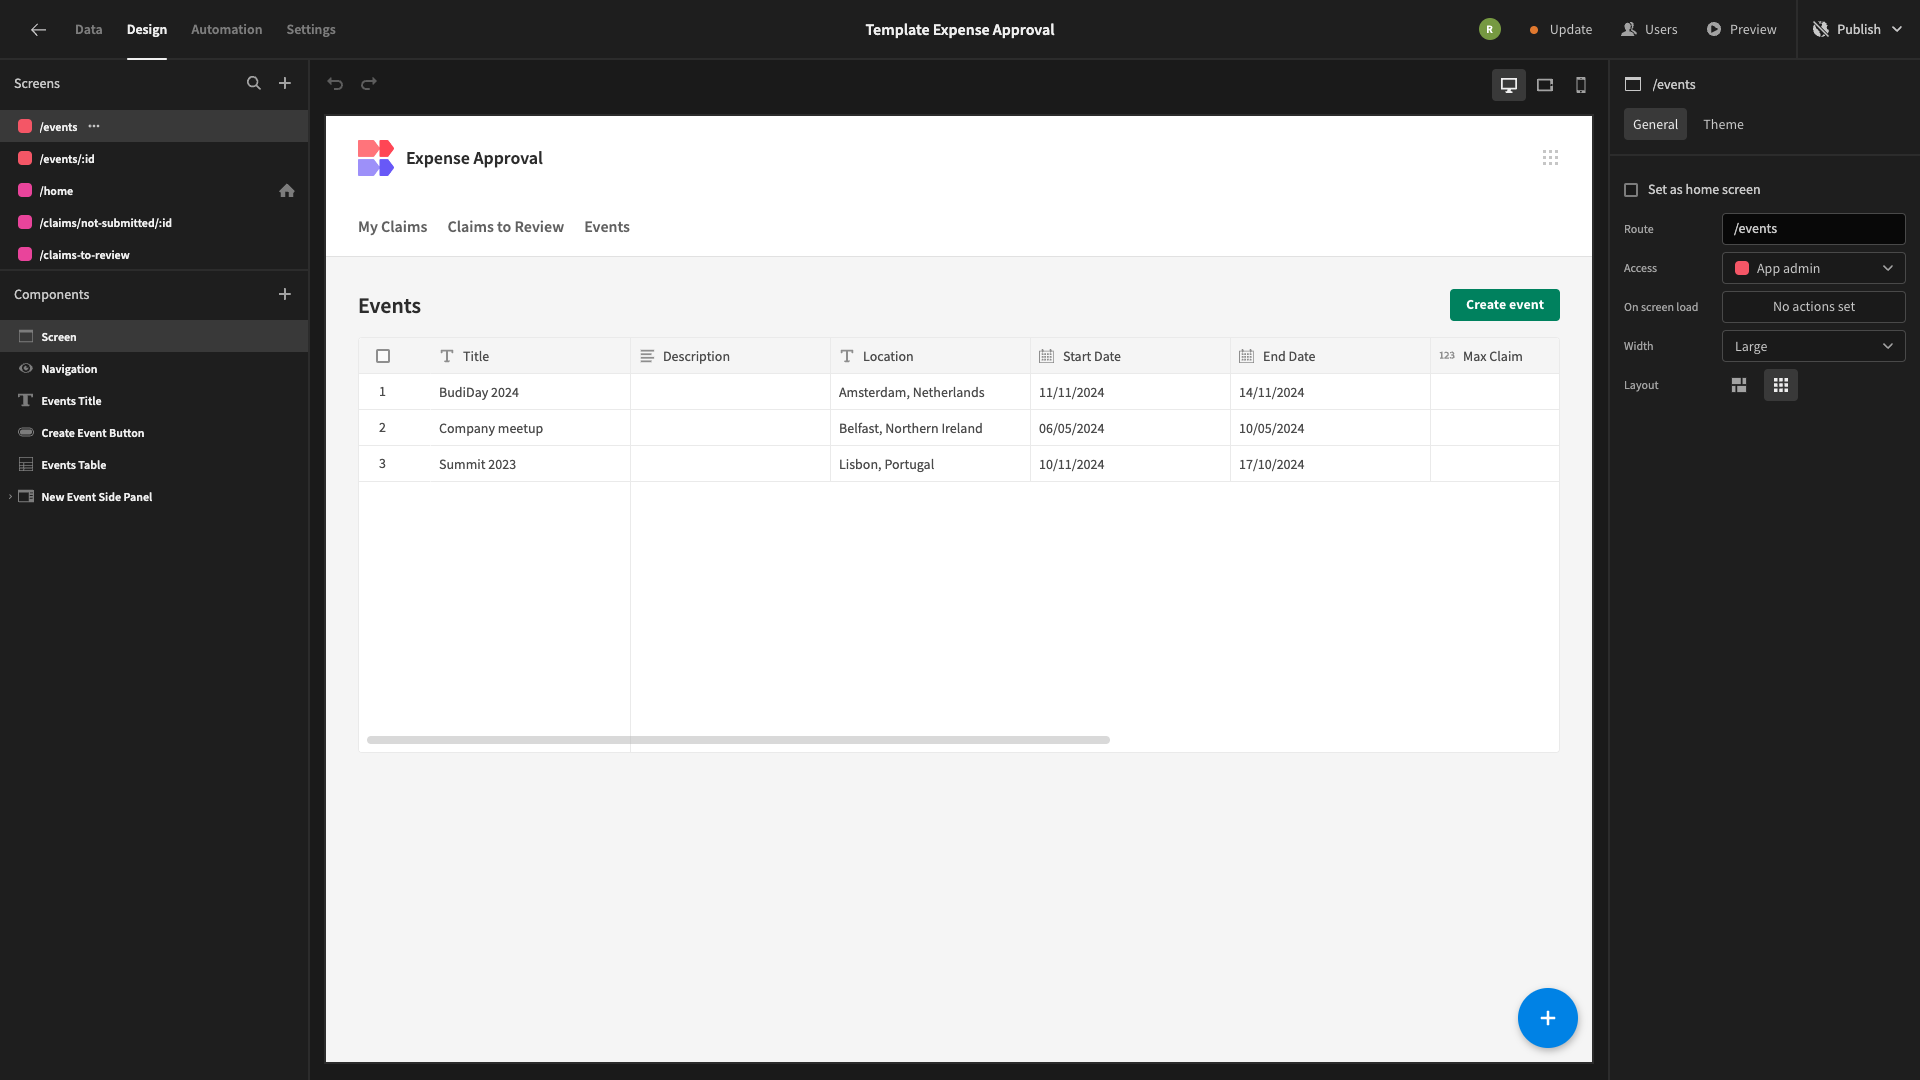
App Admins can access a dedicated CRUD screen for creating, viewing, and editing Events.
Managers are able to view the details of submitted claims and either approve or reject them using Row Actions, as we’ll see in the following section.
Automations
Our app relies on automations for carrying out user actions in a controlled manner, including to create, approve, cancel, and reject claims. Take a look at our automation docs to learn more about automating workflows in Budibase.
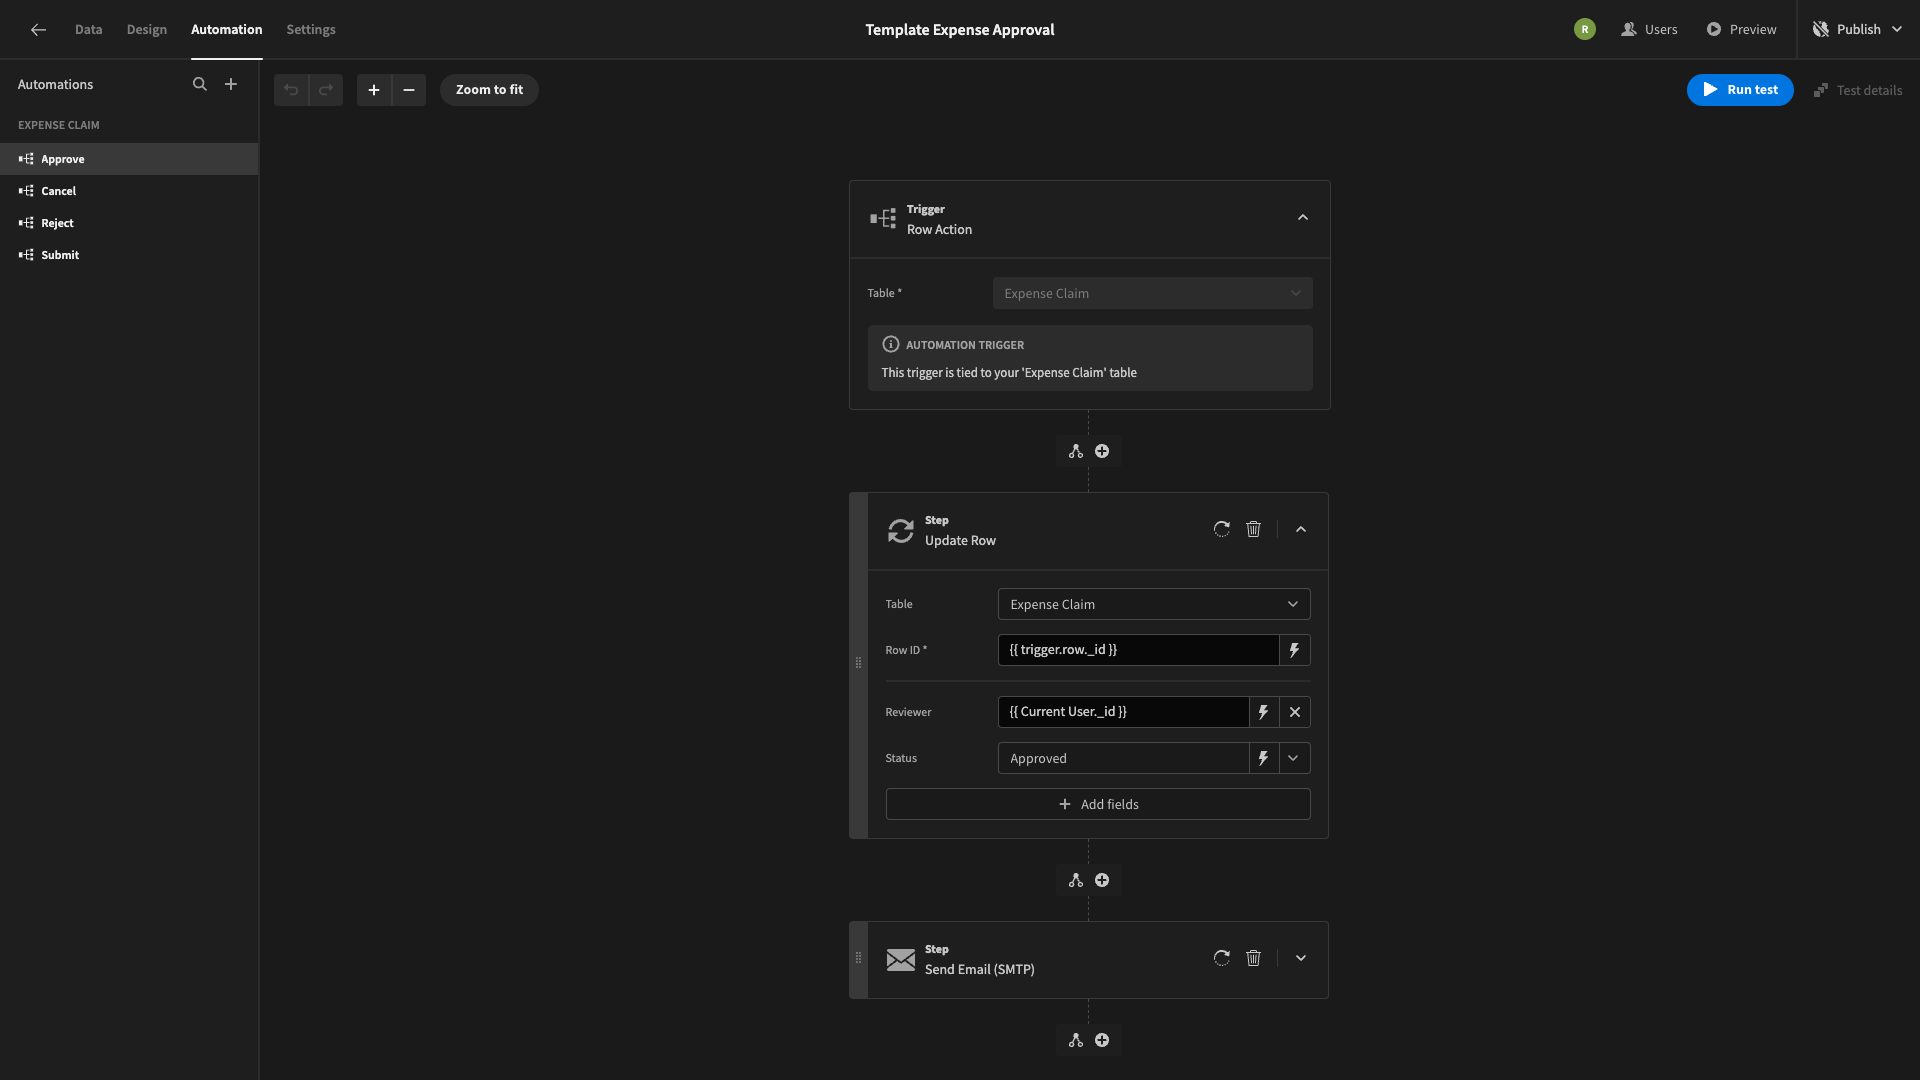
The majority of these are created using Row Actions. These are user-triggerable automations that relate to a specific row in one of our tables or Views.
Our Employees can trigger two automations. The first of these, Submit, triggers when a user submits their claim, setting the Date to the current timestamp and the Status to Submitted.
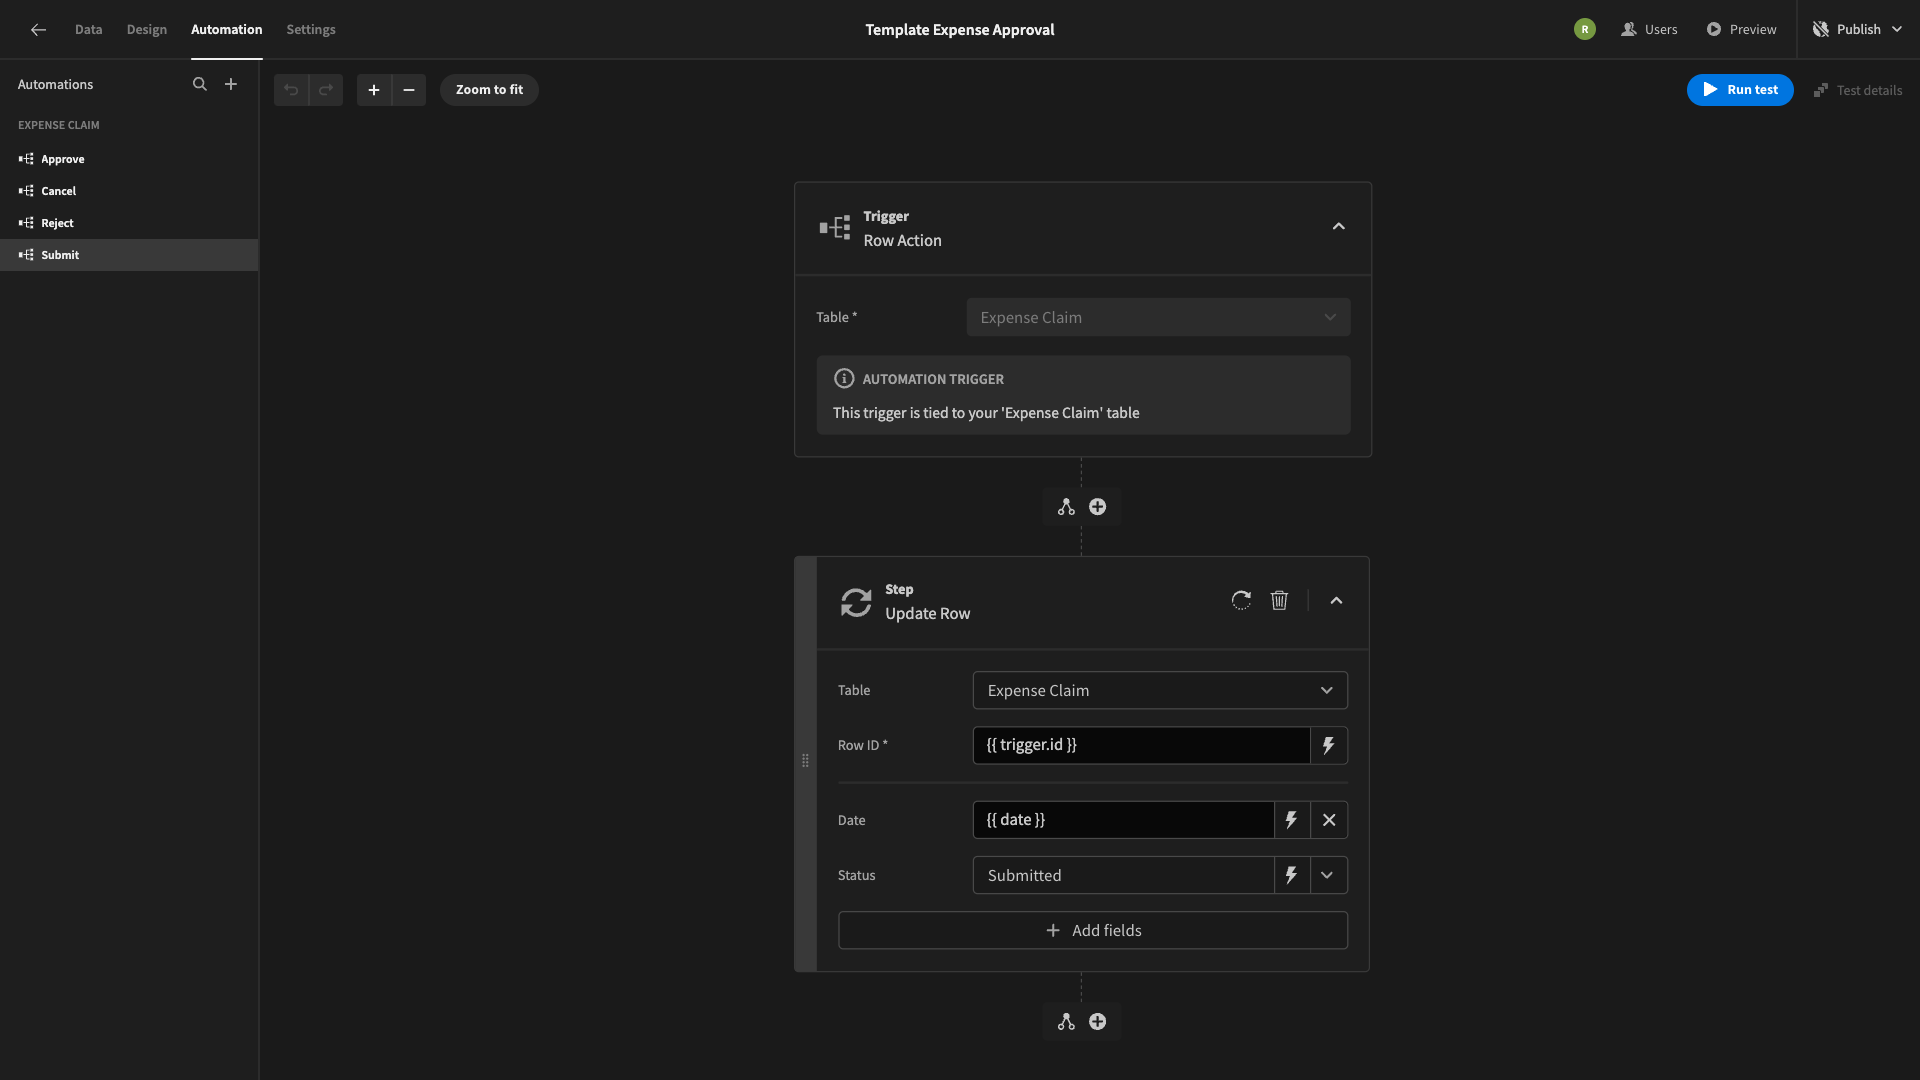
The other attributes, including the linked Expense Items, are then populated with a Save Row button action on the form UI itself.
Employees can also trigger a Row Action called Cancel. With a button push, they can update the Status of their claim to Cancelled, removing it from the review process without deleting the original record.
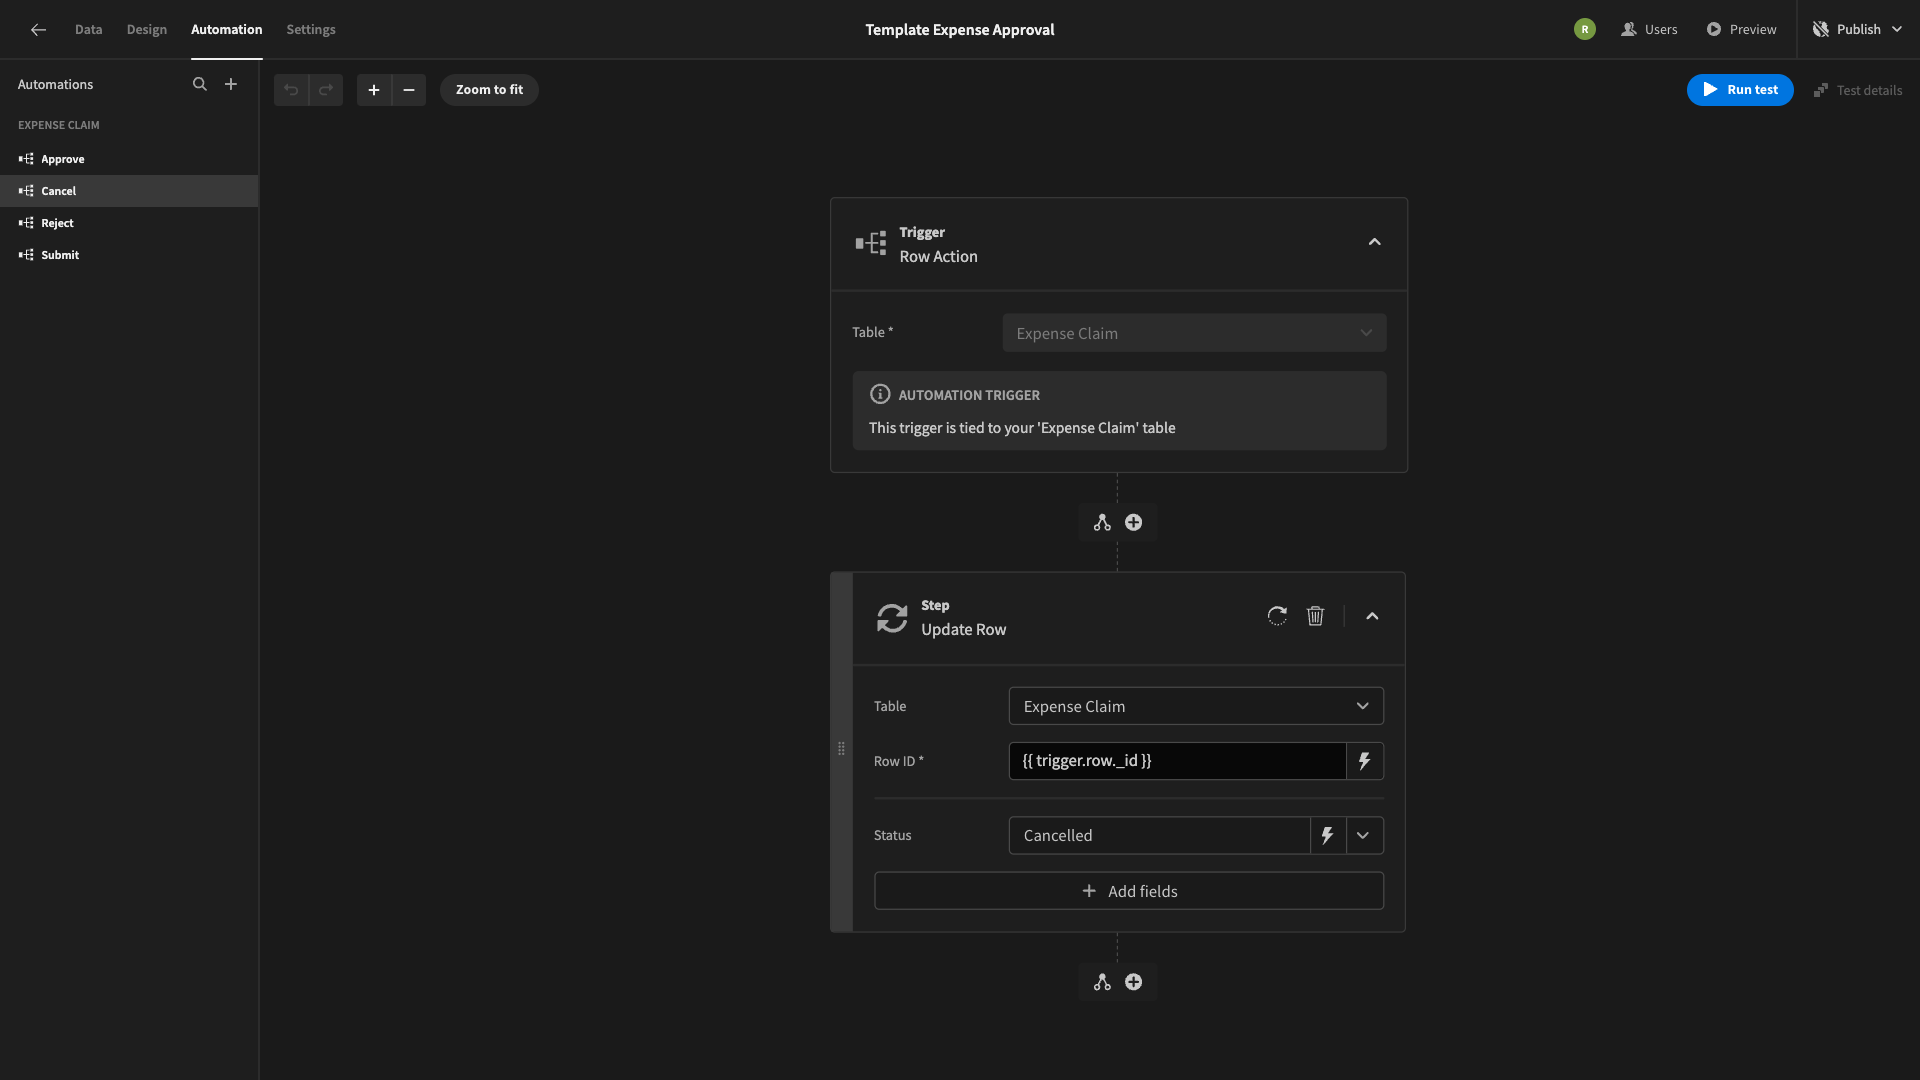
Managers also use Row Actions to respond to claims. Depending on whether they hit Approve or Reject, the Status is updated to Approved or Rejected. Then, the original requestor is emailed, notifying them.
Customising our change request template
Budibase templates offer fully functional solutions for key use cases. However, they’re also intended as a basis for further customisation, enabling you to quickly create apps with your own data and business logic.
Let’s check out some of the key modifications you might want to make to our expense approval template.
Updating the data model
The Data section is the core of the app-building experience in Budibase. As we said earlier, our application is built on top of three tables within BudibaseDB. We can modify this by either swapping in an external database or making changes to our existing one.
To connect to an external database, we’d need to recreate our internal DB’s views and access rules before swapping the existing UIs and automations for your new data.
Alternatively, we can alter the schema of our existing tables using the Data section’s spreadsheet-like interface.
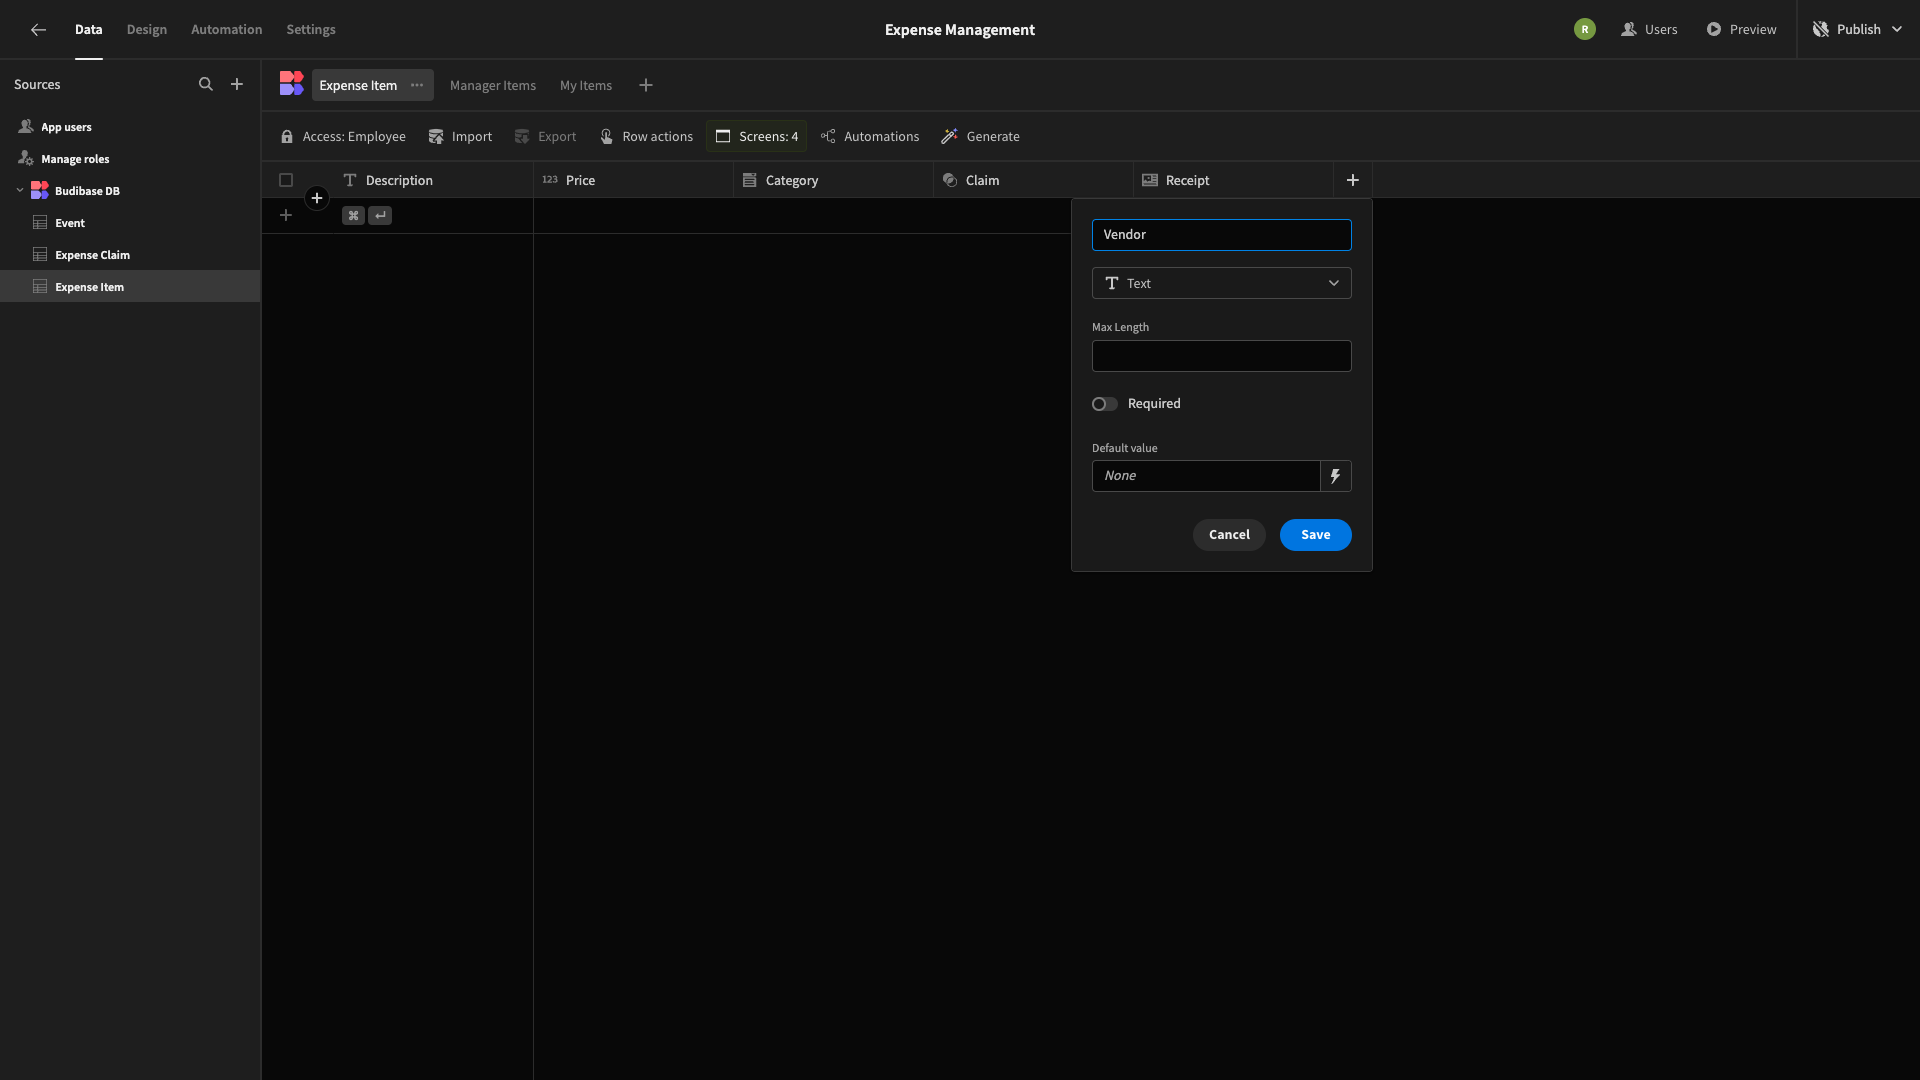
Say we wanted to add a new Text column to our Expense Items table, to store the Vendor, for more detailed records. We could do so using the Plus icon.
Adding and altering user roles
User permissions for both accessing data and carrying out actions on it are also configured within the Data section. Another key way we can modify our template is by altering this, including adding or removing roles, or updating the permissions granted to existing ones.
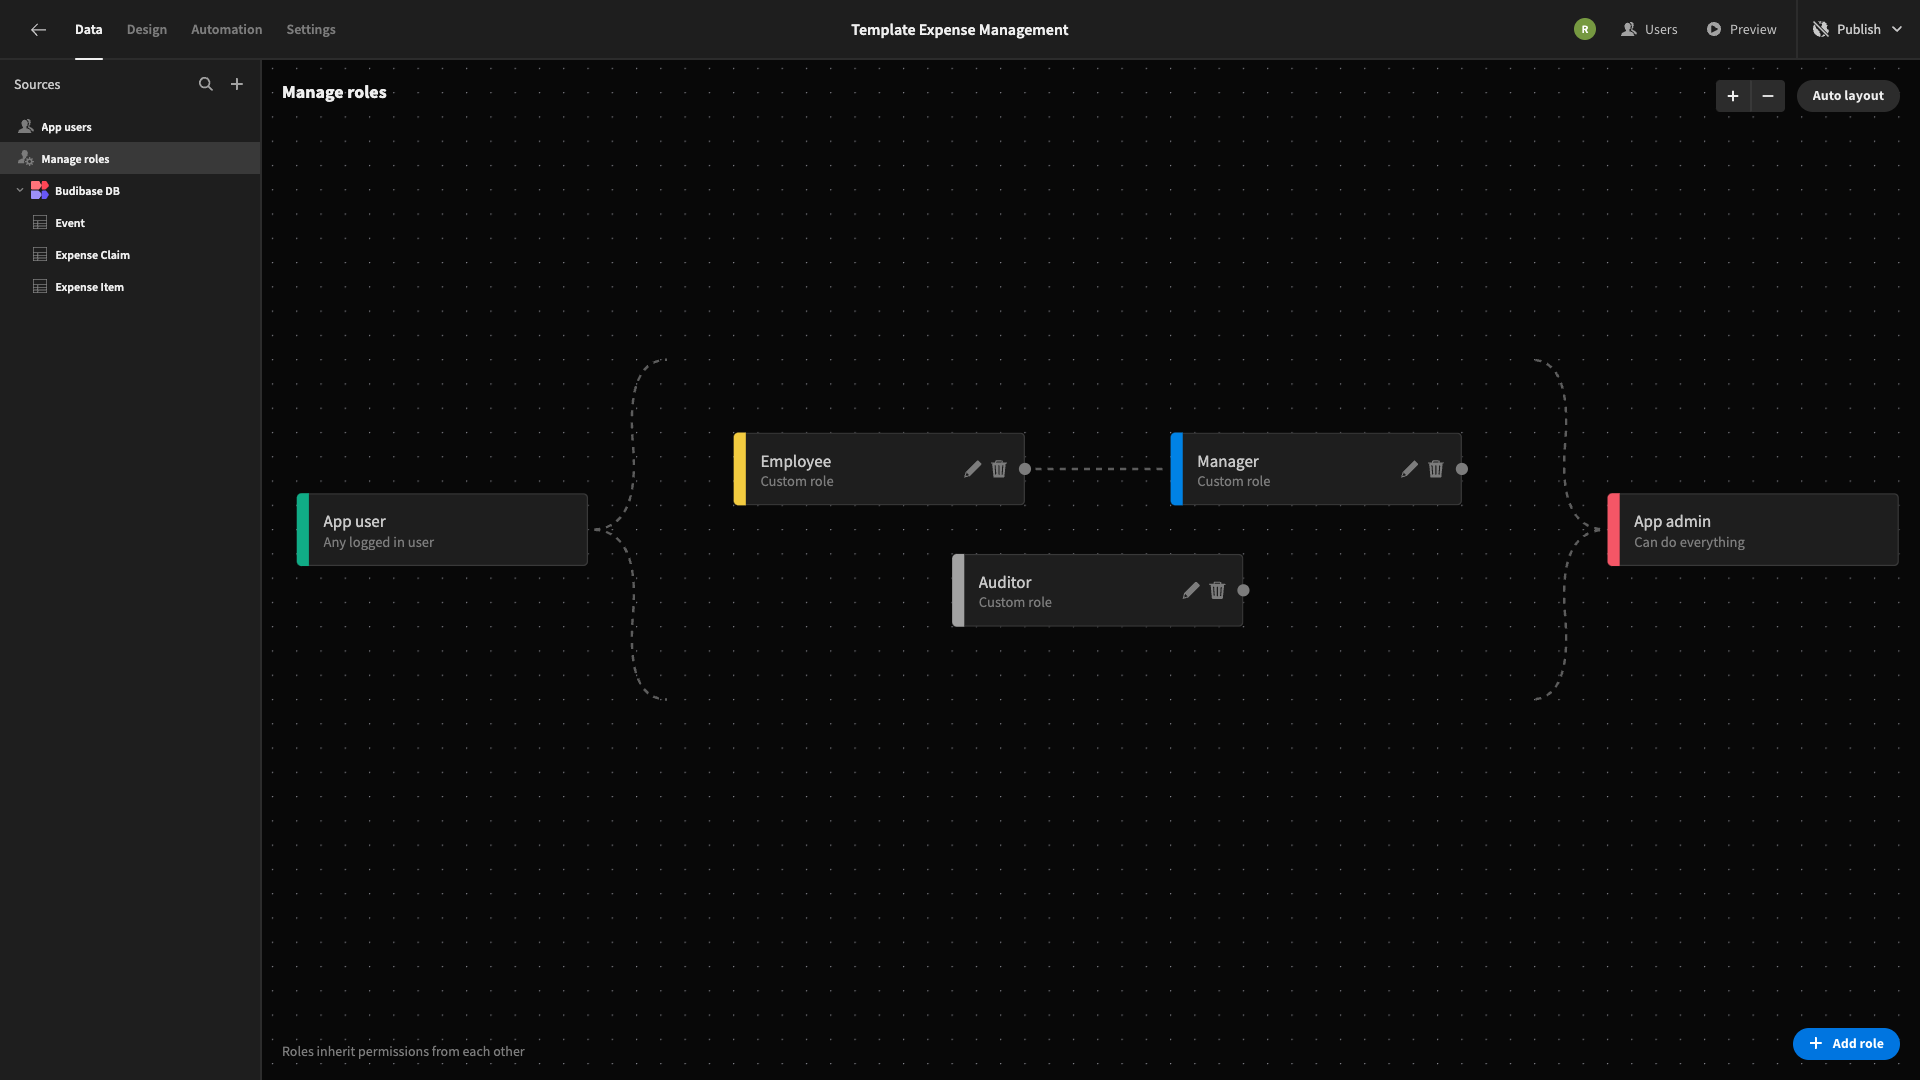
We can add entirely new roles under Manage Roles. Budibase offers branching inheritance for custom roles within a visual editor. So, we can create hierarchical roles, as well as ones with entirely separate permissions.
For instance, we might want to create an Auditor role that has Read-Only access across all data, but no Write permissions for any of our tables.
To achieve this, we’d create a parallel branch of permissions.
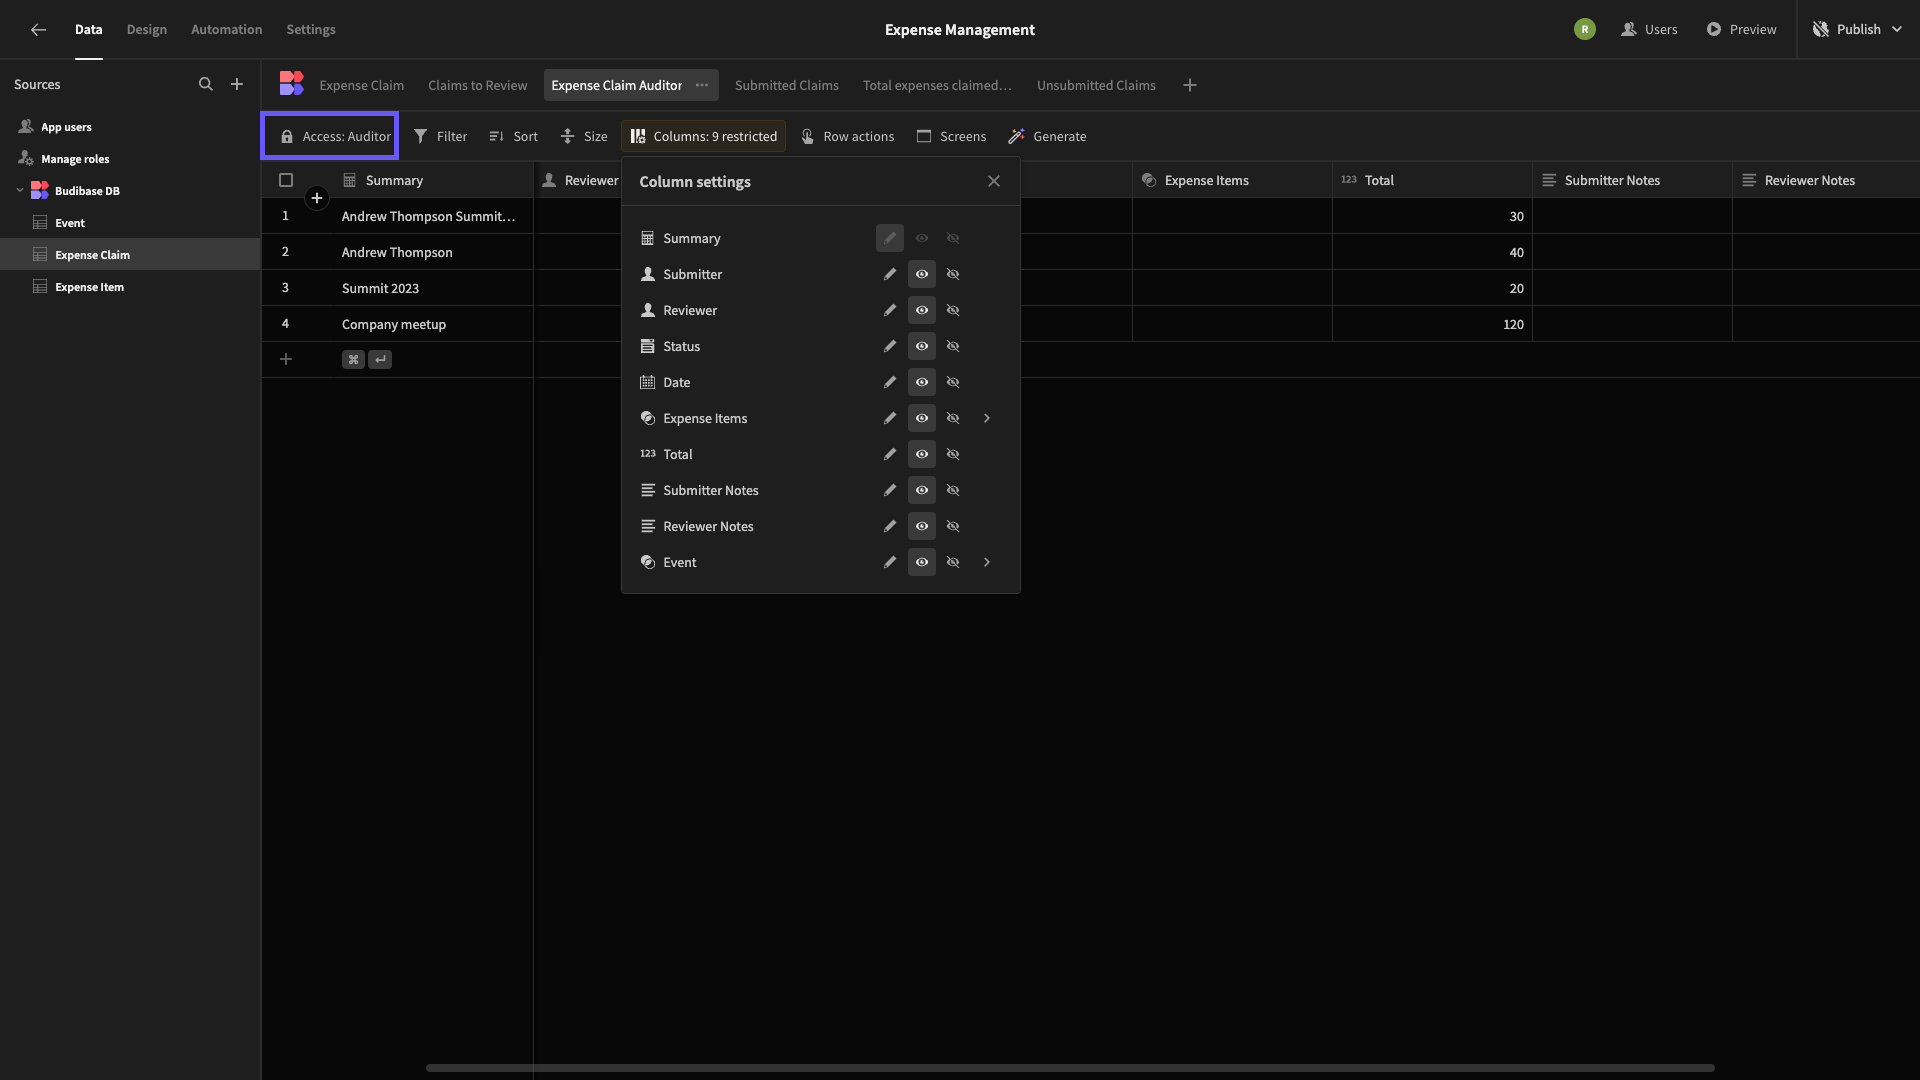
We’d then need to create Auditor Views of our data tables and assign read-only access to all attributes under the Columns tab.
Adding extra screens
We can also modify our template by altering its UIs. We can add or remove screens or make adjustments to the components on existing ones.
Let’s carry on with our example of providing Read-Only access to our Expense Claims to our new Auditor role.
From our Auditor View, we’d hit Screens to generate a table UI with side panels.
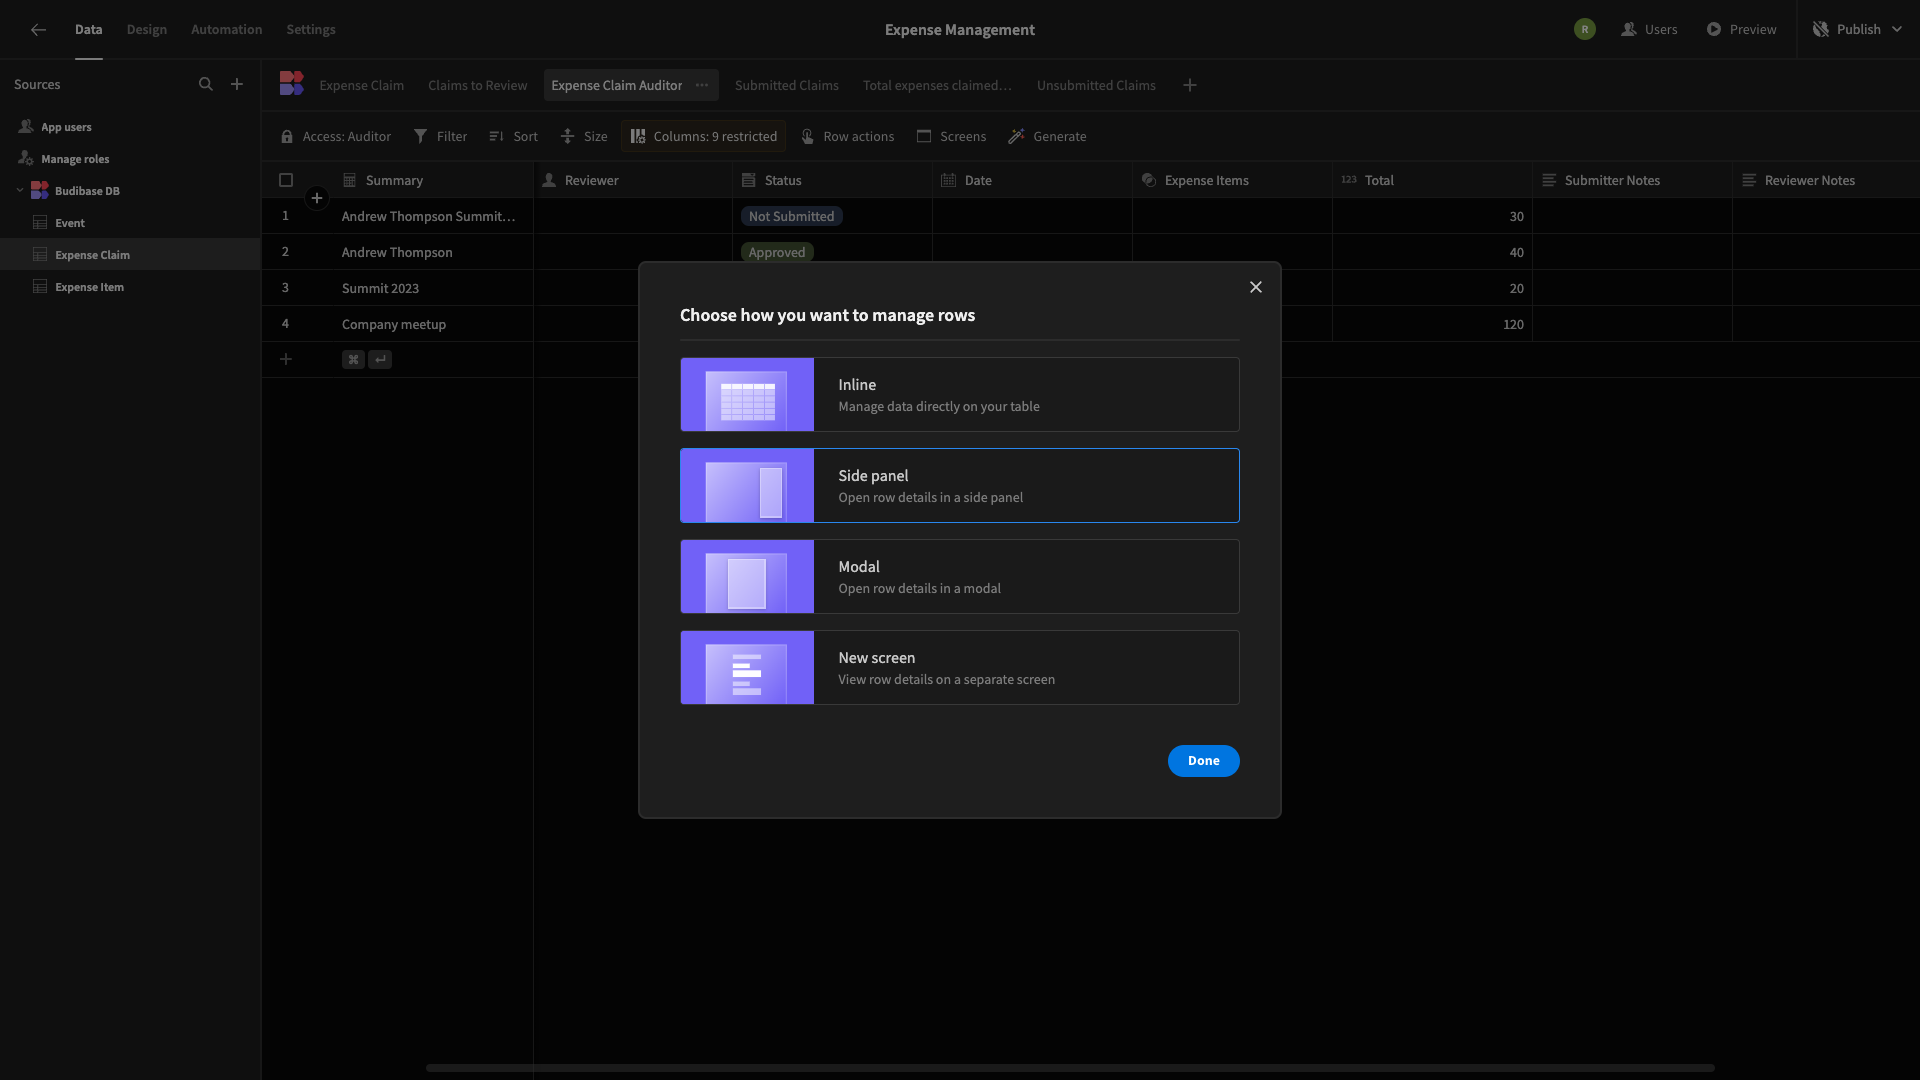
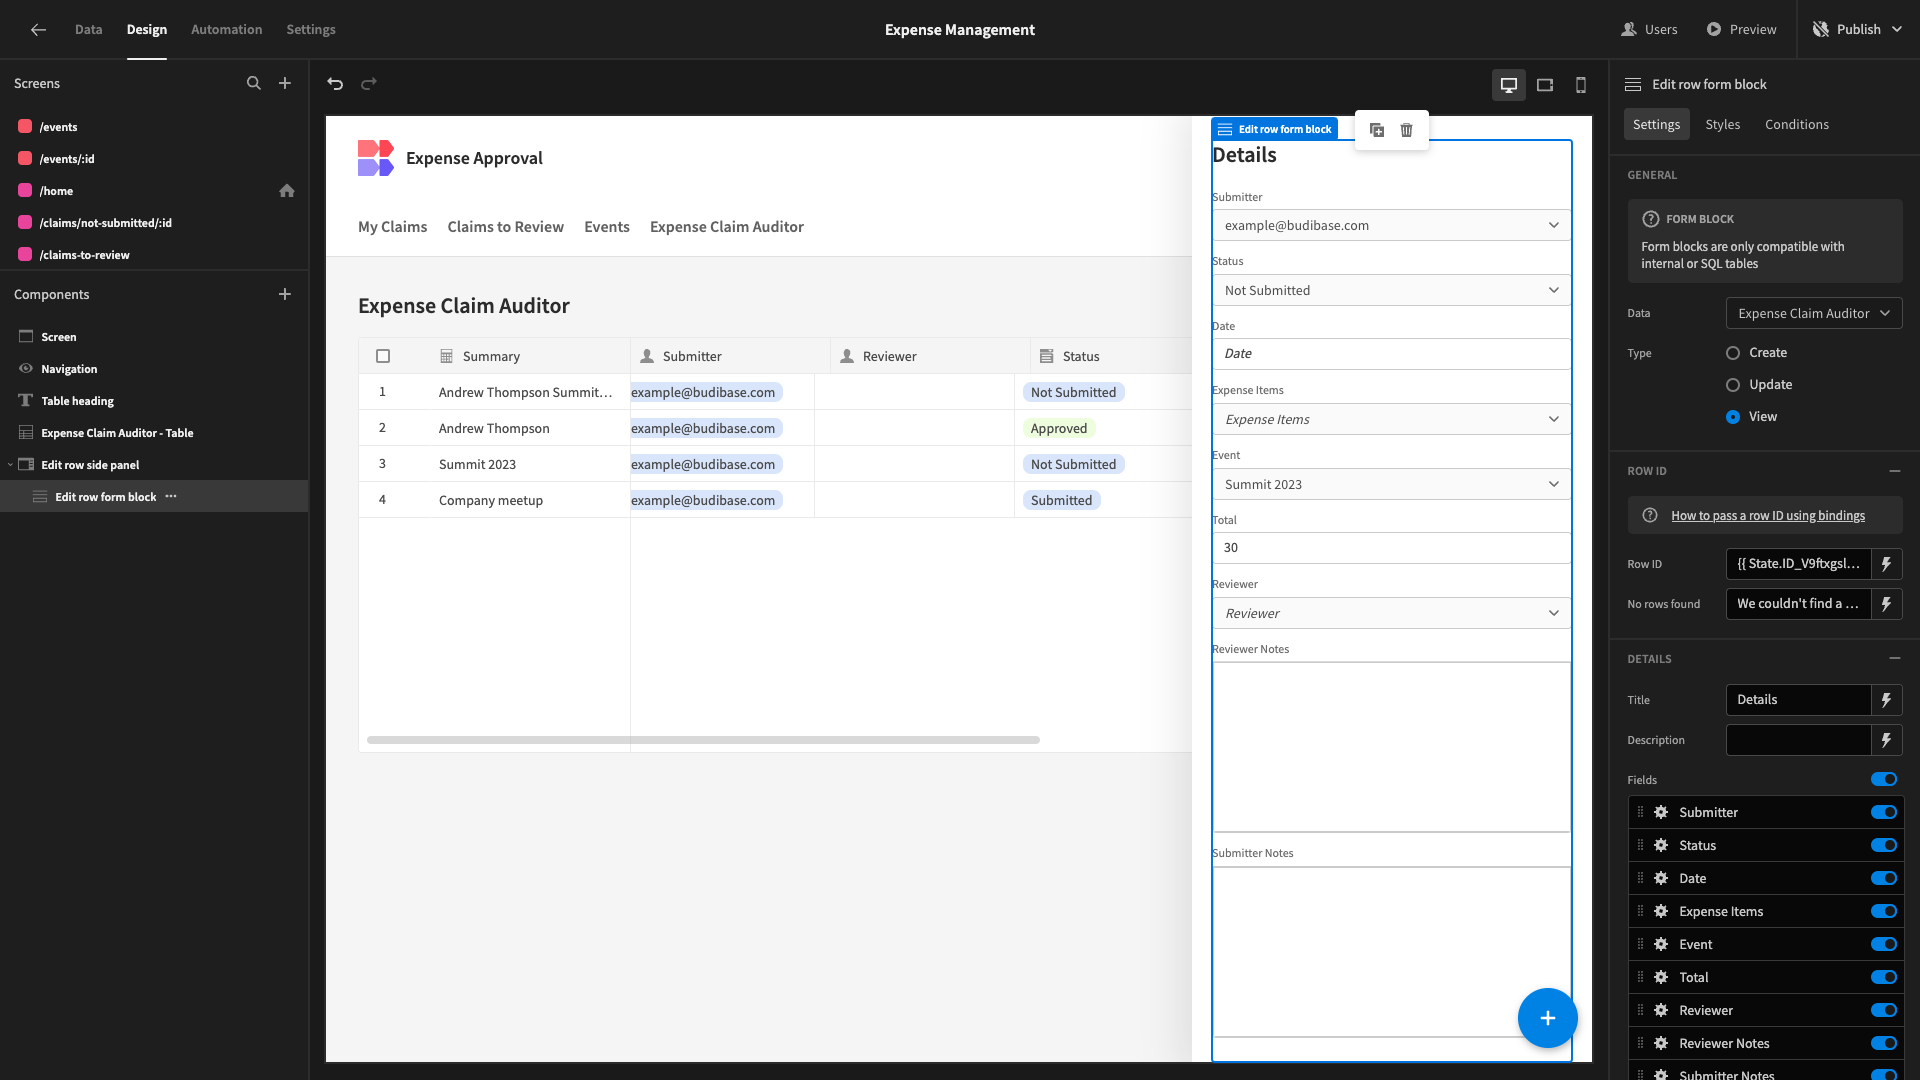
Then, all we need to do is make a few tweaks to the screen that’s outputted, including removing the Create form and setting the Update form to View.
Adding your own business rules
Budibase templates are an ideal starting point for creating custom applications to enforce your own business rules while retaining our pre-built interfaces.
For example, we could provide an action to allow our auditor to flag certain submissions as suspicious.
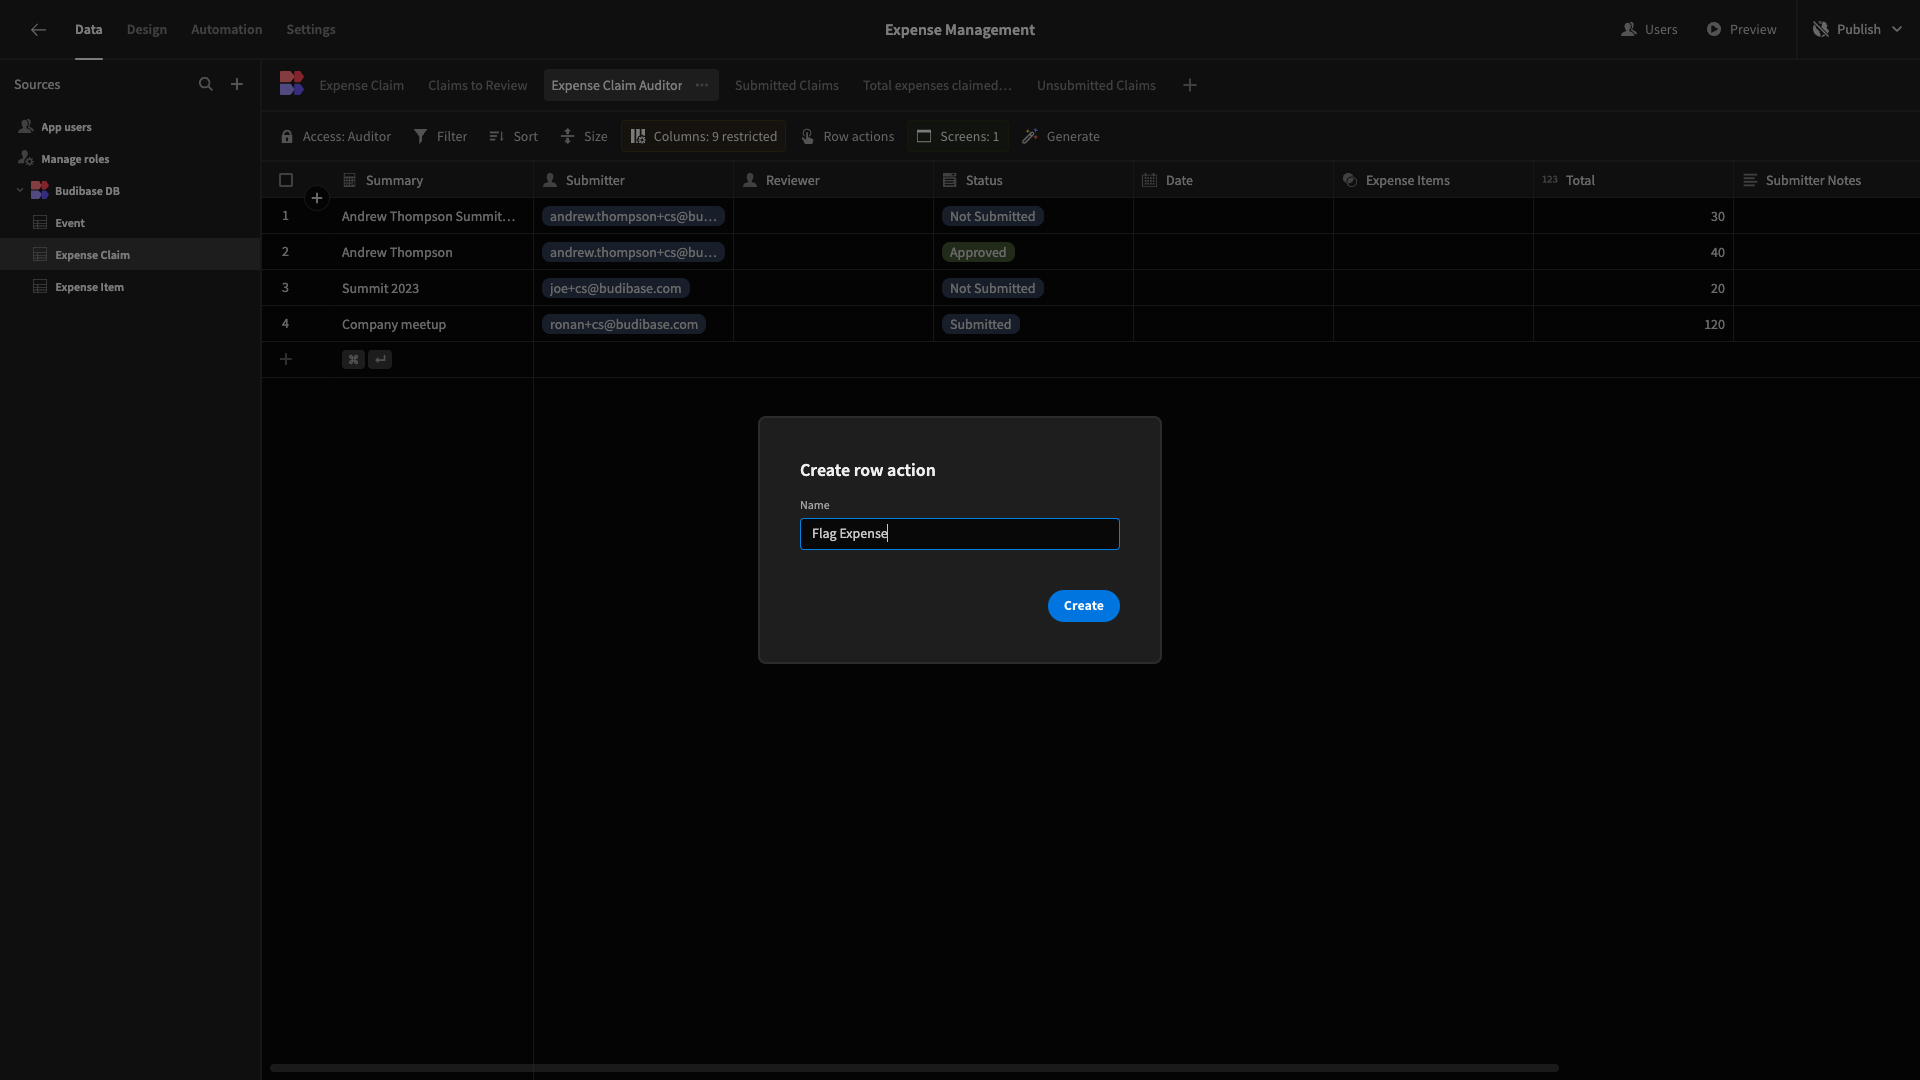
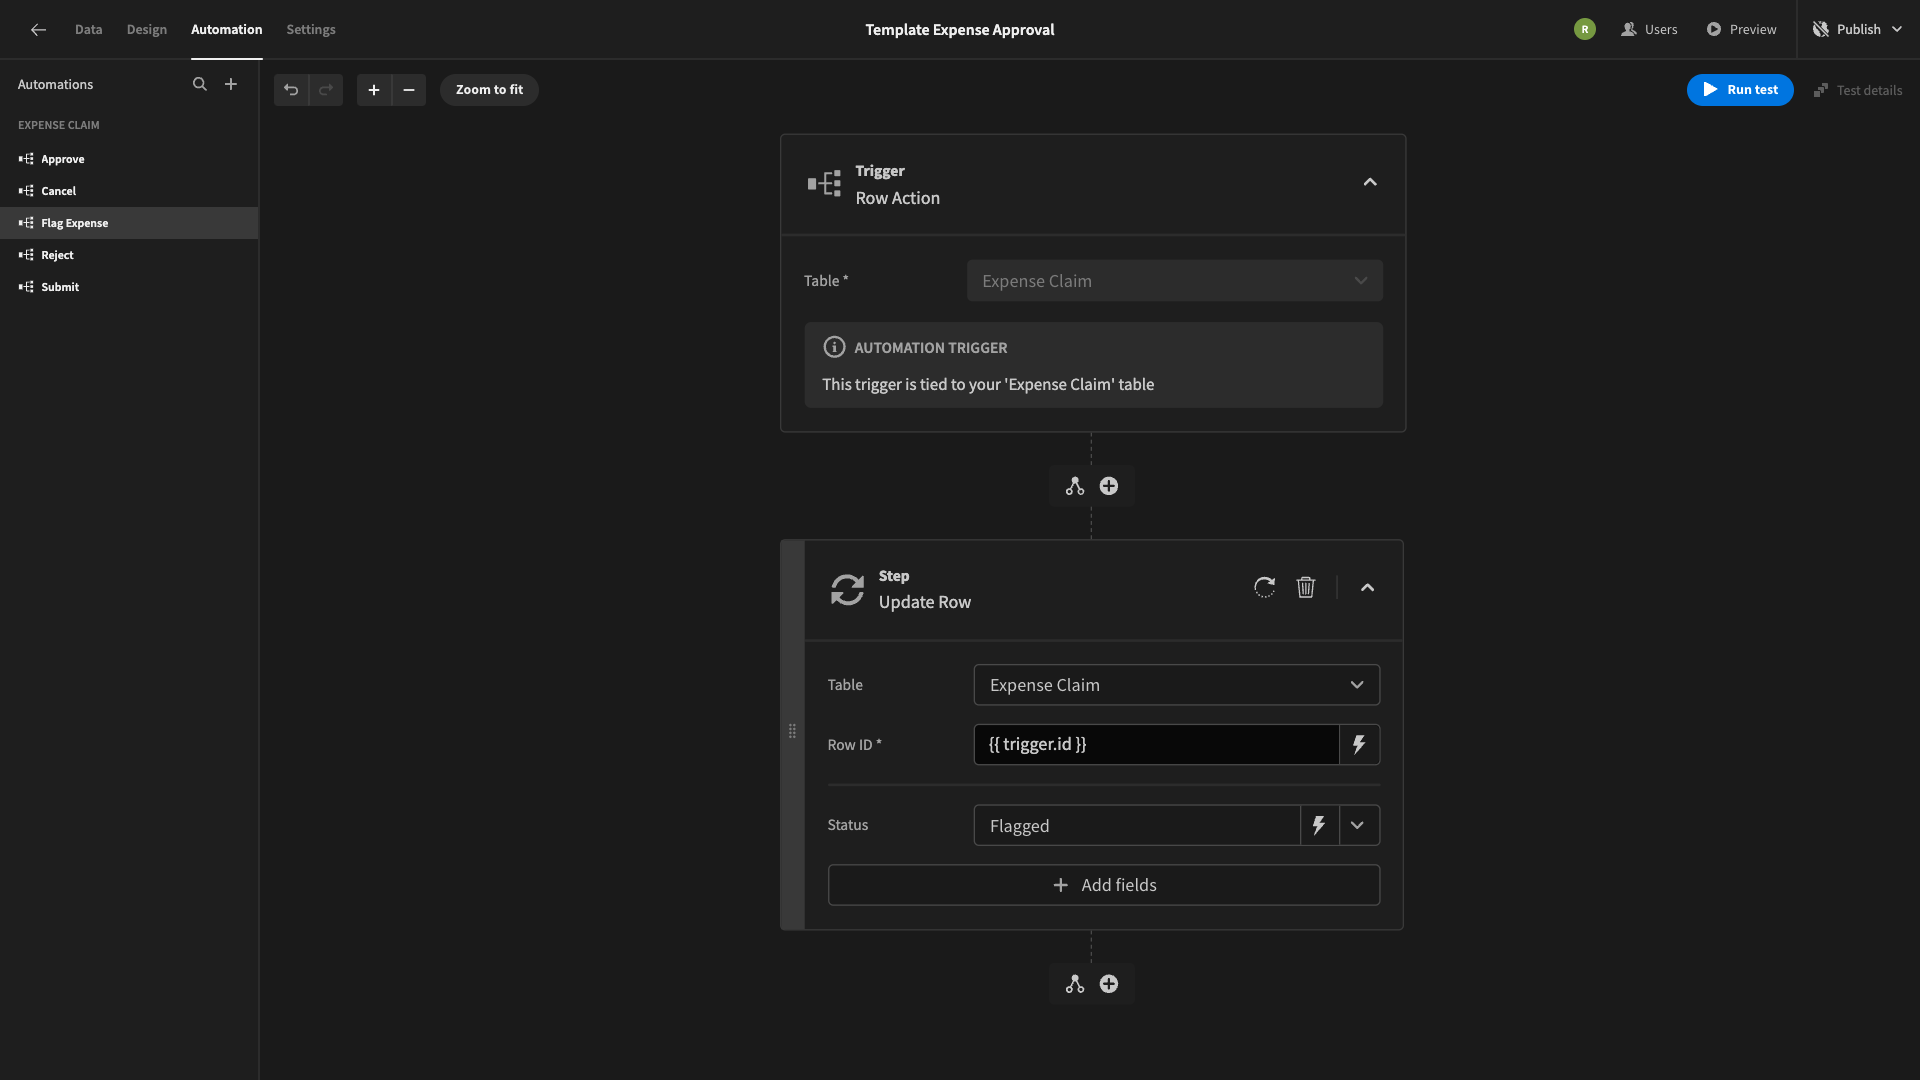
To do this, we’d start by adding a Row Action to our new Auditor View. We’ll call this Flag Expense.
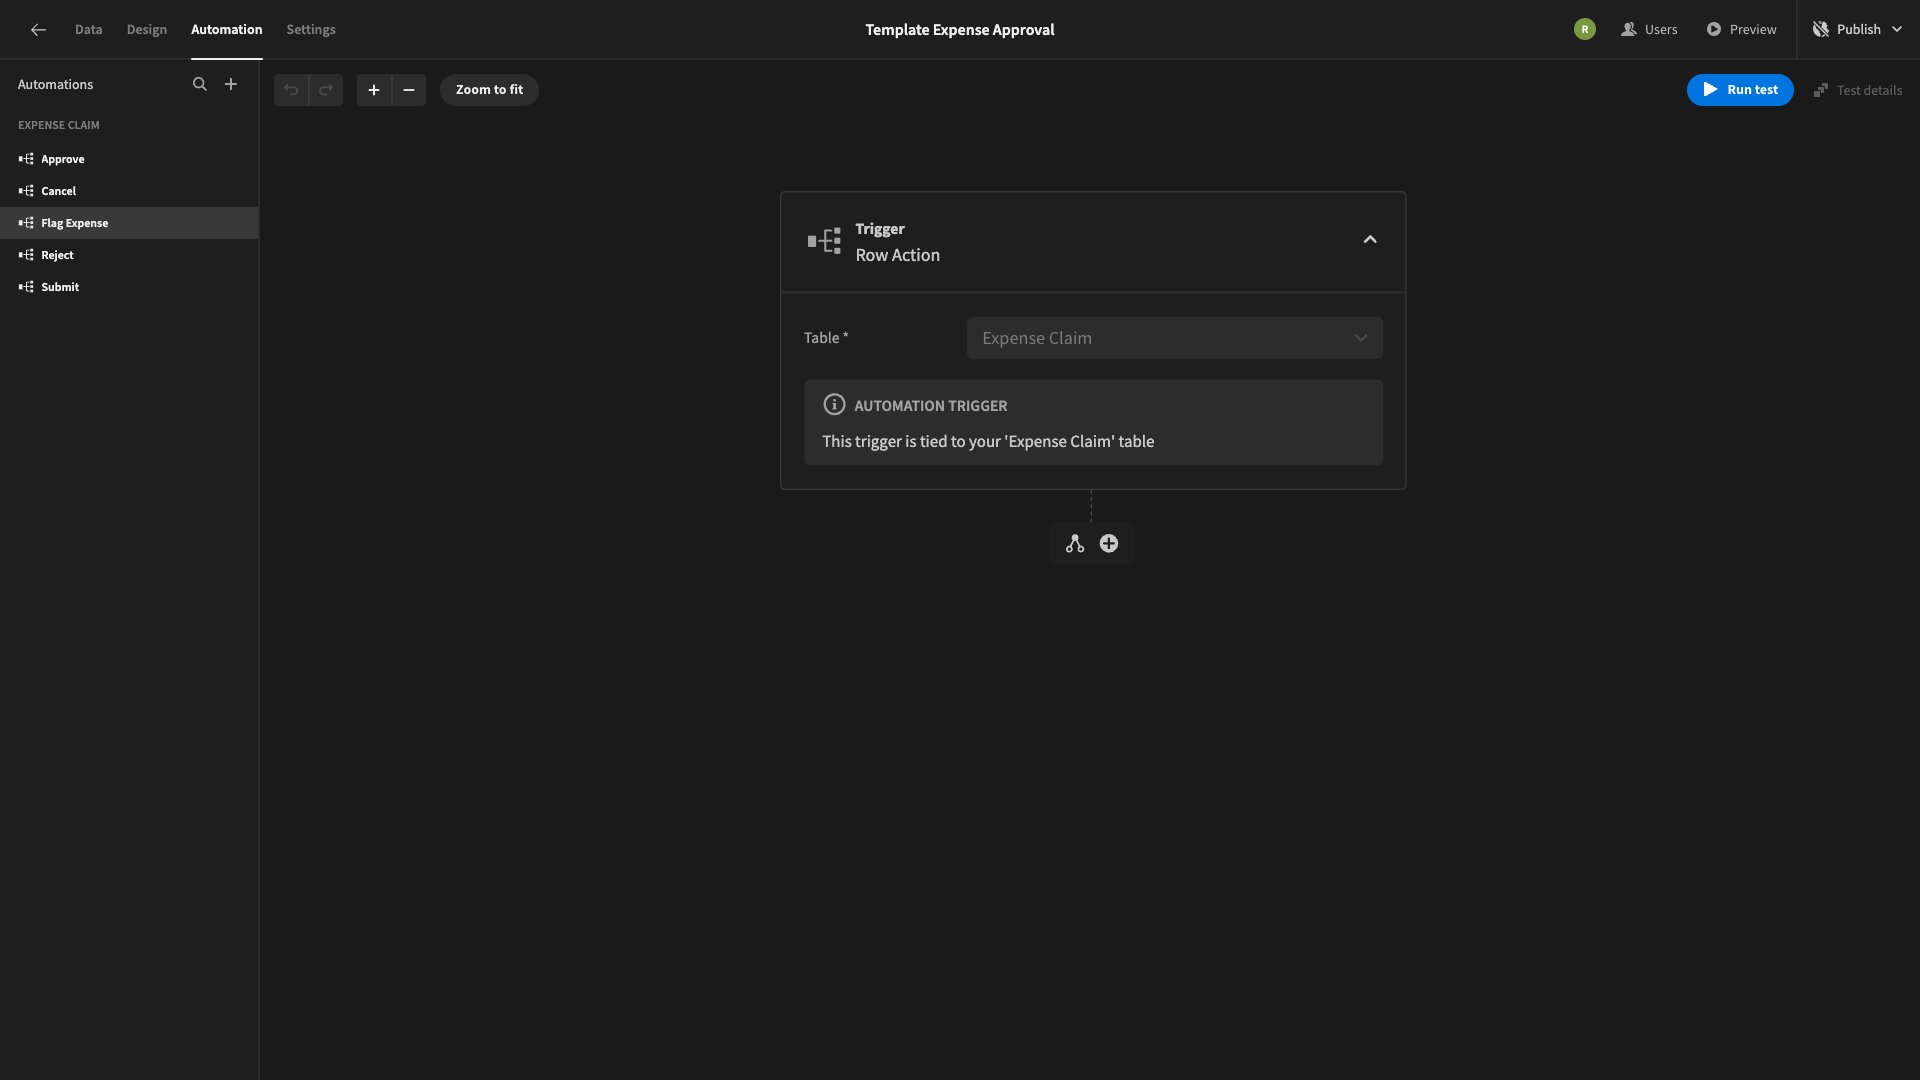
We’re then brought to the automation editor.
Back in the Data section, we’ll update the Status column on our Expense Claims table, adding an option called Flagged.
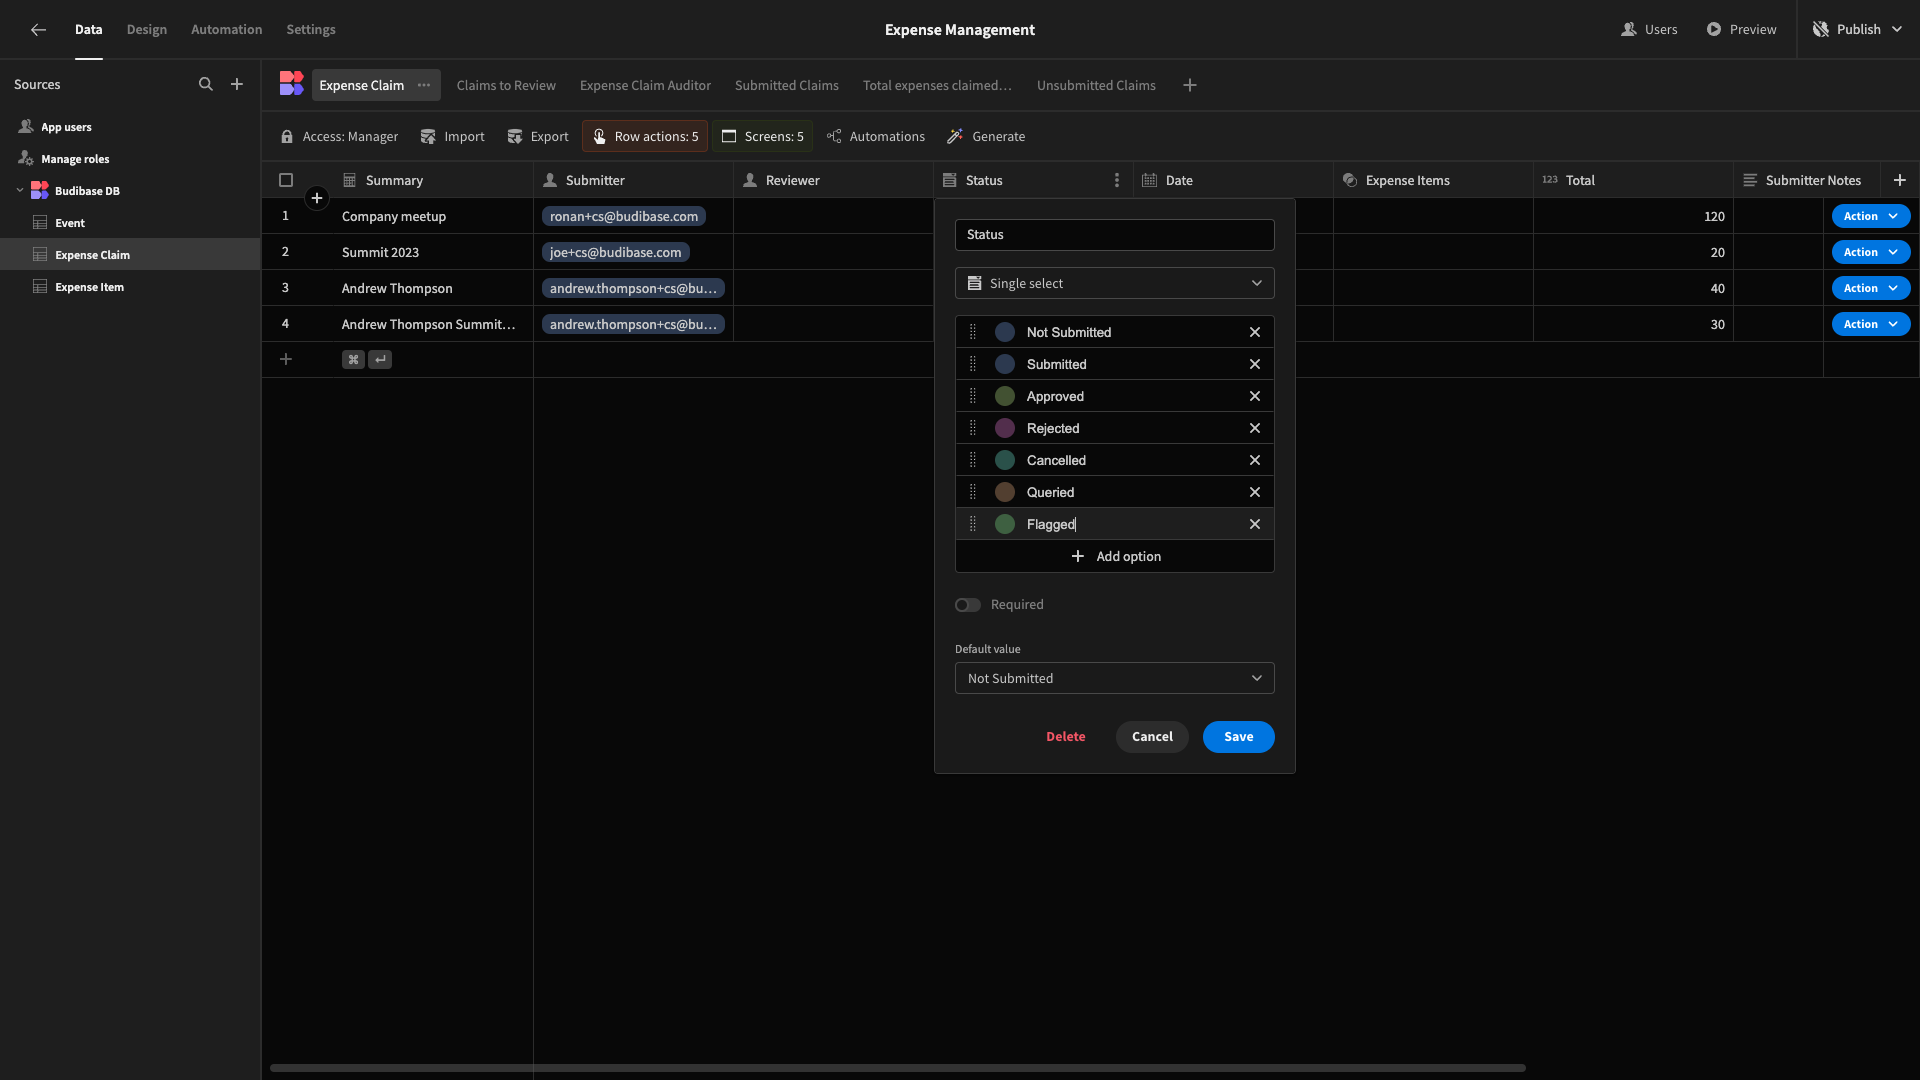
Within our Row Action, we’ll then use the same flow as our existing automation rules, only this time we’ll update the relevant row’s Status to Flagged.
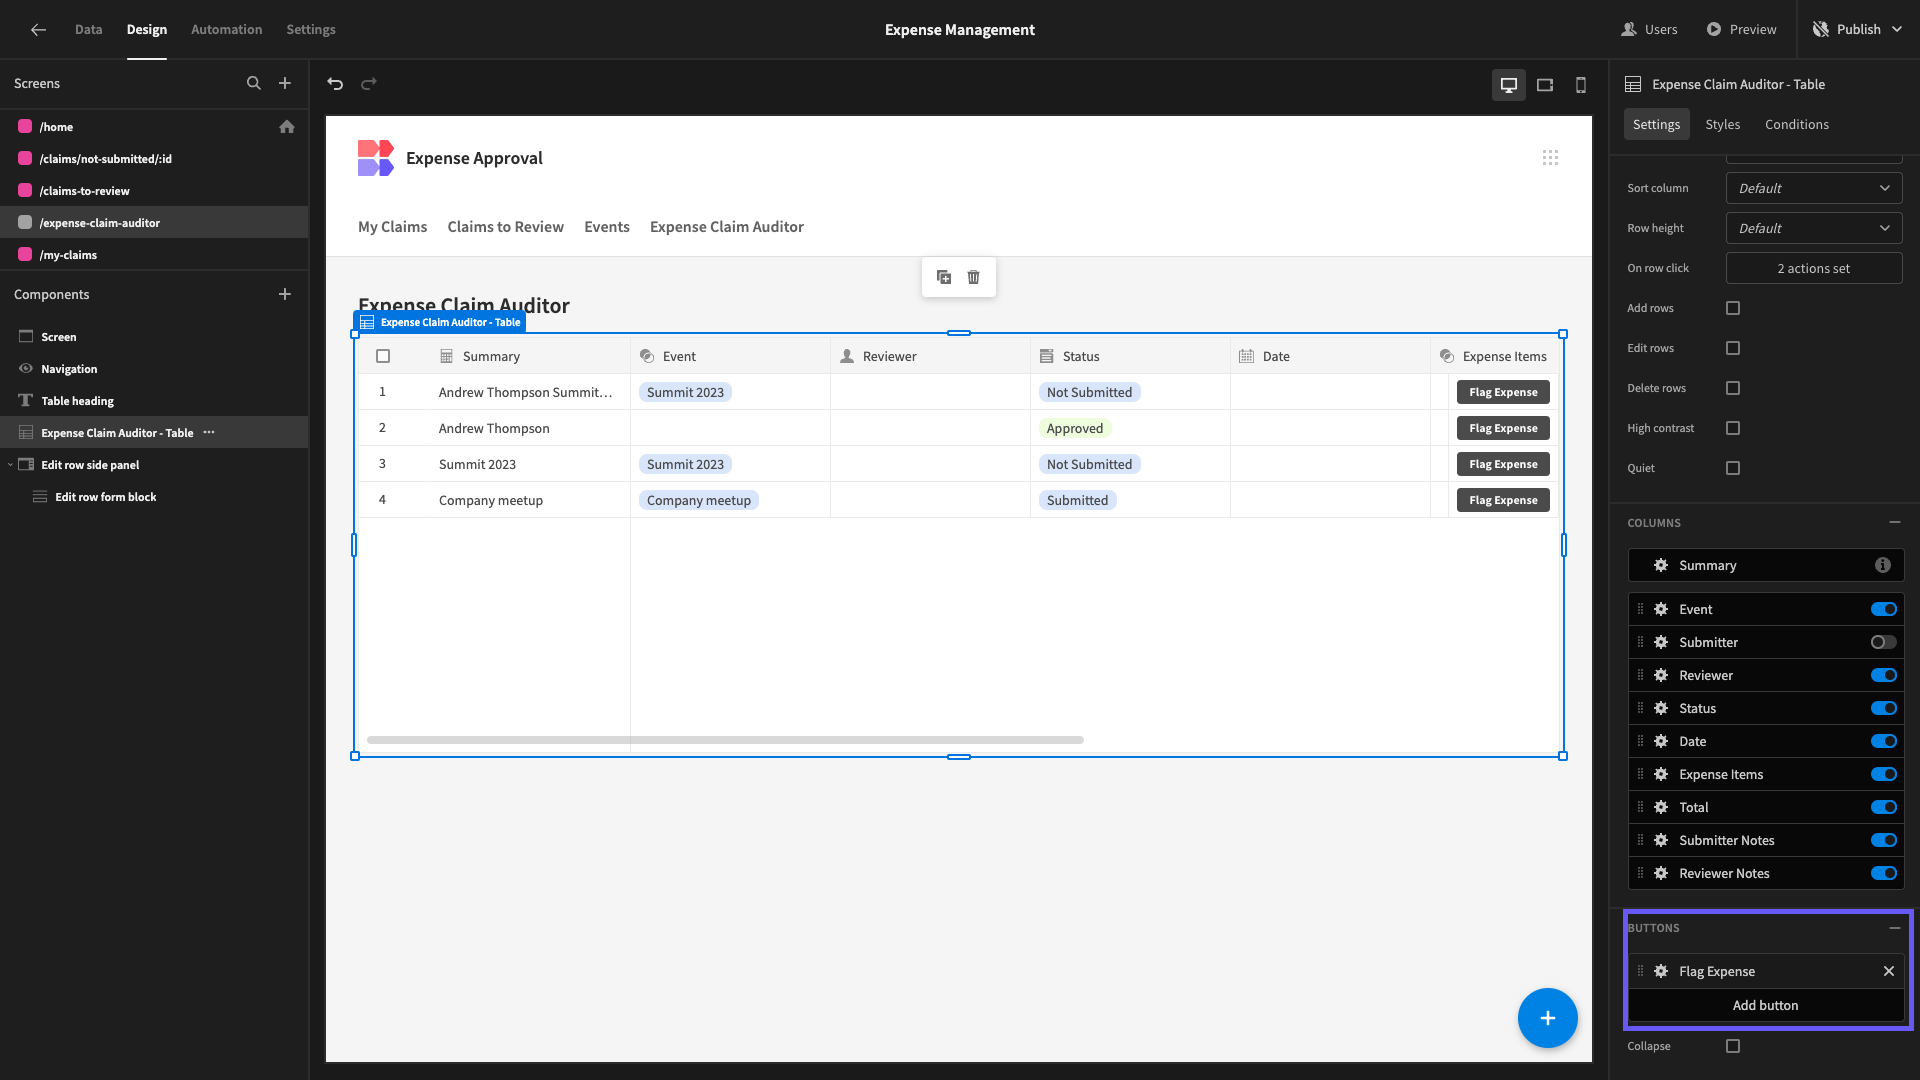
Lastly, on our new Auditor screen, we’ll add a Button to the existing Table component, allowing them to trigger our Row Action.
Updated 5 months ago