Data actions
These are data based actions; CRUD and other data manipulations.
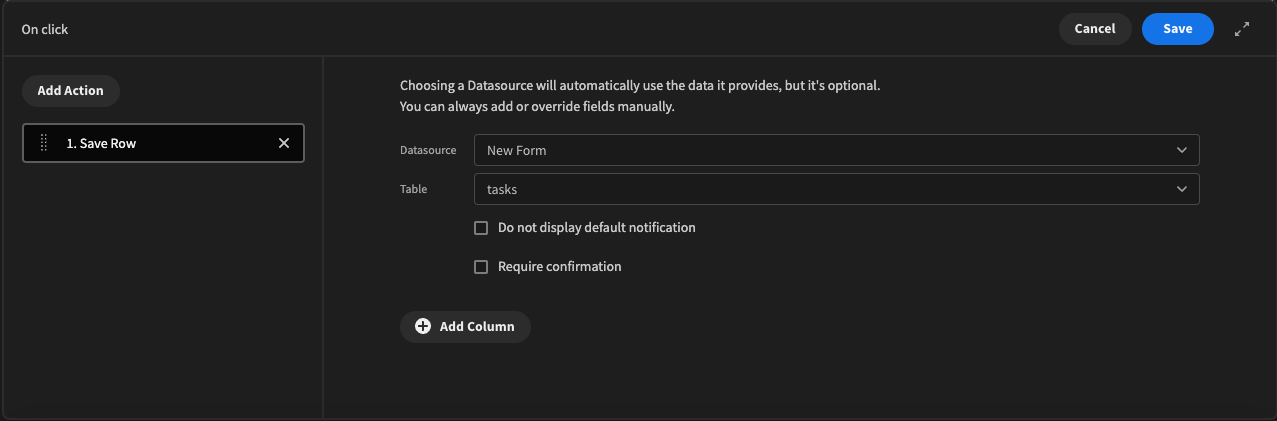
Save Row
Saving a row can mean two things: updating or adding a new row. Depending on what you want to do you will have to structure this action differently.
If you're adding, updating or viewing any row the easiest way is to add a Form Block component. Here you can choose to create, update or read, depending on your selection you will be prompted with additional fields. For update and read you will have to pass in the Row ID into the row field, this is what will be use to update the specific record back to your chosen data source. In this instance you don't have to worry about the Save Row action as it already preconfigured for you. (You can eject blocks if you want to see a good example of how the Save row action is configured). However, if you did go down the regular Form route your save row action would look something to the below.
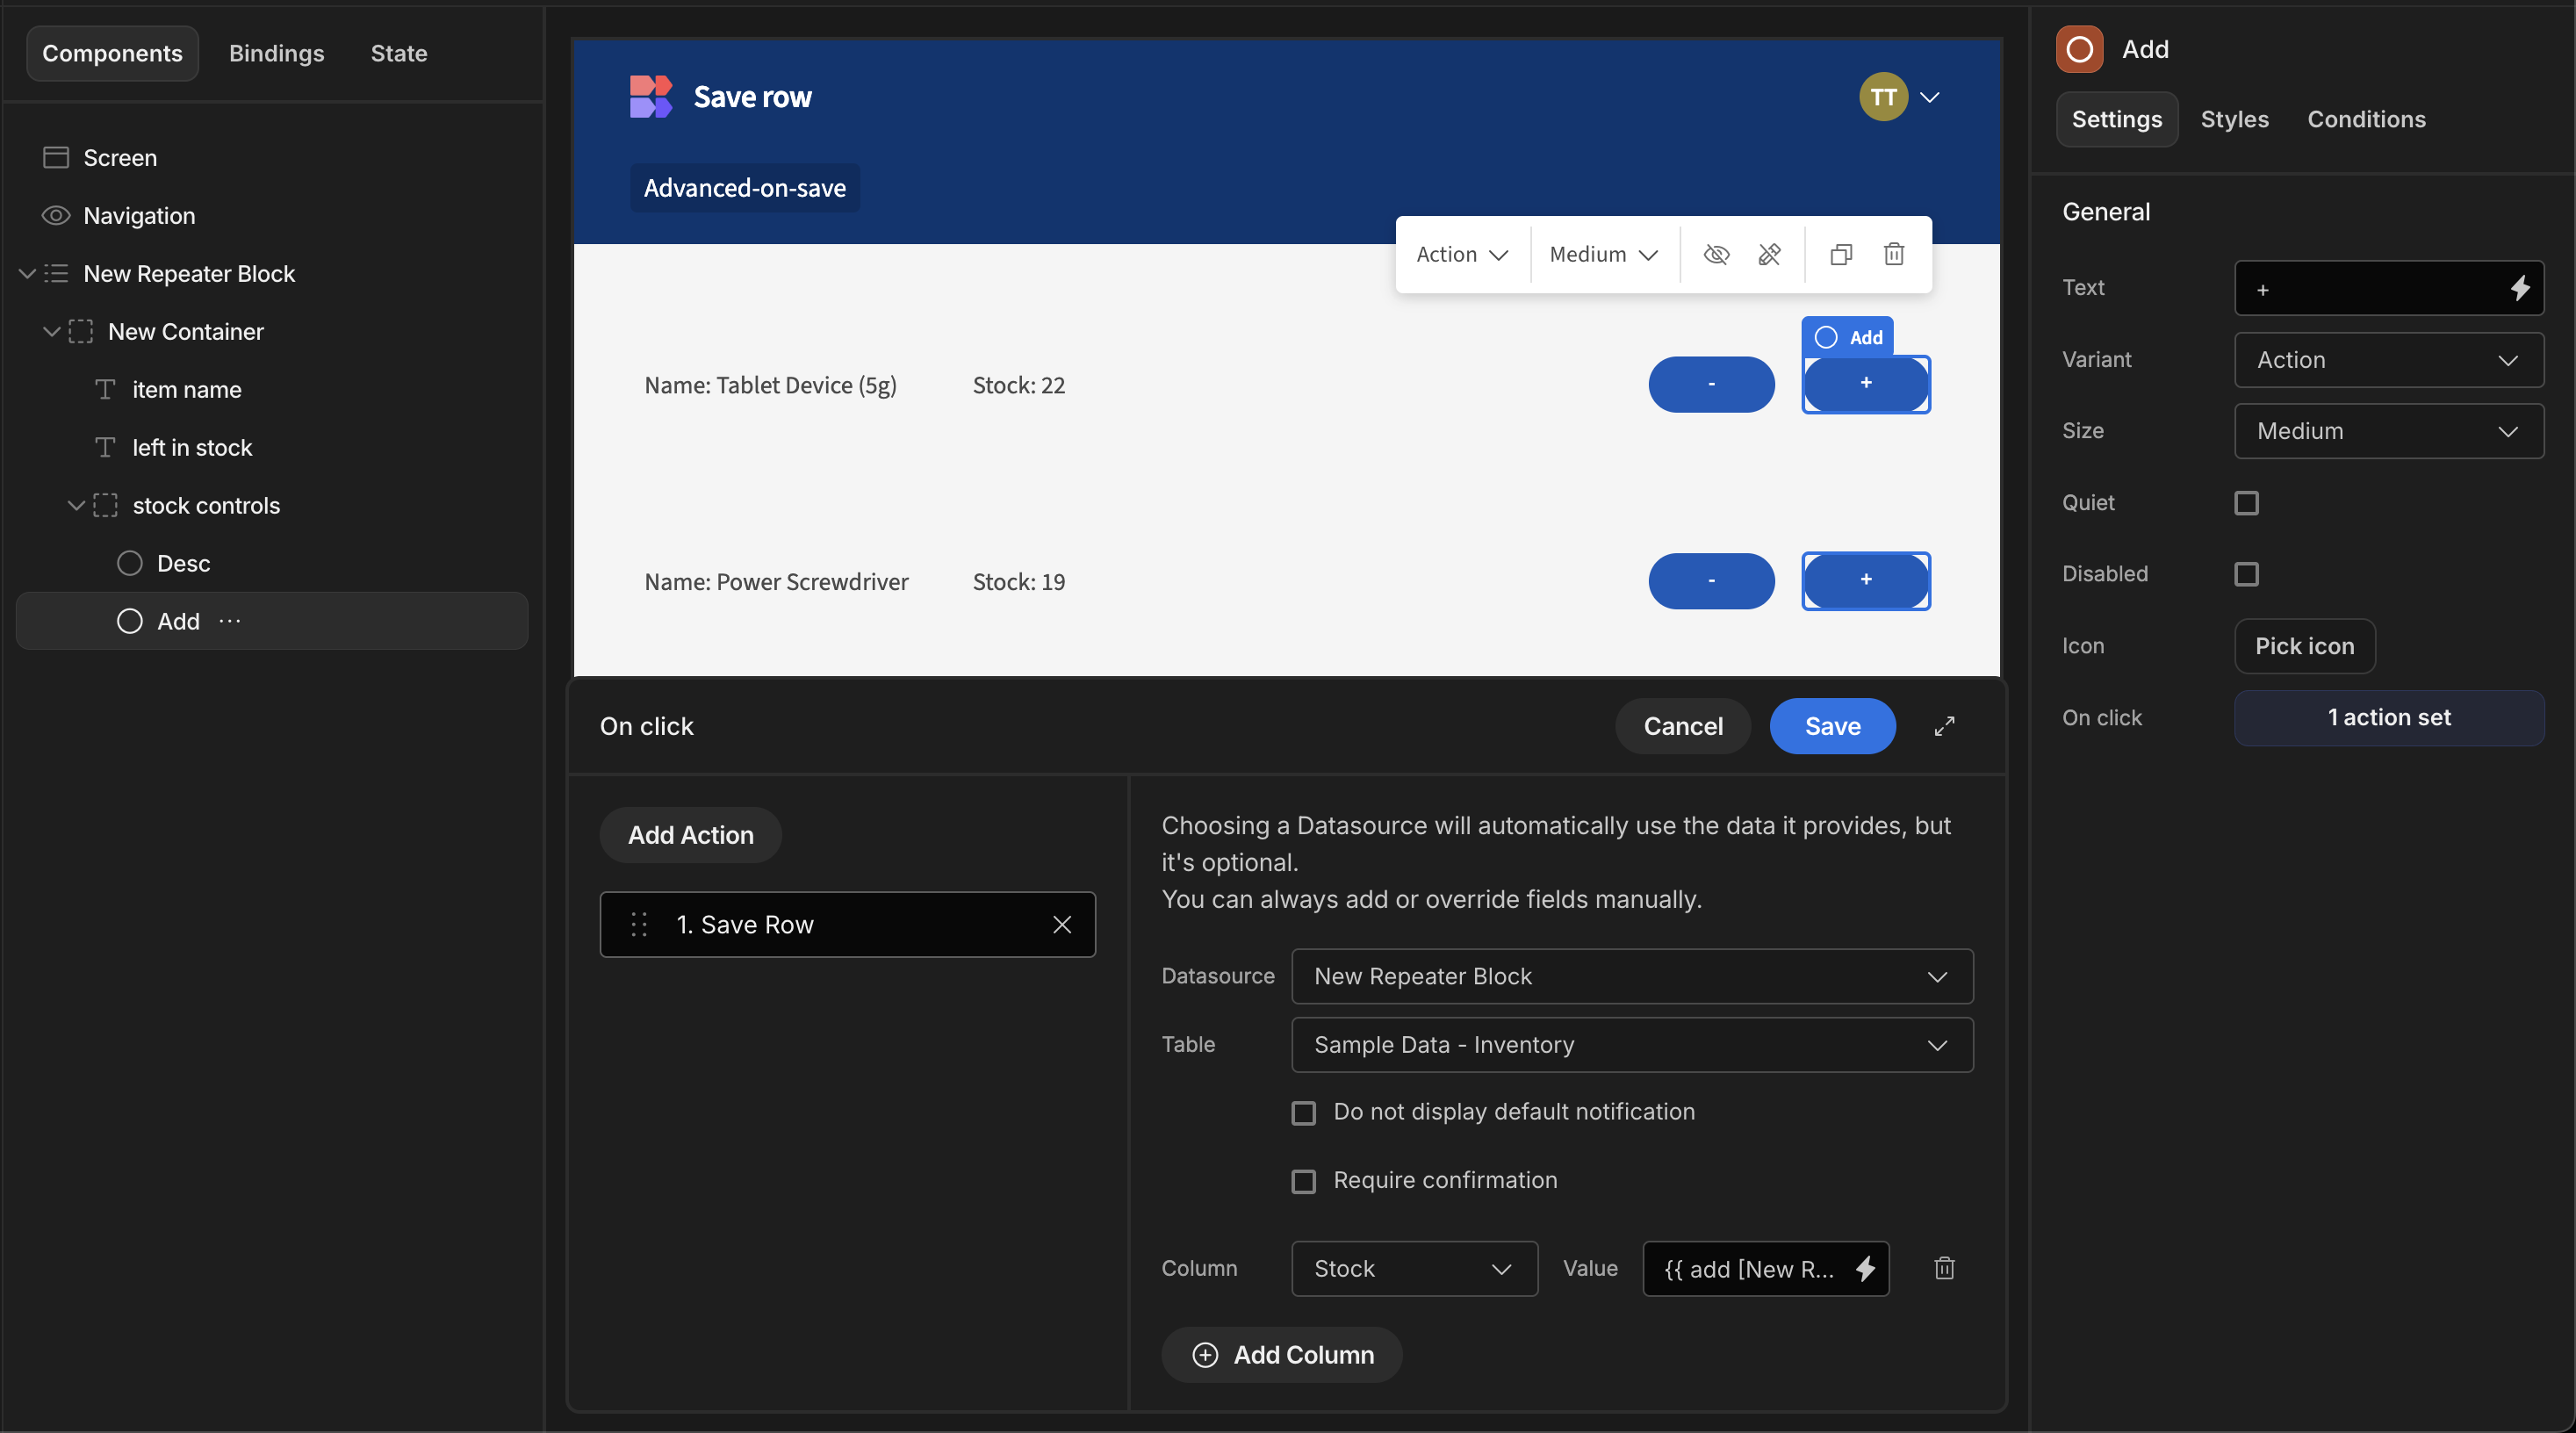
Updating a row can be done in a number of different ways. If you have a structure containing a Data provider and a Repeater, selecting the repeater as your Datasource will make it so you can correctly get the values from the specific row. To change a field you then take advantage of the add column button that is at the bottom. Click it, select the field you want to change, and type in the value you want to change it to (or use a binding). A descriptive image of this is shown below:
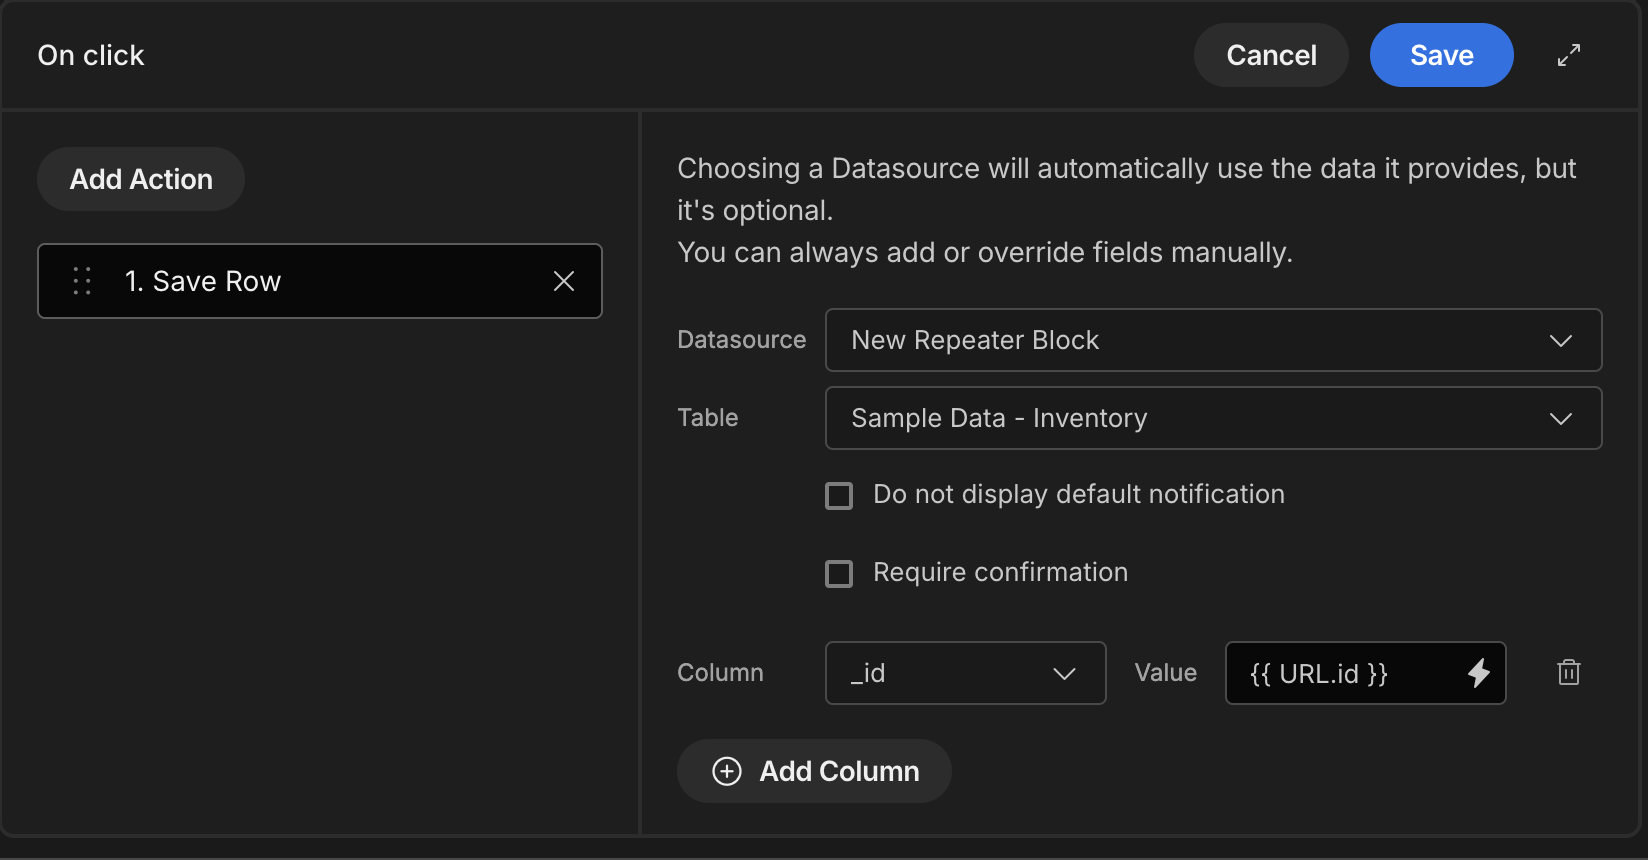
If you are not using a repeater, an alternative way to update a row is to add the _id column and provide a value that matches an existing id.
For example, you could be passing a task id in the URL:
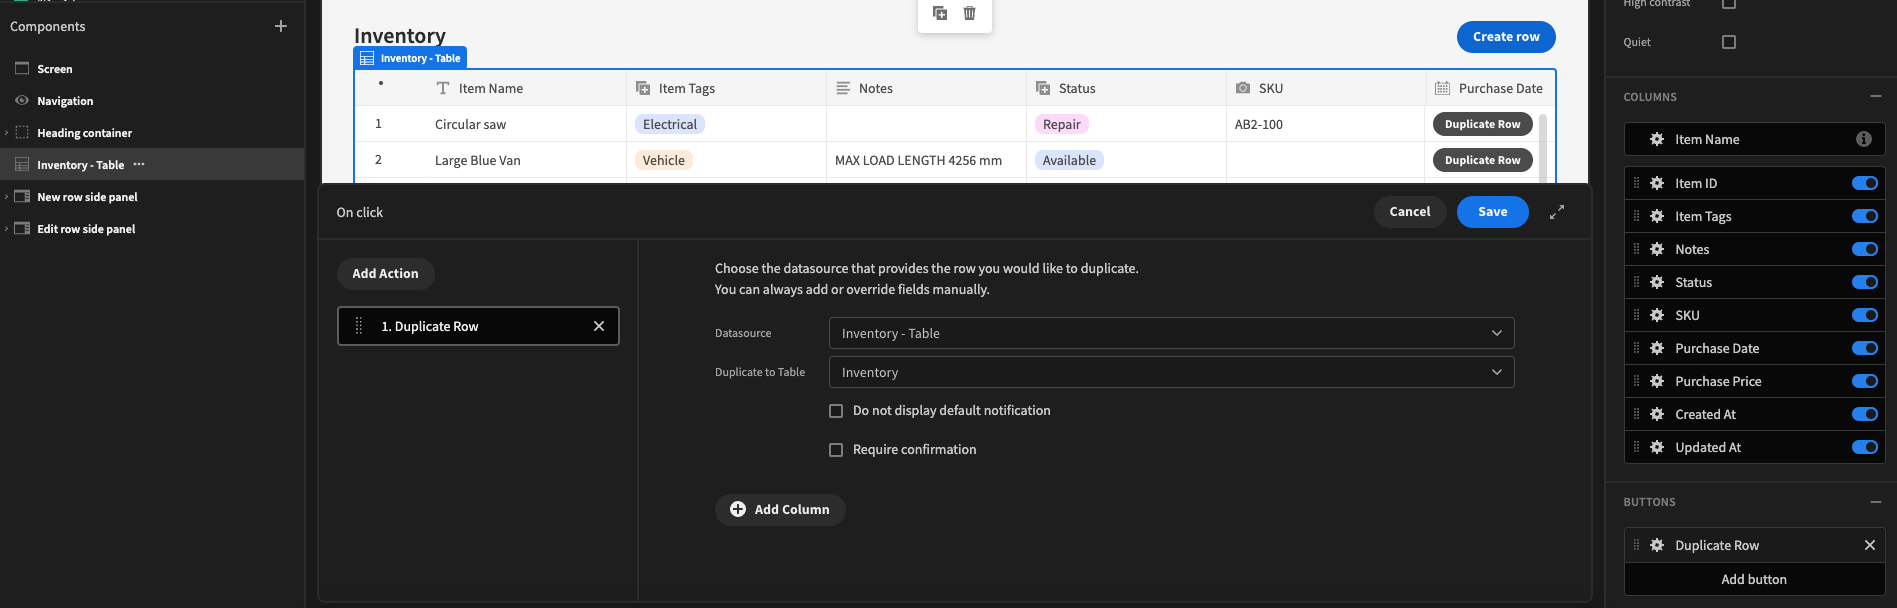
Duplicate Row
This action allows you to clone a row into any table with shared column names.
If you are performing this action from a row button click, then no _id needs to be provided.
Alternatively, your button could be nested within a Repeater. The below example shows how this would be setup with a repeater.
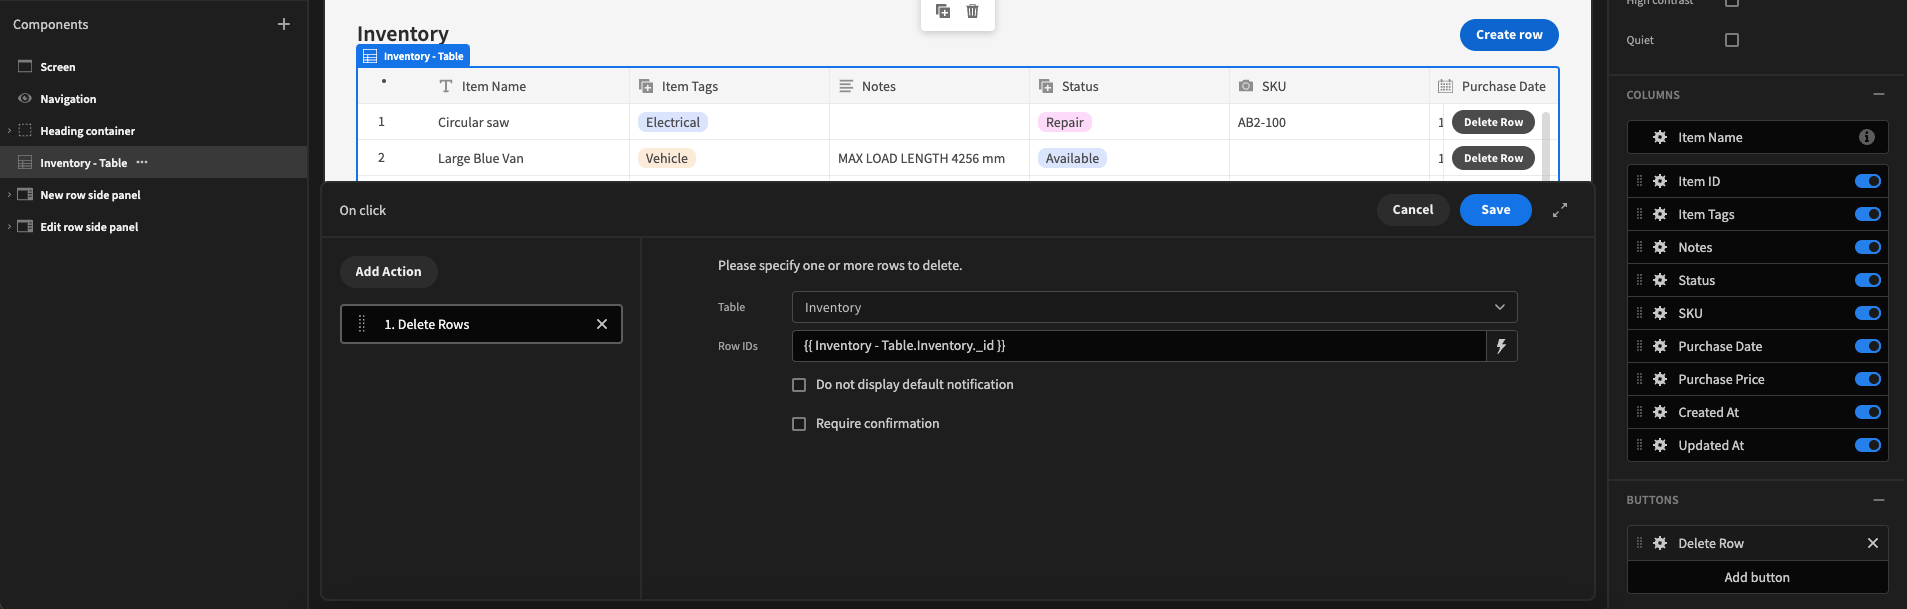
Delete Row
This action is used to delete rows from your data source. It's used much in the same way that you would when updating a row. The main difference being you don't have to select a data source. You only have to select the table and pass the correct Row ID binding. For this example we will pass the Row ID via a URL variable, then the Row ID will be passed into the delete on click action used to delete the record from the Budibase DB.
Fetch row
This action allows you to fetch a table row from any table within your app. This action works the same Delete Row where you have select a table and reference the Row ID.
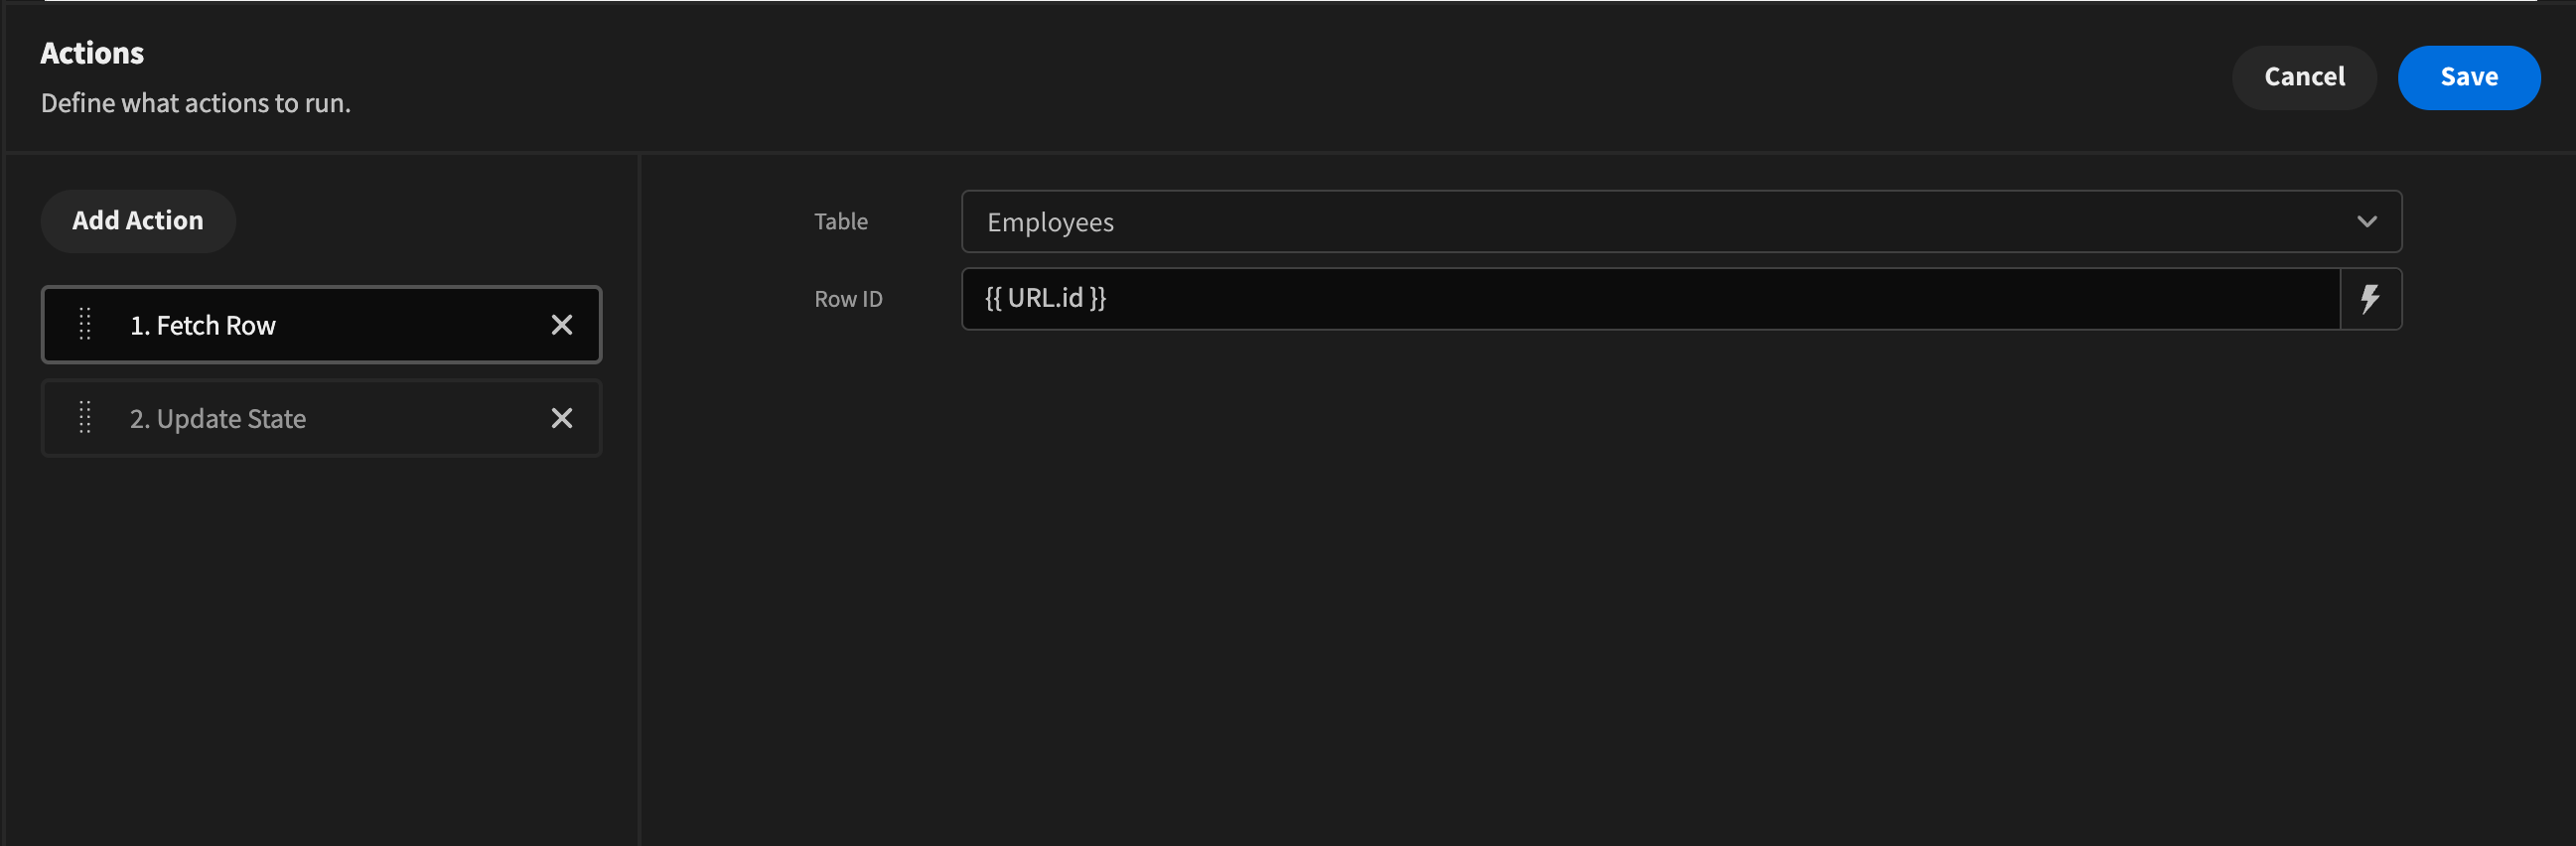
This can be used alongside other actions a good example of this is with App state. You can fetch the row then create a state to hold all the data related to the row fetched. This can then be used to as the basis to bind to different components within your app.
Below there is a simple demo showing this in action. This is a very simple demo and its only outputting the entire fetch object to a paragraph component. You can break this up into multiple components and output different parts of the object if you so choose.
Execute Query
The Execute Query action requires separate configuration as the queries need to be setup before they can be used by this action within your apps. There are many ways to use this action. For instances, you can use it to send the query results to a REST API, retrieve results from a query created using an External data source, and so on.
In the example below we will be focusing on using this with a REST datasource. This example won't be too in-depth and shall only show a basic get REST query. This will also be used in a similar fashion to Fetch rows action, where we will storing it as state to display the object.

For anything more advance have a read through the REST API docs. It will show you how to import and configure everything necessary to perform a more advanced action.
Refresh Data Provider
This is mainly used for External datasources for example the REST API as it requires the recalling of queries in order to refresh Data providers after other actions have been performed. A good example for this is when you update a user record within a Form inside a Side panel. Once updated you would want to chain the Refresh Data Provider action afterwards to refresh the changes made without having to refresh the page to see these changes. Another example of this might be for the Candlestick Chart where new data is available over time, and it may be useful to refresh at the click of a button.
Update State
Allows you to set a state value, or delete the key entirely. When entering an identifying Key you can select an existing one from the dropdown, or simply manually type into the text box to create a new key.
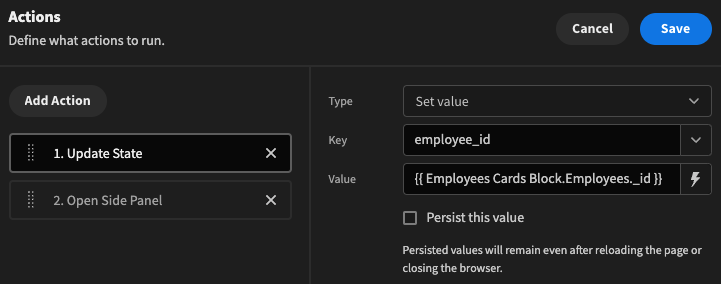
Your state variable can then be accessed, anywhere in your app, via the state Binding, in this case: {{ State.employee_id }}.
See App state for further reading and examples.
Upload File To S3
To be used with the S3 File Upload component.
Export Data
This action is used to export selected rows within a table to either a CSV or JSON file. To set this up quickly add a Table component to a screen, and set it to display the Employees table from the sample BudibaseDB data. Add a button component underneath, and add an On Click action "Export Data".
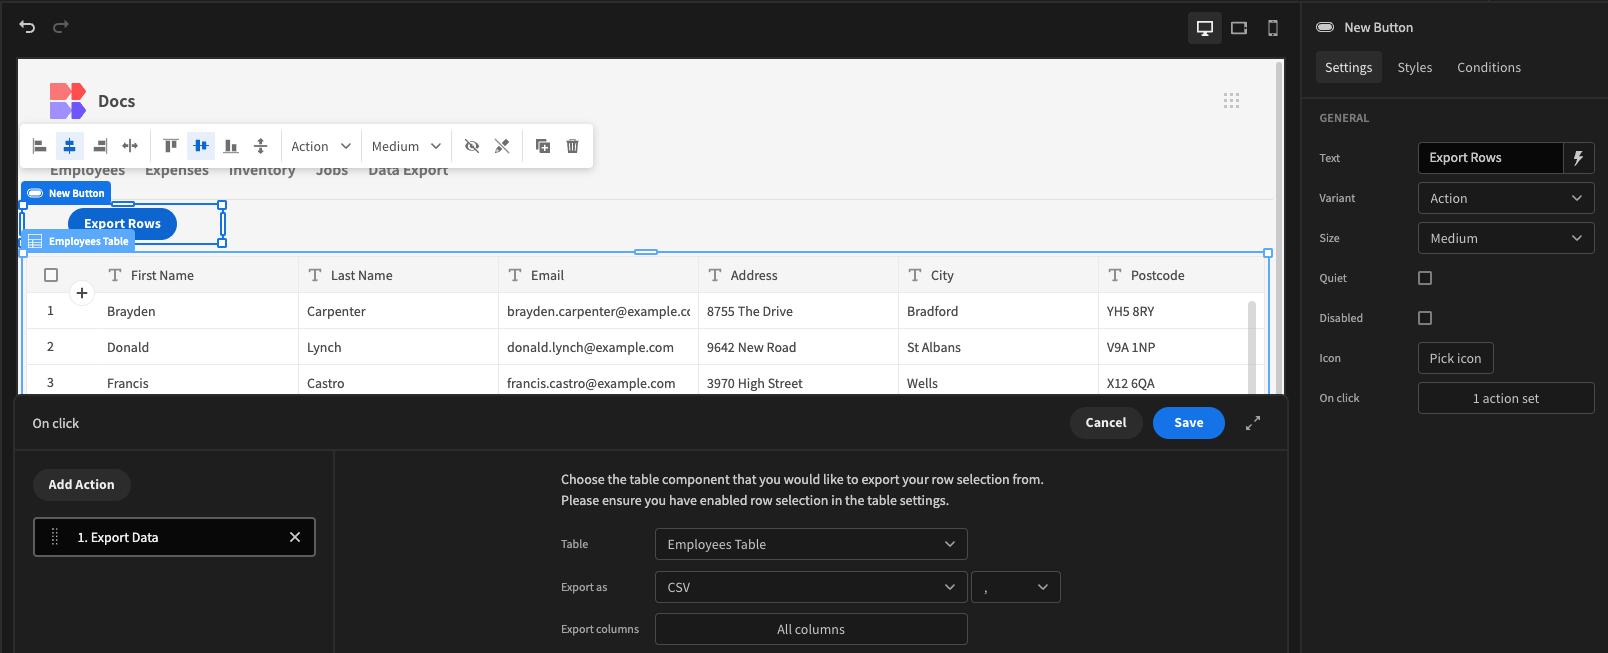
Once this has been done, it should export the rows selected and output it as the selected export.

Configure delimiter
The default delimiter (separator) for CSV exports is a comma , . It is however possible to change this to one of a preset list of options. This feature does not apply to JSON file exports.
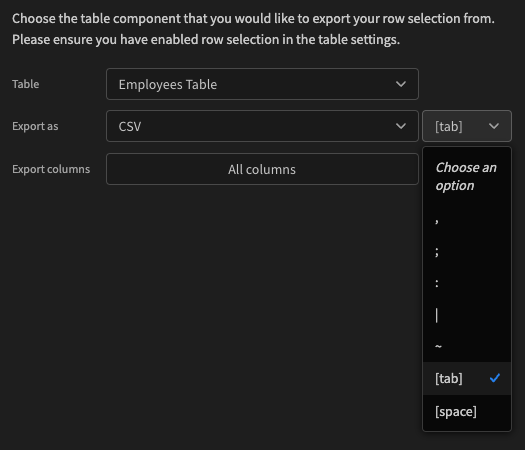
Using the tab key delimiter
Configure export columns
By default all table columns will be included in the export, however you can use a subset and provide custom labels.
Click the Export columns button and add the specific columns you want to export. You can also drag-and-drop the columns to rearrange the column order in the export.
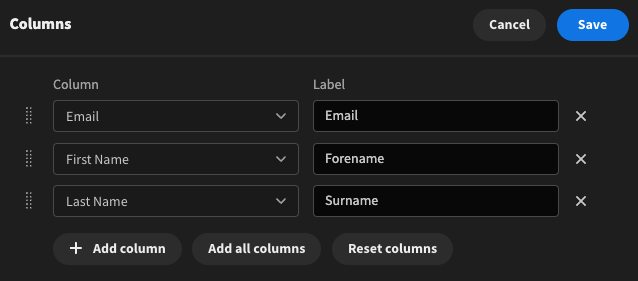
Only include these three columns in the data export
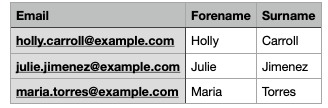
Exported CSV file
Clear Row Selection
Deselects any selected rows of the chosen table.
Can also be useful in combination with the Open Side Panel action.
Download File
Initiates the download of a specified file or files.
Download from Attachment

Specify the table and column from which the file(s) will be downloaded - only columns that have the type Single Attachment or Multi Attachment will appear in the Column dropdown.
Downloading from Multi Attachment columns will result in a .zip file containing all items being downloaded with a filename comprising of the name of the Display Column followed by the name of the Multi Attachment Column.
Download from URL

Specify the URL of the file to be downloaded. If File name is left blank the file downloaded will be named "undefined" and appended with the file extension.
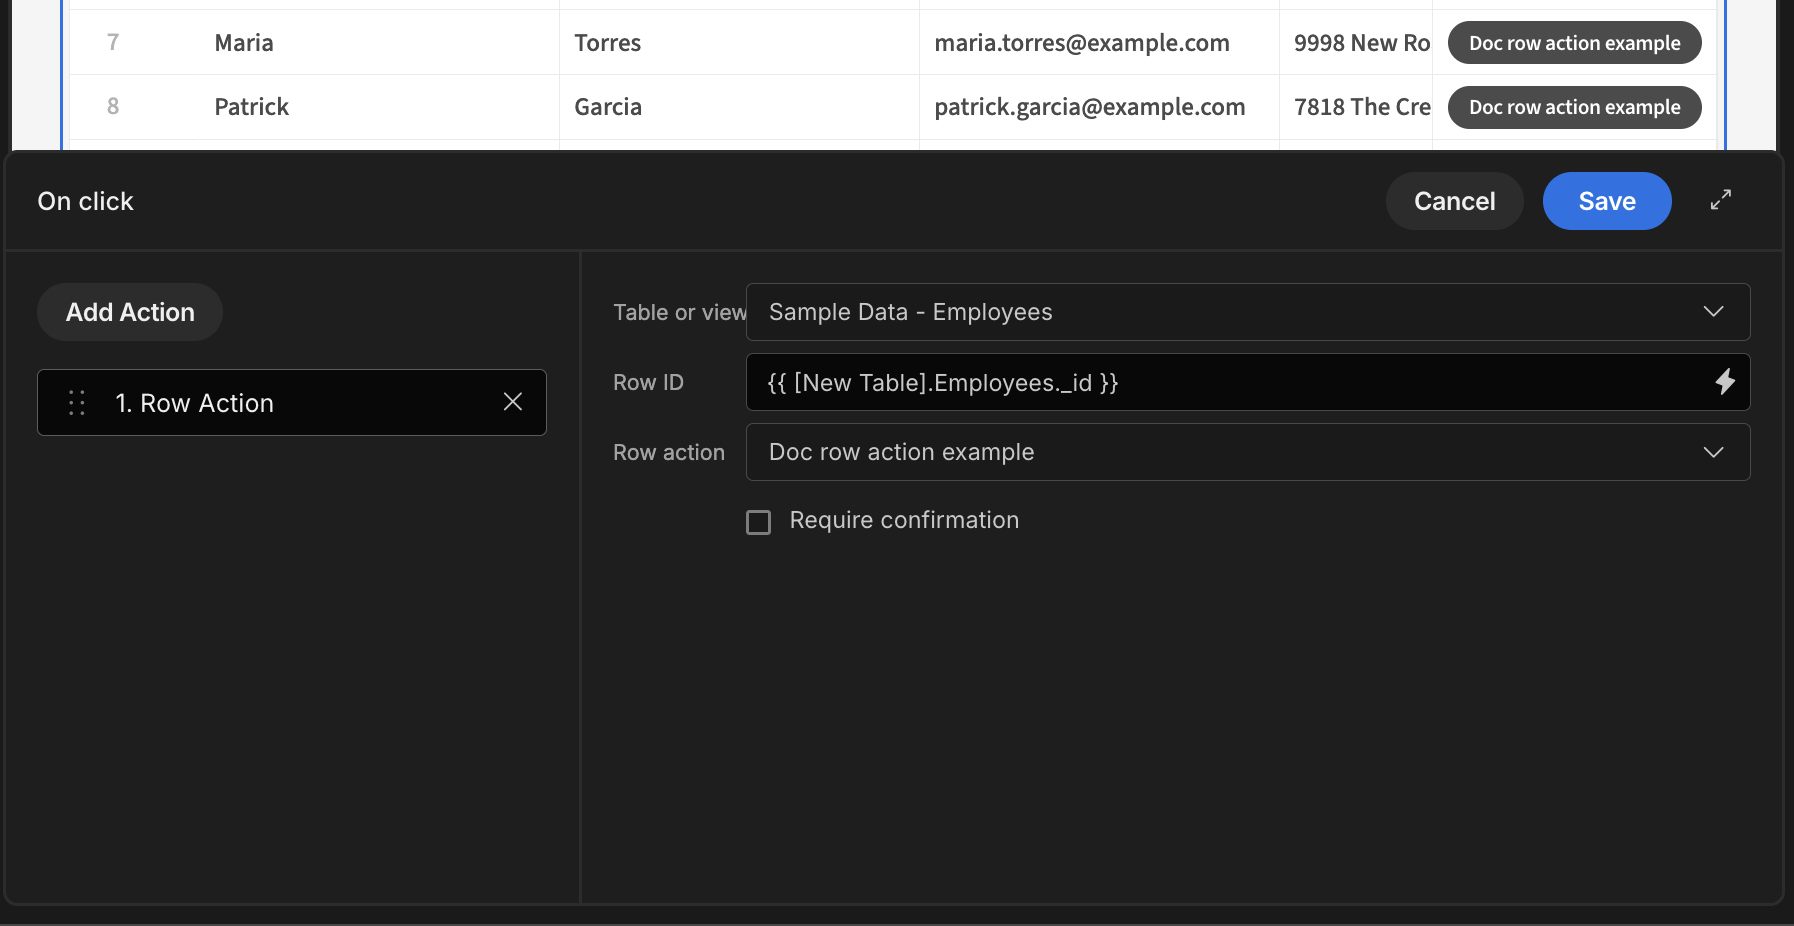
Row action
With V3, a new automation called Row Actions was introduced. This allows for a data action that triggers specific automations. The Row Actions action includes four configurable settings:
- Table or View
- Specify the table or view where the row action has been created
- Row ID
- Provide the Row ID that the row action will use.
- Row Action
- Select the specific row action you want to trigger
- Require Confirmation
- This is a checkbox option. A modal will appear when selected, requiring user confirmation to trigger the row action automation. Additional fields will be displayed, enabling you to customize elements of the modal, such as the title, body text, and button labels.